
Port-Based Access Control by Wired 802.1X
In this document, we are going to explain how to wet up Wired 802.1X with an External RADIUS server, set up Wired 802.1X with Local 802.1X, and enable 802.1X authentication on Windows client.
Vigor Router supports wired 802.1X, which provides authentication to devices which attempt to join the network from its LAN ports. To do 802.1X authentication for LAN clients, network administrator need 1. Enable Wired 802.1X function 2. set up the authentication server, which can either be an external RADIUS server or Vigor Router itself. In this document, we are going to explain how to
- Set up Wired 802.1X with an External RADIUS server
- Set up Wired 802.1X with Local 802.1X
- Enable 802.1X authentication on Windows client
Notice that Wired 802.1X is port-based access control so that we can only authenticate a single device attached to the LAN port. If you would like to authenticate multiple devices that connected to the router by a switch, please use an 802.1X-capable switch and configure 802.1X authentication on the switch instead.
Set up Wired 802.1X with an External RADIUS server
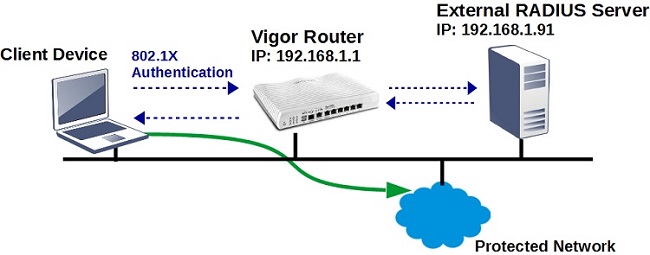
1. Set up RADIUS server: Go to Applications >> RADIUS/TACACS+ >> External RADIUS,
- Enable External RADIUS
- Enter Server IP Address as the RADIUS server's IP address
- Enter Shared Secret and Confirm Shared Secret as the same on the RADIUS server
- Click OK to save
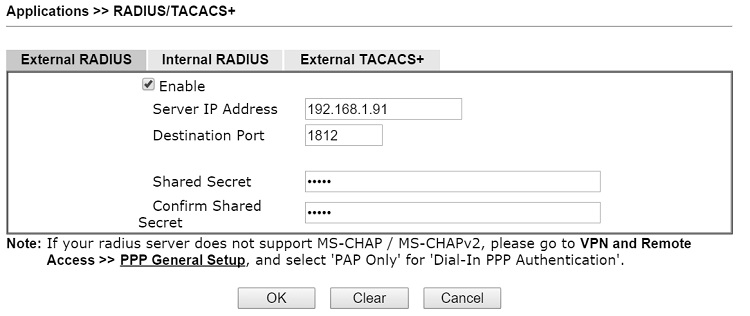
2. Enable Wired 802.1X: go to LAN >> Wired 802.1X,
- Check Enable
- Select Authentication Type to "External RADIUS"
- Select the LAN ports you would like to control the access
- Click OK and reboot the router to apply.
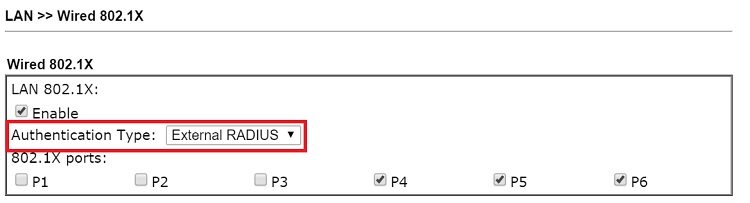
Set up Wired 802.1X with Local 802.1X
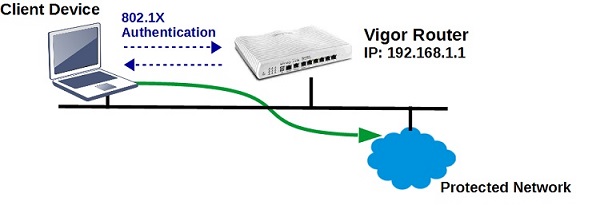
1. Create User profiles and enable Local 802.1X: Go to User Management >> User Profile, click on an available profile,
- Enable this account
- Enter Username
- Enter Password and Confirm password
- In Internal Services, enable Local 802.1X.
- Click OK to save the profile.
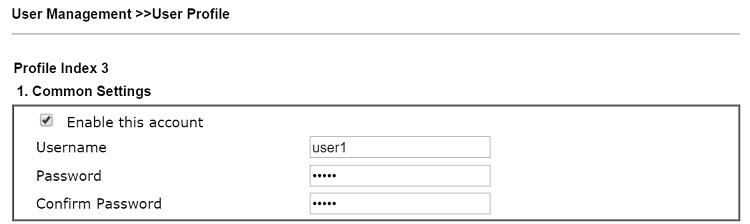
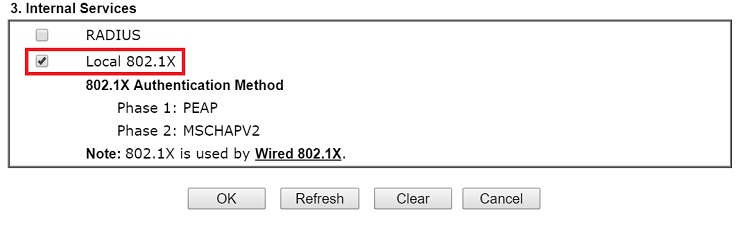
2. Enable Wired 802.1X: go to LAN >> Wired 802.1X,
- Check Enable
- Select Authentication Type as "Local 802.1X"
- Select the LAN ports you would like to control the access
- Click OK and reboot the router to apply.
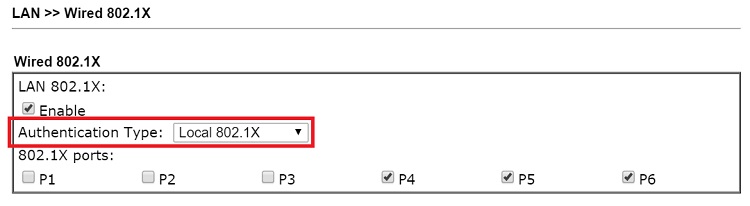
Enable 802.1X authentication on Windows clients
For LAN clients that are going to attach to the Vigor Router, it is required to enable 802.1X Authentication on the network adapter as well. For Windows users, please do the following:
1. Run service.msc, find Wired AutoConfig, right-click and click Start.
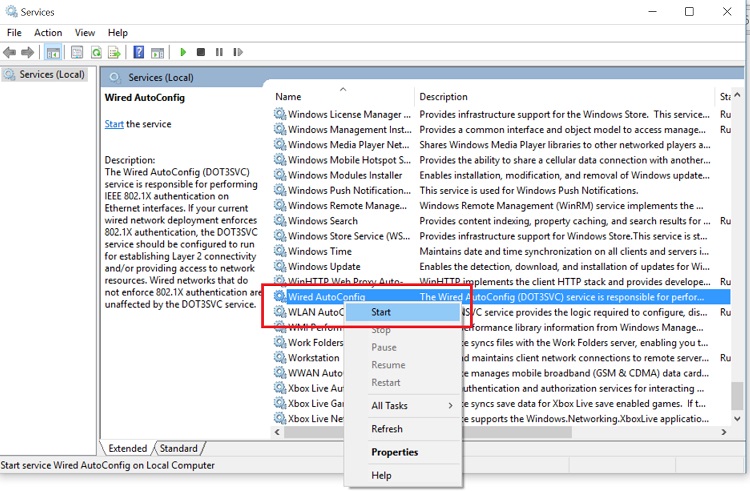
2. Enable 802.1X Authentication for the network adapter: For Windows users, go to Change adapter settings >> Properties >> Authentication tab, enable IEEE 802.1X Authentication
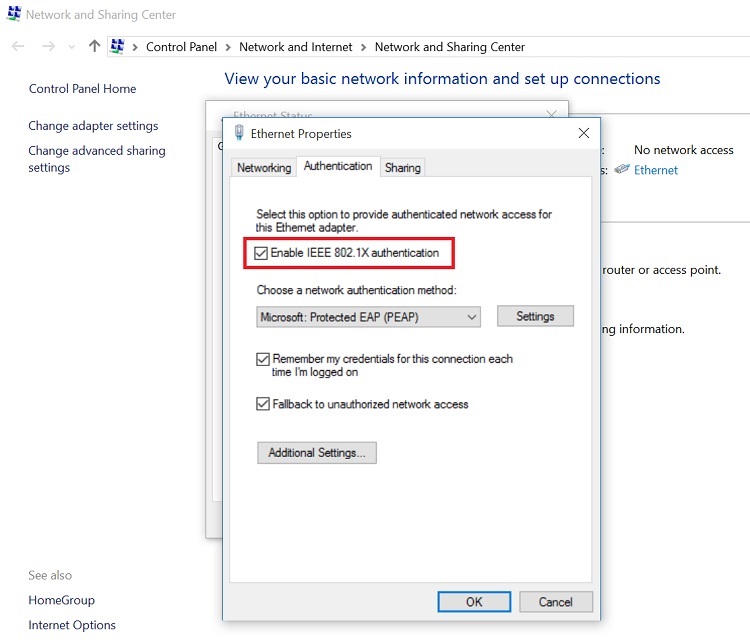
3. After enabled 802.1X Authentication on the network adapter, there will be a login window, enter the username and password as the ones in External RADIUS or router's Local 802.1X.
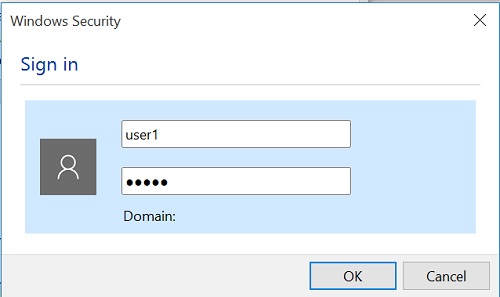
4. If all the credentials are correct, we will be able to access the network.
Vigor Router supports wired 802.1X, which provides authentication to devices which attempt to join the network from its LAN ports. To do 802.1X authentication for LAN clients, network administrator need 1. Enable Wired 802.1X function 2. set up the authentication server, which can either be an external RADIUS server or Vigor Router itself. In this document, we are going to explain how to
- Set up Wired 802.1X with an External RADIUS server
- Set up Wired 802.1X with Local 802.1X
- Enable 802.1X authentication on Windows client
Notice that Wired 802.1X is port-based access control so that we can only authenticate a single device attached to the LAN port. If you would like to authenticate multiple devices that connected to the router by a switch, please use an 802.1X-capable switch and configure 802.1X authentication on the switch instead.
Set up Wired 802.1X with an External RADIUS server
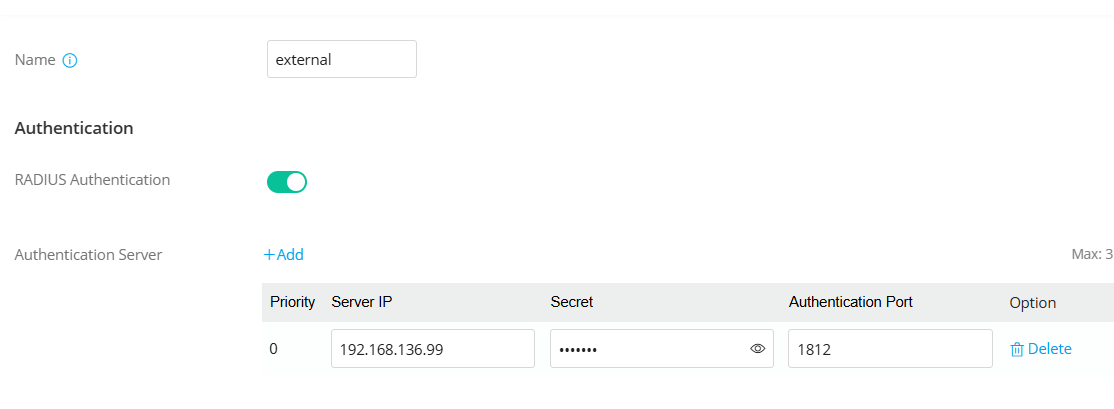
1. Set up RADIUS server: Go to Configuration / RADIUS/ TACACS+ / External RADIUS, click Add to create a RADIUS client profile.
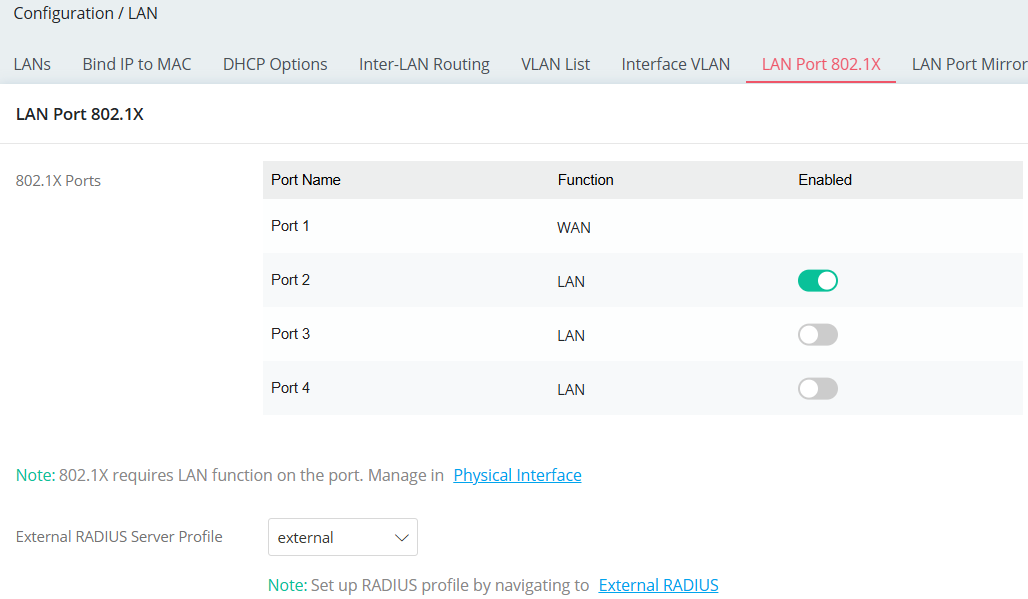
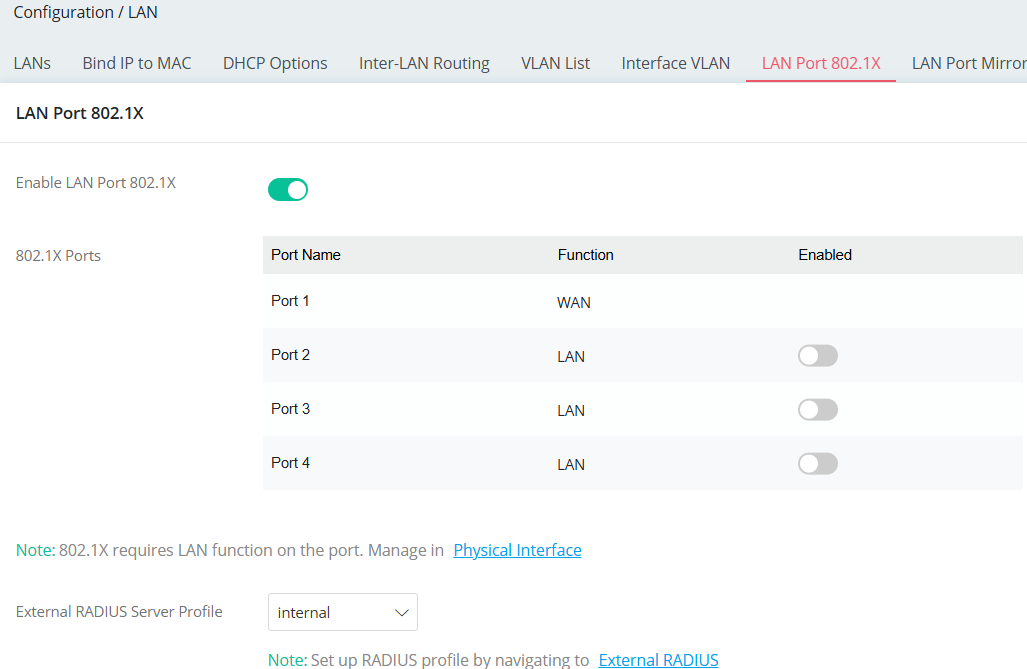
2. Enable LAN Pport 802.1X: go to Configuration / LAN / LAN Port 802.1X,
Set up Wired 802.1X with Local 802.1X
1. Create User profile by navigating to IAM / Users & Groups/ Users.
2. Set up a RADIUS client profile by navigating to Configuration / RADIUS/ TACACS+ / External RADIUS, click Add to create a RADIUS client profile.
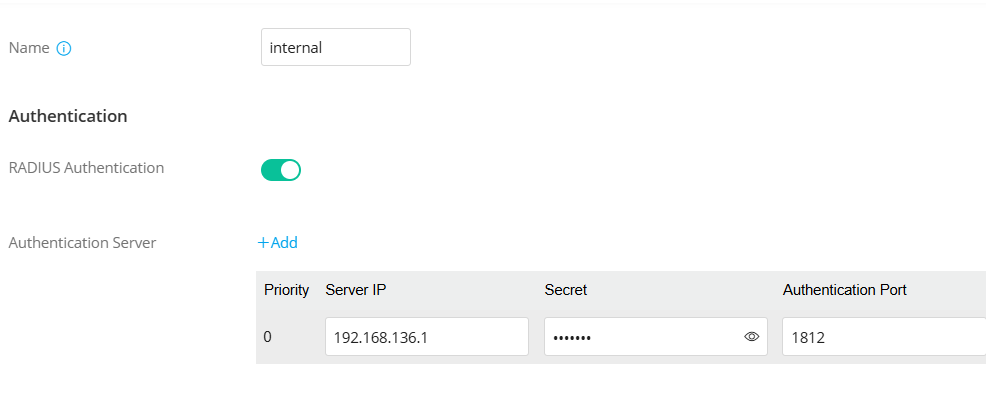
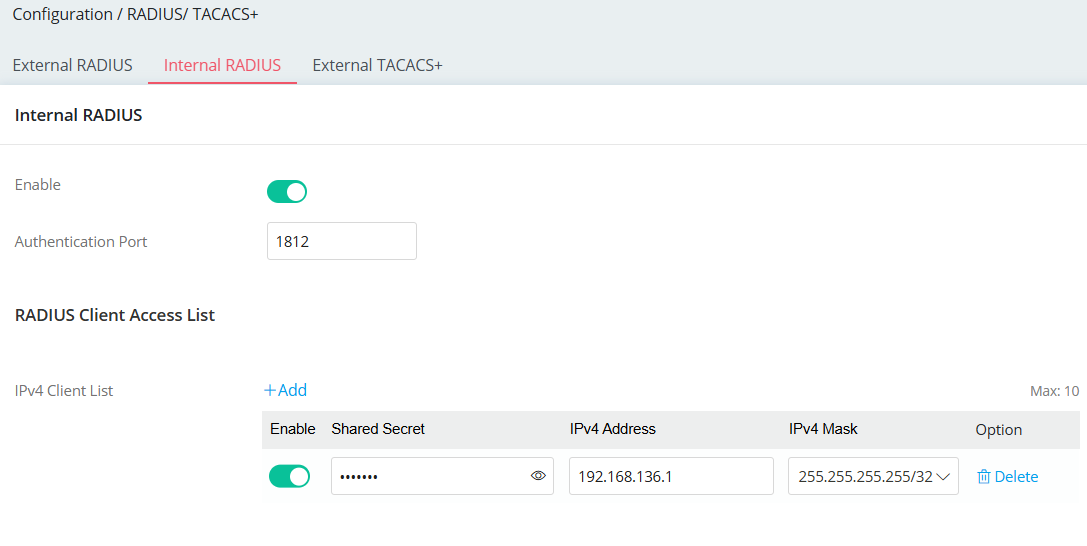
3. Set up the Internal RADIUS.
4. Enable LAN Pport 802.1X: go to Configuration / LAN / LAN Port 802.1X,
Enable 802.1X authentication on Windows clients
For LAN clients that are going to attach to the Vigor Router, it is required to enable 802.1X Authentication on the network adapter as well. For Windows users, please do the following:
1. Run service.msc, find Wired AutoConfig, right-click and click Start.
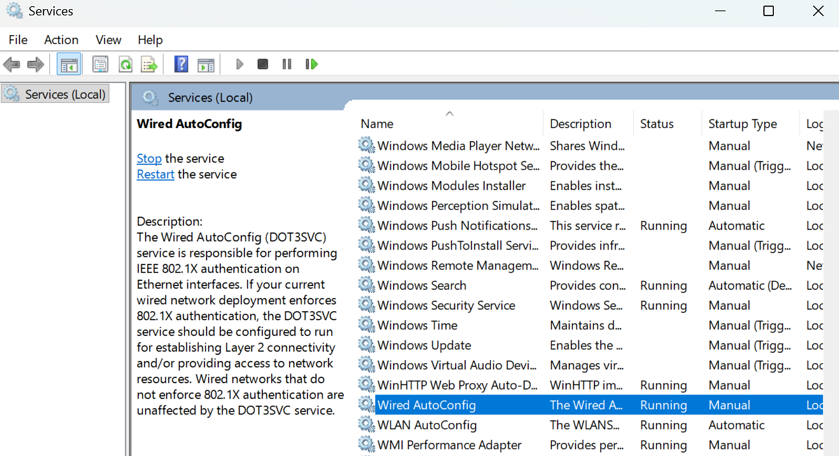
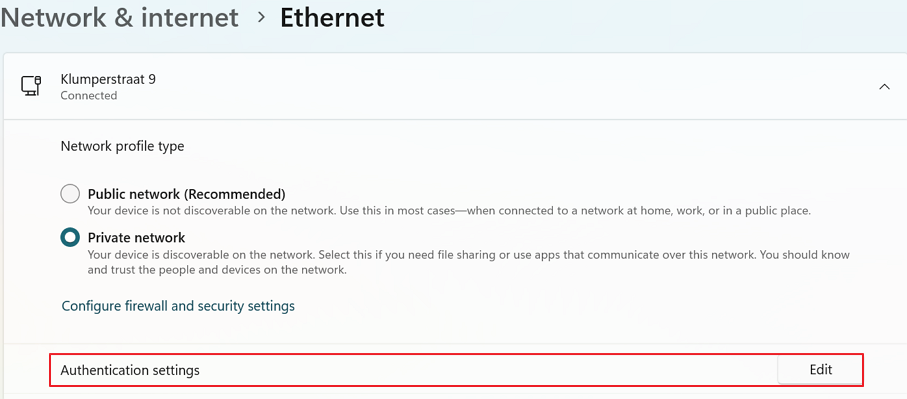
2. Enable 802.1X Authentication for the network adapter: For Windows 11 users, go to Network and Internet Settings, select Ethernet and Edit the Authentication Settings.
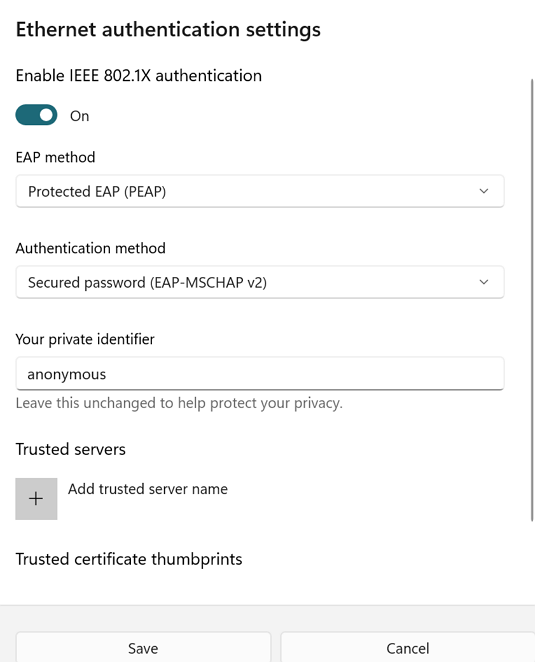
3. Toggle Enable IEEE 802.1X authentication, select PEAP as the EAP Method and Secured Password as the Authentication method.
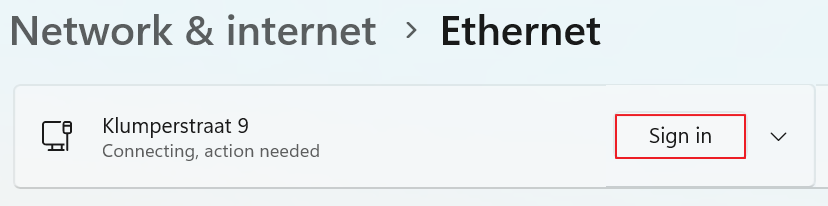
4. Go back to Network and Internet Settings >> Ethernet. Click Sign in. Then enter the user credentials.
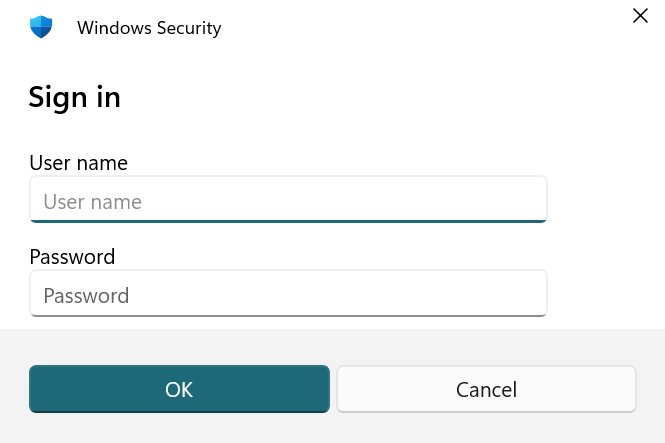
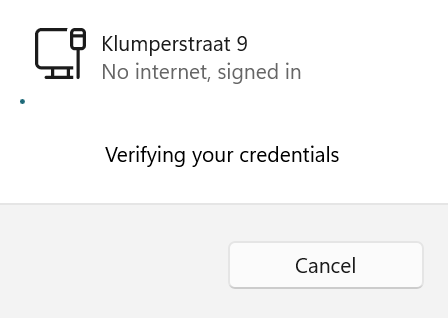
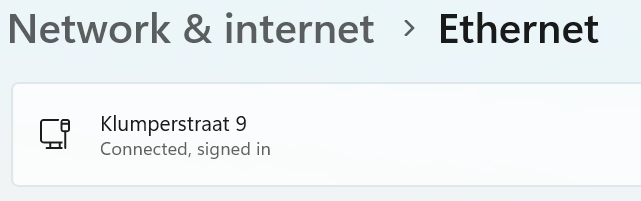
5. Wait a few seconds for the server to verify the user credentials. If the authentication is successful, the Ethernet connection status will display as Signed in and Connected.
Published On:2025-12-31
ShareWas this helpful?