
Protecting VPN Services on Vigor Routers Using Port Knocking
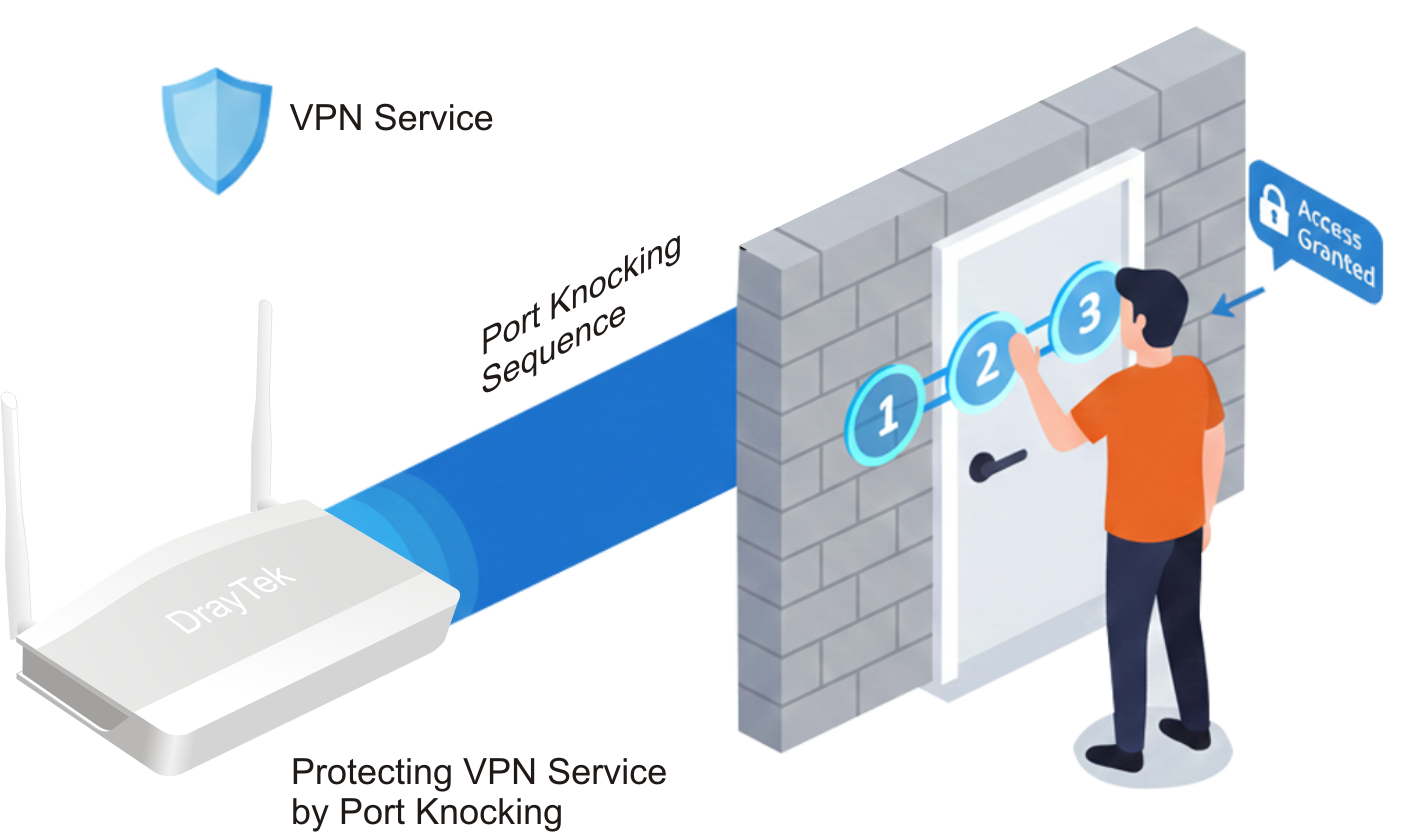
Port Knocking is a security feature designed to protect the Vigor Router’s VPN services from unauthorized access. It operates by requiring a specific sequence of “knocks”—connection attempts to predefined ports—before granting access to the desired service port. To enhance security, the Vigor Router uses TOTP (Time-Based One-Time Password) to calculate the knock ports, making it dynamic and much harder to guess or replicate.
When enabled, Port Knocking keeps the VPN port hidden from public access until the correct knock sequence is received. This effectively prevents unauthorized port scans and significantly reduces the risk of brute-force attacks.
Supported Models and Minimum Firmware versions:
Note that VPN dial-in LAN-to-LAN and Host-to-LAN connections that match the Peer IP address or domain name specified in the VPN profile are excluded from the Port Knocking mechanism. All other incoming VPN connections — including both LAN-to-LAN and Host-to-LAN connections without a specified peer IP or domain name — will be protected by the Port Knocking feature.
VPN Server Setup
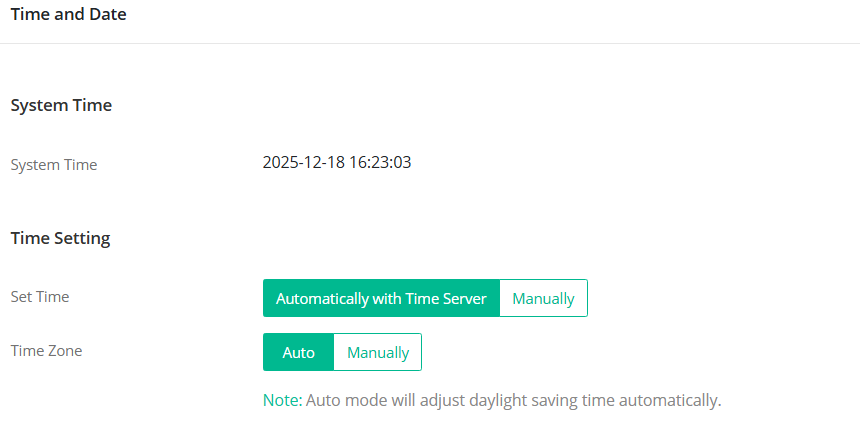
1. Ensure the Vigor Router's current system time is correct by navigating to System Maintenance >> Time and Date. If the time is incorrect, click Inquire Time to synchronize it. Accurate time is essential for TOTP-based Port Knocking to function properly.

2. Create a Port Knocking profile for VPN service by navigating to NAT >> Port Knocking.


3. Navigate to VPN and Remote Access >> Remote Access Control, and select the Port Knocking profile for VPN services you want to protect. All VPN services will use the same Port Knocking profile, allowing the VPN client to connect using different VPN protocols as needed. If the EasyVPN/ SSL VPN and HTTPS services share the same port, the router will follow the configuration defined under System Maintenance >> Management >> Port Knocking for Local Service.

5. The VPN profile settings are similar, so this article will skip that part. Next, let's proceed to configure the VPN client.
VPN Client Setup
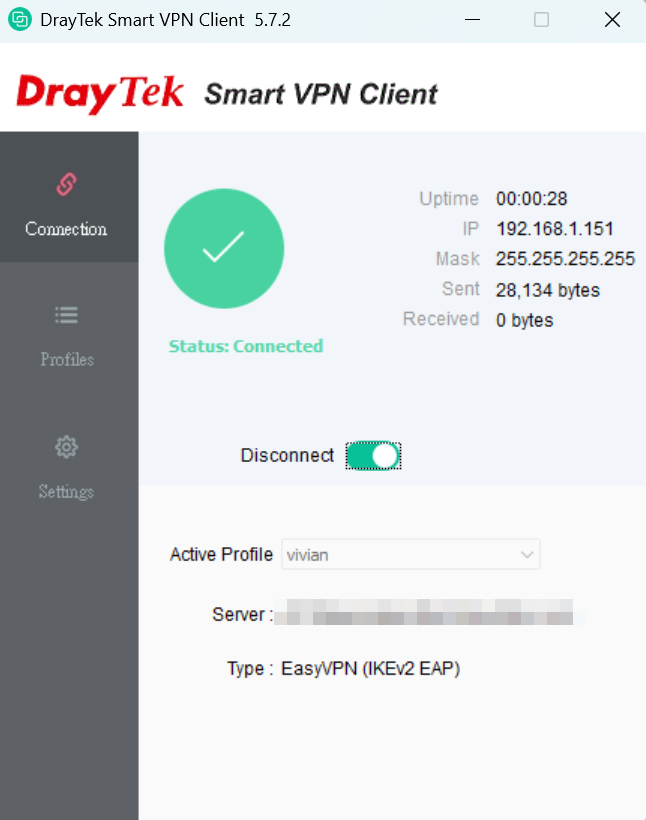
1. SSL VPN from Windows Smart VPN Client


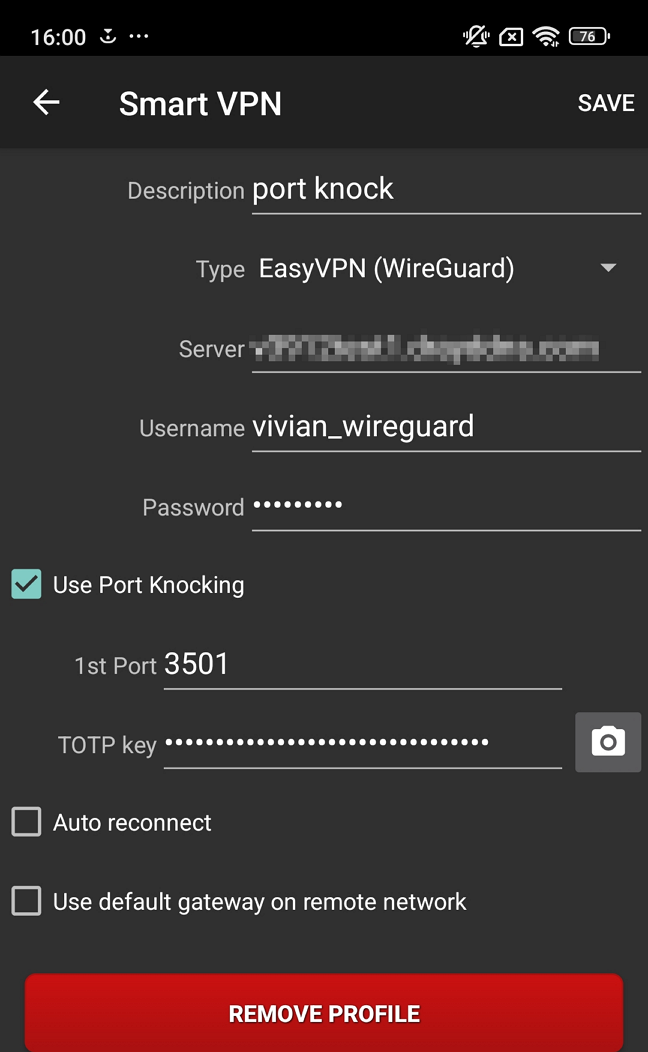
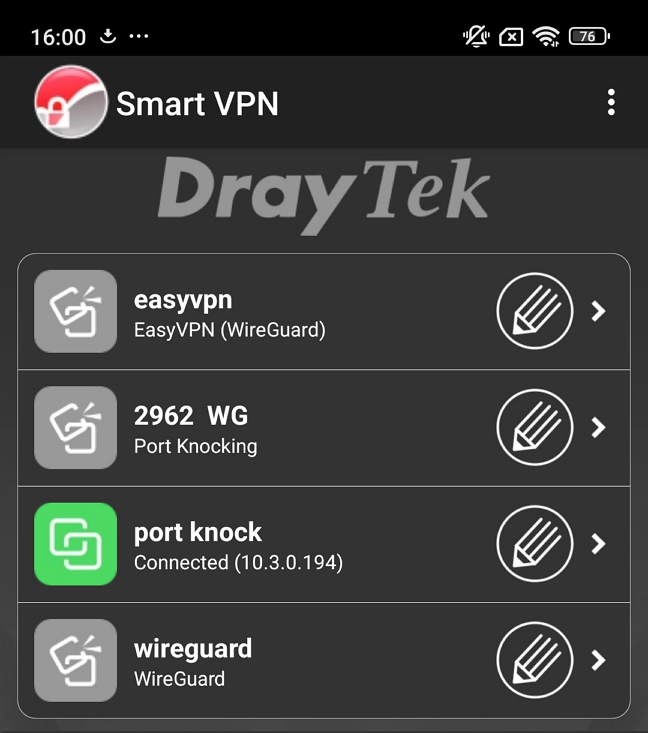
2. WireGuard VPN from Android Smart VPN App


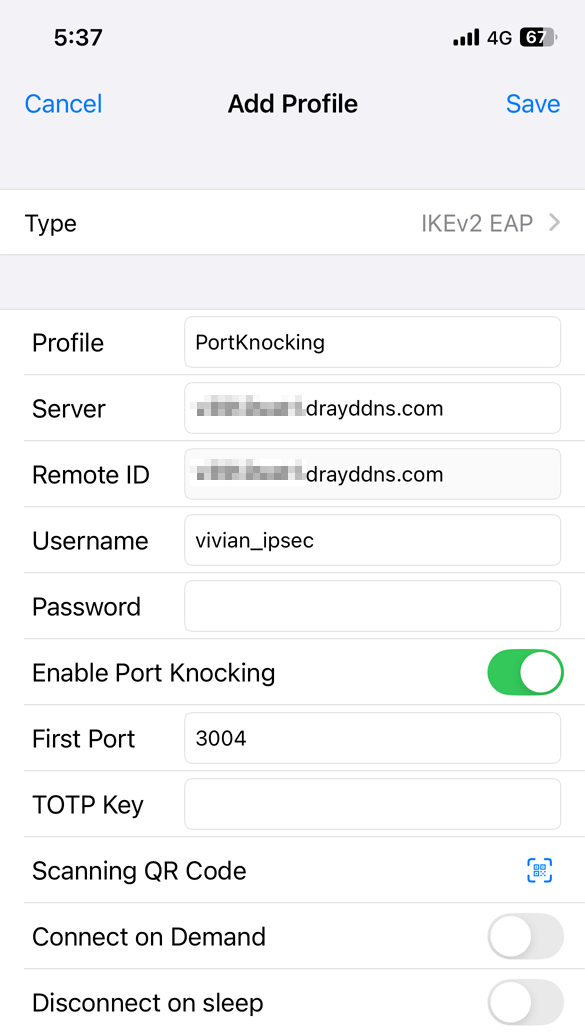
3. IKEv2 EAP VPN from iOS Smart VPN App


4. When the VPN fails to establish, check the following:
Port Knocking is a security feature designed to protect the Vigor Router’s VPN services from unauthorized access. It operates by requiring a specific sequence of “knocks”—connection attempts to predefined ports—before granting access to the desired service port. To enhance security, the Vigor Router uses TOTP (Time-Based One-Time Password) to calculate the knock ports, making it dynamic and much harder to guess or replicate.
When enabled, Port Knocking keeps the VPN port hidden from public access until the correct knock sequence is received. This effectively prevents unauthorized port scans and significantly reduces the risk of brute-force attacks.
Supported Models and Minimum Firmware Versions
- Vigor2136, C510, C410, and Vigor2767 firmware version 5.3.6*
- Vigor3912, Vigor3910, and Vigor2962 firmware version 4.4.5
- SmartVPN Client Windows v5.7.2
- SmartVPN Client Android v1.6.4 and above
- SmartVPN Client iOS v1.9.8 and above
- All incoming VPN connections to DrayOS5 router—including both LAN-to-LAN and Host-to-LAN connections—will be protected by Port Knocking.
- Port Knocking doesn’t apply to L2TP with the current firmware 5.3.6.
VPN Server Setup
1. Verify System Time
Ensure the router has the correct system time by navigating to: System Maintenance / Device Settings / Time
2. Port Knocking and IAM User / Teleworker VPN Configuration
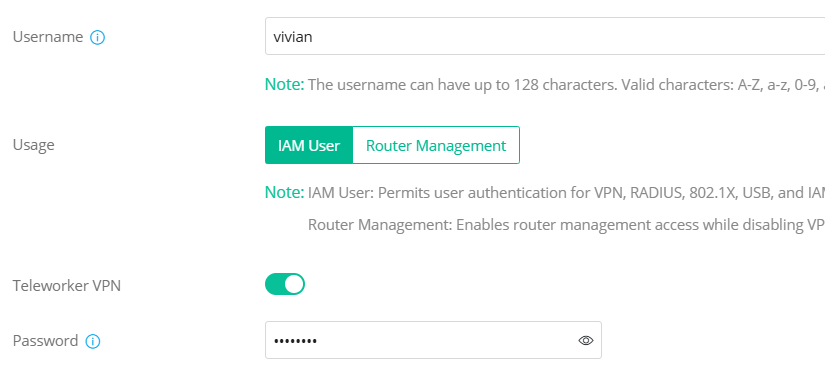
- Create an IAM user profile: IAM / Users & Groups / Users → +Add
- Enter a Username and Password.
- Enable Teleworker VPN.
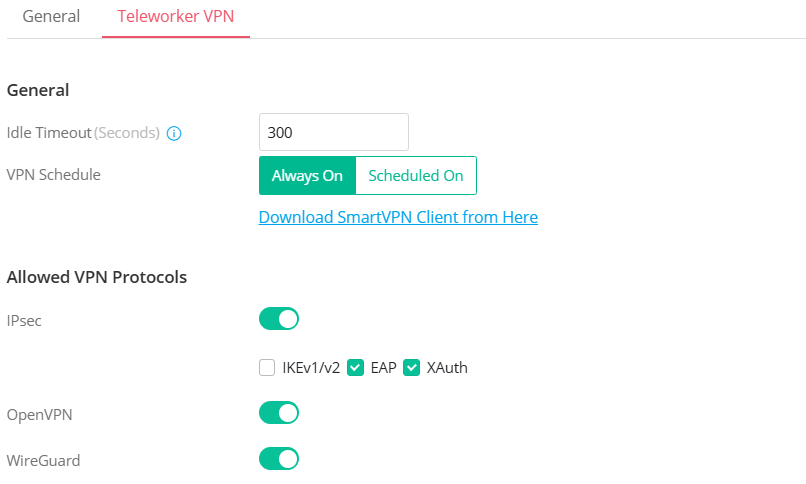
- Go to the Teleworker VPN tab and configure the corresponding VPN settings.
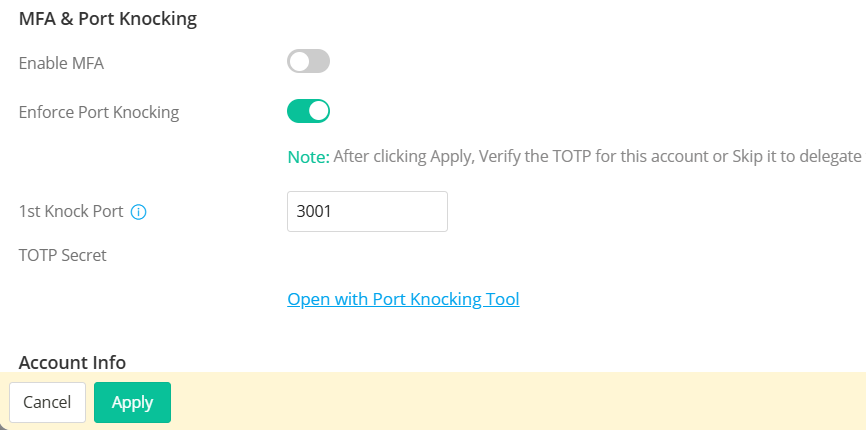
- Return to the General Tab, enable Port Knocking, enter the First Knock Port, then right-click Open with Port Knocking Tool → Open the link with a new tab.
- Click Apply to proceed with TOTP setup.
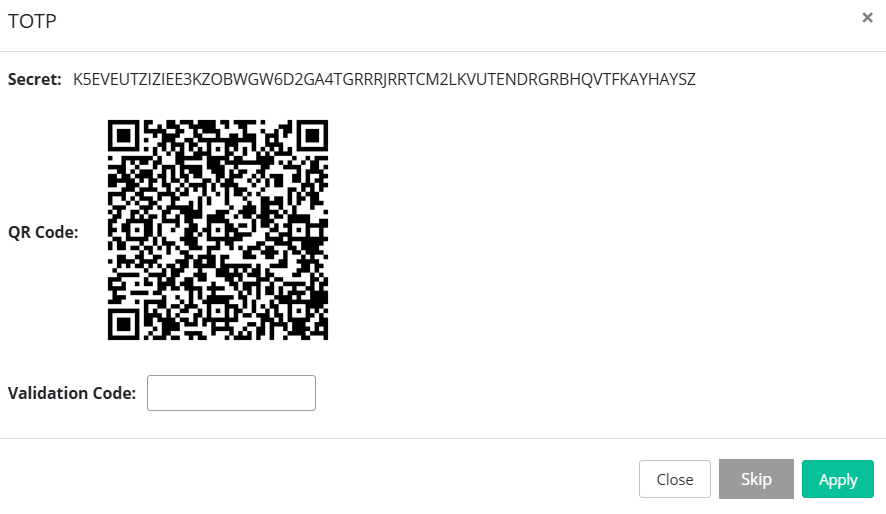
- A TOTP Secret window will appear — copy the TOTP secret.
- Go to the Port Knocking Tool web page, paste the TOTP secret, and a 6-digit authentication code will be generated.
- Return to the TOTP Secret window, paste the 6-digit code, and click Verify.
- Wait for the OK message on the top-right corner. The IAM / Teleworker user setup with Port Knocking is now complete.

3. Apply Port Knocking to VPN Services
Navigate to VPN / General Setup and configure:
- Enable Enforce Port Knocking
- Select the VPN types to protect with Port Knocking
- Allow All Connections is the default mode; using Allow List mode allows listed IPs to bypass Port Knocking

VPN Client Setup
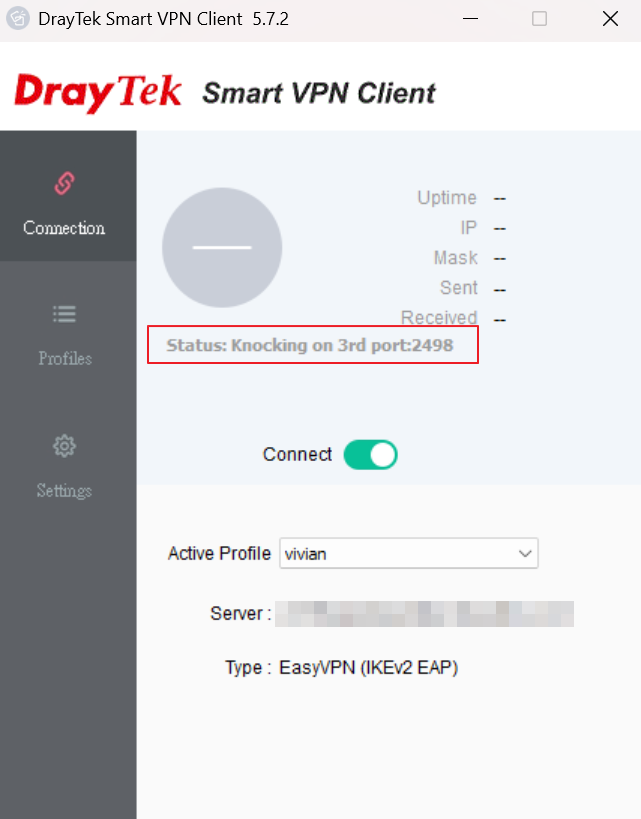
1. EasyVPN from Windows Smart VPN Client
- Edit an existing VPN profile, enable Port Knocking, enter the First Knock Port and TOTP key.
- Click OK to save, toggle Connect to ON. The SmartVPN Client will start knocking the ports.
- Once successful, the Smart VPN Client establishes a VPN tunnel to the Vigor Router.

2. WireGuard VPN from Android Smart VPN App
- Edit an existing VPN profile or add a new one. Enter profile name/description, select EasyVPN (WireGuard), and provide the VPN server IP/domain, username, and password.
- Check the Use Port Knocking option, enter the 1st Port, and paste the TOTP key.
- Tap SAVE to apply the settings.
- Click Connect. Once successful, a WireGuard VPN tunnel is established.
3. IKEv2 EAP VPN from iOS Smart VPN App
- Add a new VPN profile, select IKEv2 EAP, provide profile name, server domain, username, and password.
- Enable Port Knocking, enter First Port, and paste the TOTP key.
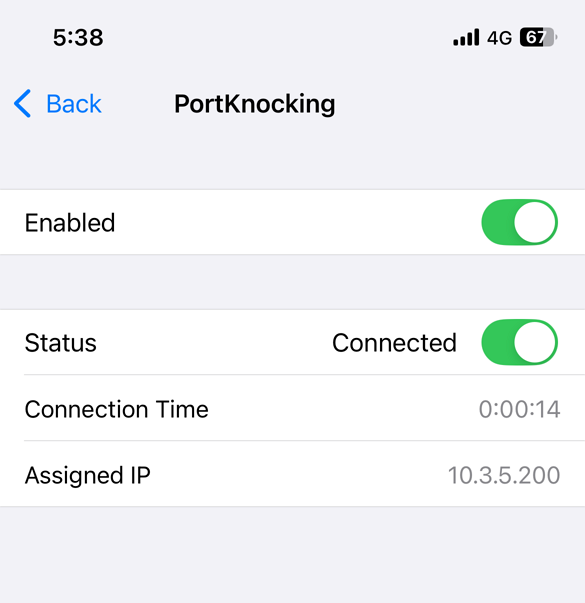
- Tap Save, toggle Enabled, then switch on Status. Once successful, an IKEv2 EAP VPN tunnel is established.
4. IPsec VPN LAN to LAN from Vigor Router
The Vigor Router does not support the Port Knocking feature when initiating a VPN connection.
To use port knocking in this scenario, we can run the Port Knocking Tool from a computer behind the VPN client router to knock the required ports before establishing the VPN connection.
a. Configure the VPN Site-to-Site profile. Do not enable Always On in this step.

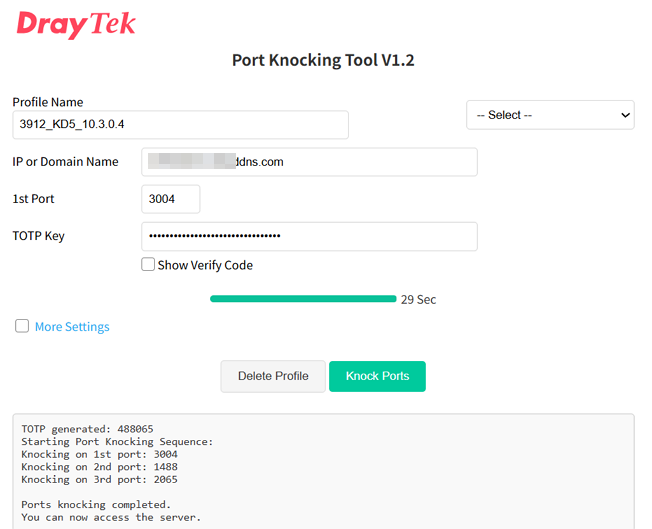
b. Open the Port Knocking Tool on a computer behind the VPN Dial-Out router:
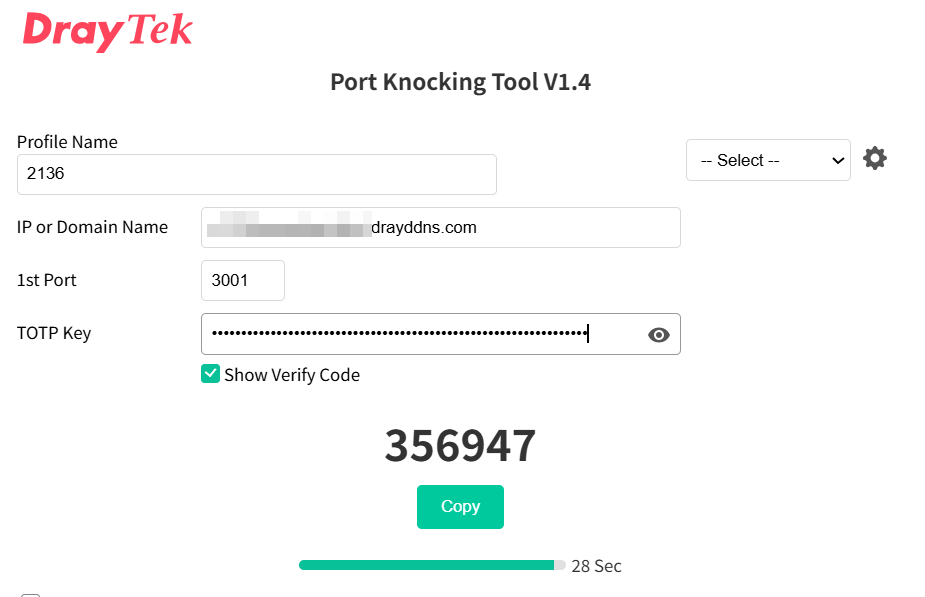
https://www.draytek.com/products/portknockProvide a profile name, enter the VPN server's IP address or domain name, specify the first port, and paste the TOTP key.
Then click Knock Ports.
The tool will begin knocking the ports.
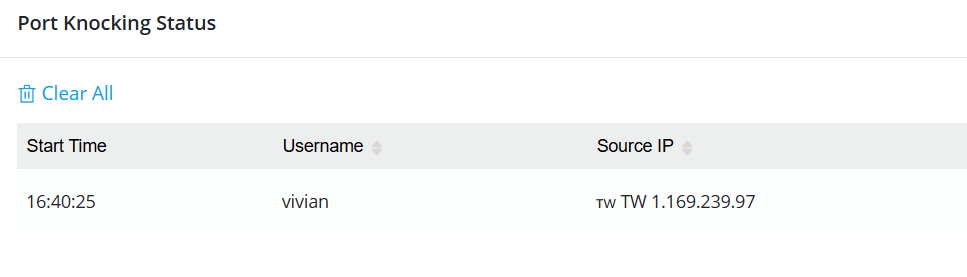
c. On the VPN server router, navigate to Monitoring / Port Knocking Status and check whether the VPN client’s IP address appears on the page after the ports are knocked.
If the IP address appears, it means the IP is allowed to access the Vigor VPN server's VPN service.
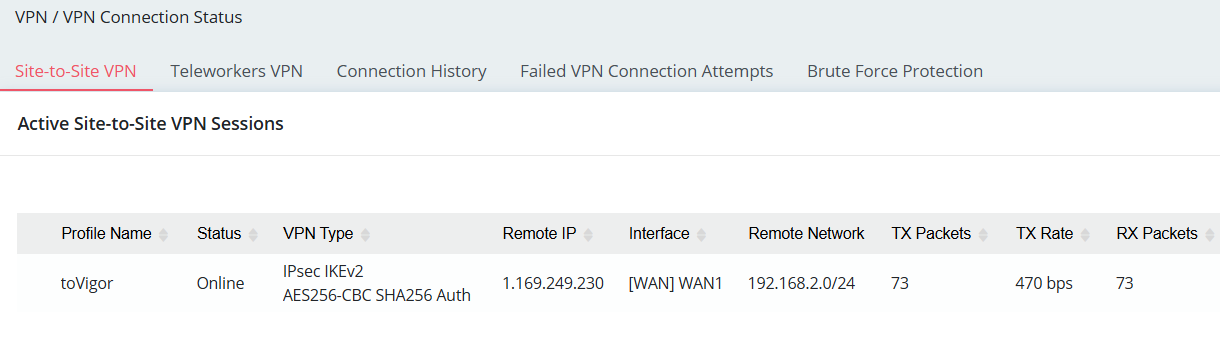
d. Enable the Always On option in the VPN profile on the VPN client router, and verify whether the VPN tunnel is established successfully.
5. Troubleshooting VPN Connection
- Check the Port Knocking Status Table on the VPN server to see if the client’s IP appears.
- If the IP is not listed, the client won’t receive a response. Possible causes:
- Client’s Internet IP changed
- Firewall restrictions blocking TCP connections
- Other network issues

Published On:2026-01-27
ShareWas this helpful?