
Single-Arm VPN Configuration
Single-Arm VPN allows the router's VPN to work only on the WAN interface, instead of working on traffic sent between LAN and WAN. When doing single-arm VPN, traffic arrives on the WAN interface, gets encrypted, and sent out through the same WAN interface. It's the solution to add VPN compatibility to the network without replacing the Internet gateway. To use the Single-Arm VPN, it’ s required to open the corresponding ports for VPN protocols to Vigor Routers and create the static routing rule for the VPN traffic on the Internet gateway.
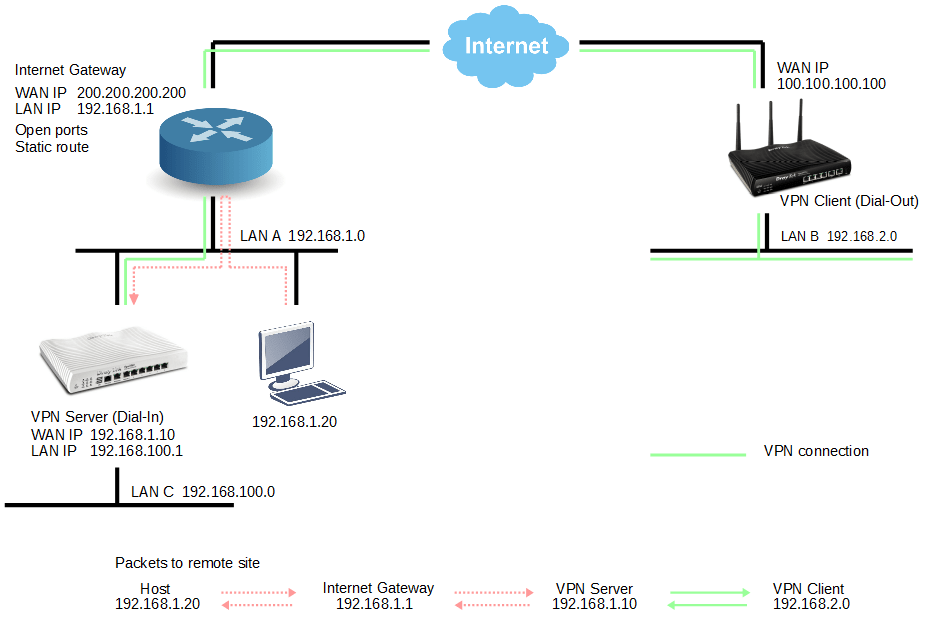
Since 3.8.4.2 version firmware, Vigor Router supports single-arm VPN for PPTP (TCP 1723), IPsec (UDP 500 and 4500) and SSL (TCP 443 or user-defined).
Vigor Router Configuration (The Router on LAN A)
1. Go to VPN and Remote Access >> LAN to LAN and click an available index
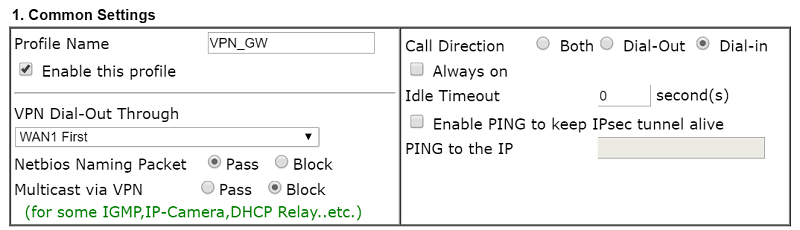
- Enable profile and choose "Dial-In" for Call Direction
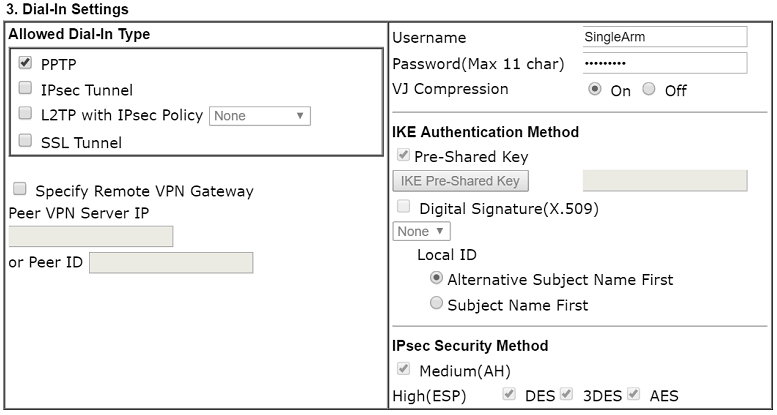
- Enable PPTP and give a Username and Password in Dial-In Settings
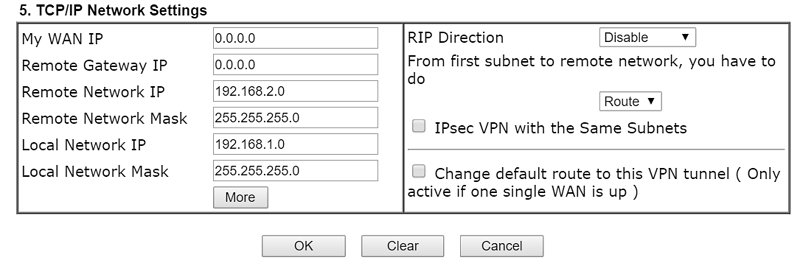
- Type LAN B for Remote Network in TCP/IP Network Settings
- Type LAN A (WAN network) for Local Network
2. To avoid LAN network conflict with WAN network, please change the LAN network of the Vigor Router.
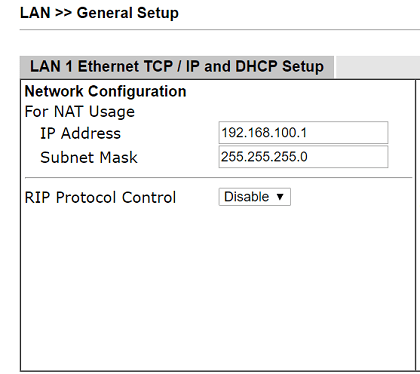
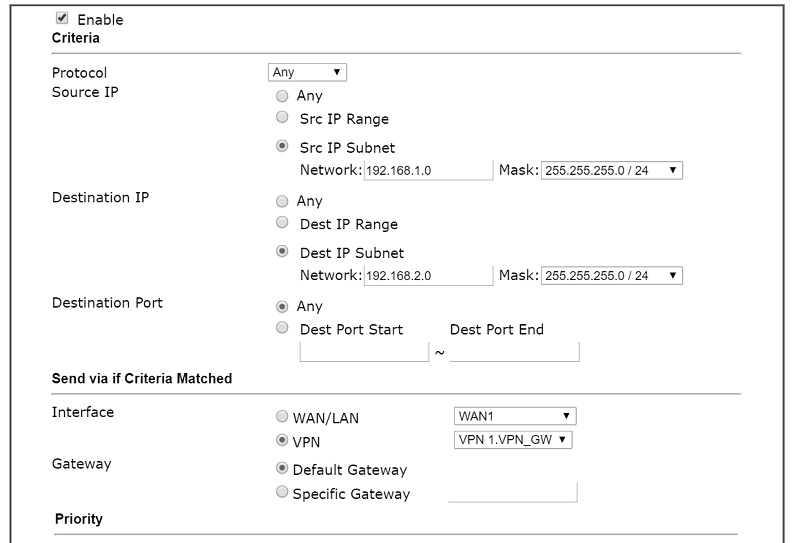
3. Go to Routing > Route Policy and click an available index to add a new rule:
- Enter LAN A in Source IP
- Enter LAN B in Destination IP
- Select the VPN profile for Interface
Remote Router Configuration (The Router on LAN B)
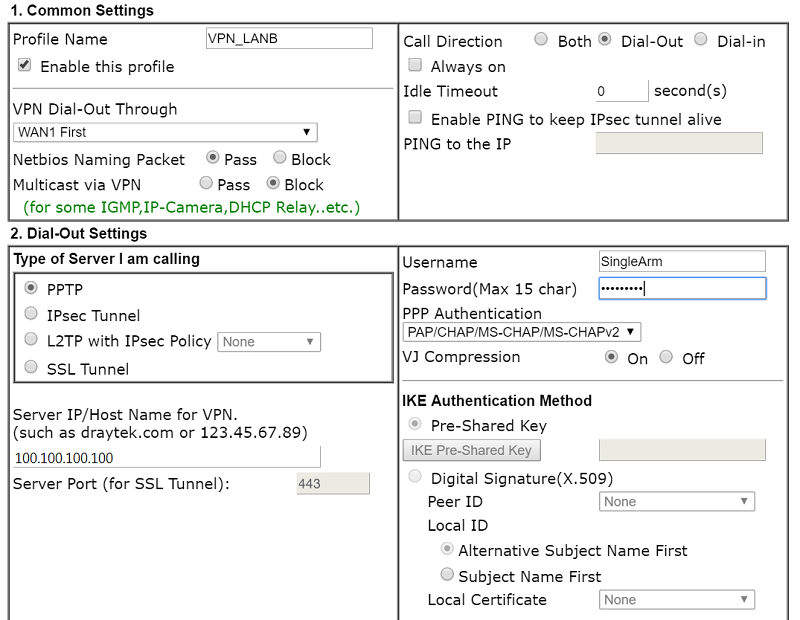
Go to VPN and Remote Access >> LAN to LAN and click an available index to add a new profile:
- Enable the profile and choose "Dial-Out" for Call Direction
- Select PPTP for Type of Server I am calling
- Type WAN IP or domain name of the internet gateway.
- Type Username and Password
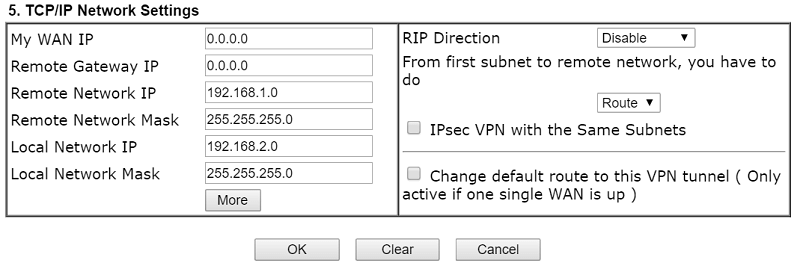
- Type LAN A for Remote Network in TCP/IP Network Settings
Internet Gateway Configuration
To make the single-arm VPN work, we must make the VPN traffic pass through the internet gateway and be sent to the VPN tunnel. Here we take a Vigor300B for example.
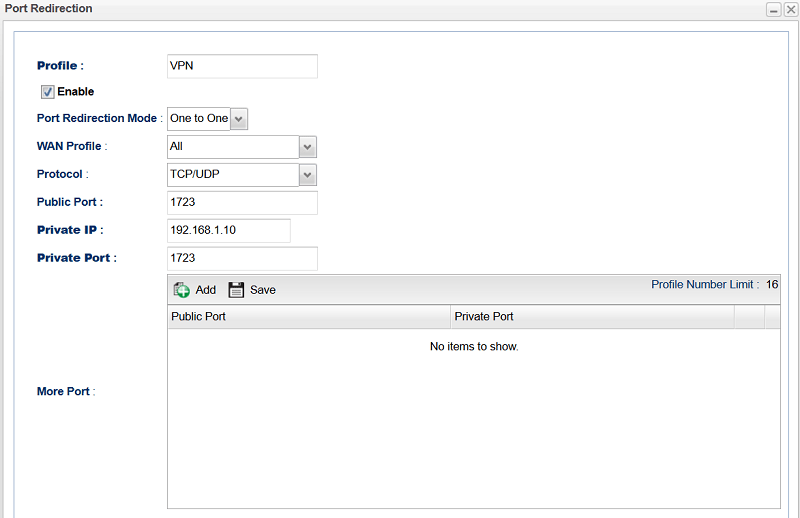
1. Go to NAT >> Port Redirection and click Add to create a new rule:
- Enable profile and Select One-to-One for Port Redirection Mode
- Type "1723" for Pubilc Port and Private Port (This is the port used by PPTP VPN)
- Type Vigor Router WAN IP for the Private IP
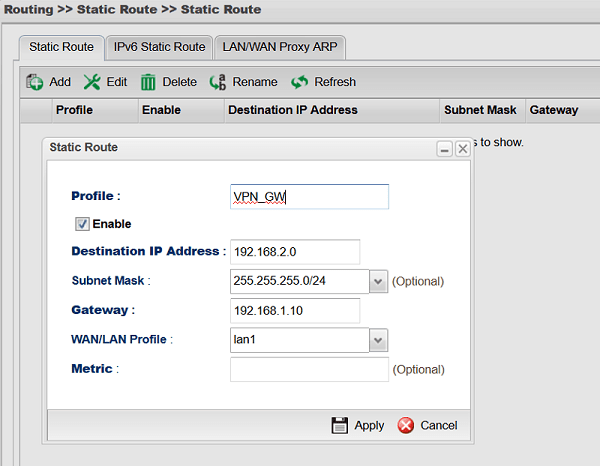
2. Go to Routing >> Static Route and click Add to create a new rule
- Enable profile
- Type LAN B for the Destination IP Address
- Type Vigor Router WAN IP as the Gateway
The latest DrayOS 5 routers can also support Single-Arm VPN since 5.3.1 version and above for the following protocols:
- IPsec (UDP 500, 4500)
- OpenVPN (TCP/UDP 1194)
- WireGuard (UDP 51820)
Internet Gateway Configuration
To make the Single-Arm VPN work, we must make the VPN traffic pass through the Internet Gateway and forward to the VPN server. Here we take a Vigor2927 for example.
-
Go to VPN and Remote Access >> Remote Access Control page, disable all VPN services.
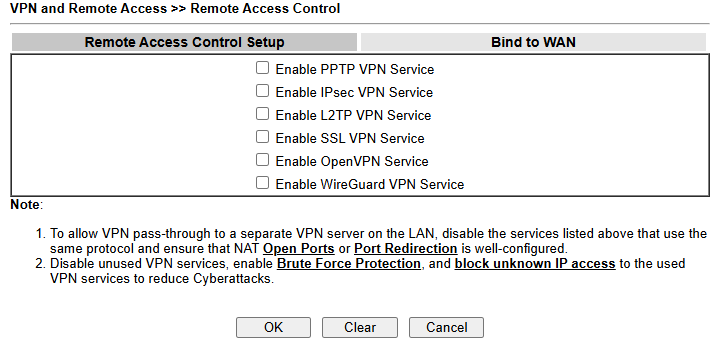
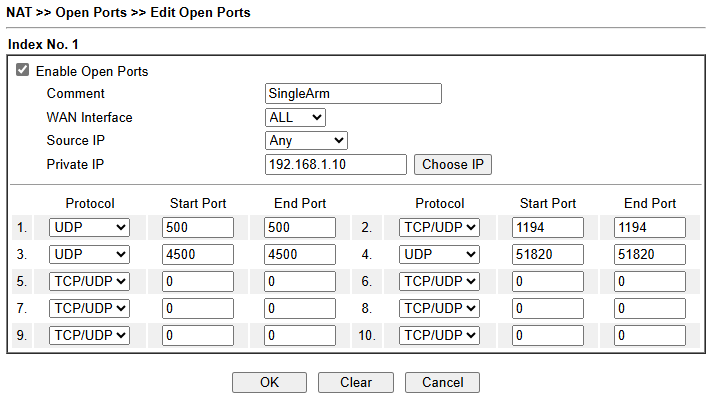
- Go to NAT >> Open Ports page and select available index to edit as follows:
- Enable Open Ports.
- Give a name in the Comment.
- Enter VPN server router WAN IP: 192.168.1.10 as the Private IP.
- Edit the port for the VPN service.
-
Click OK to save the profile.
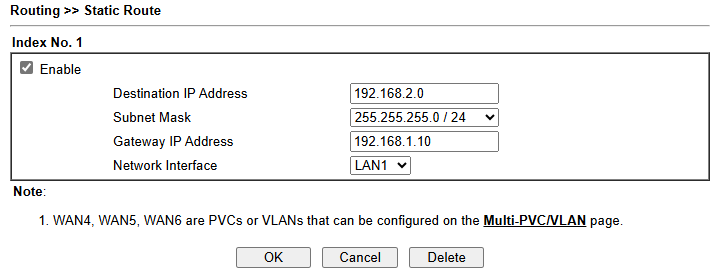
- Go to Routing >> Static Route page and select available index to edit as follows:
- Enable the profile.
- 192.168.2.0 as the Destination IP Address.
- 255.255.255.0/24 as the Subnet Mask.
- Enter VPN server router WAN IP: 192.168.1.10 as the Gateway IP Address
- Choose the Network Interface.
-
Click OK to save the profile.
Vigor Router Configuration (The Router on LAN A)
Here we take a Vigor2136 as the example for VPN server router.
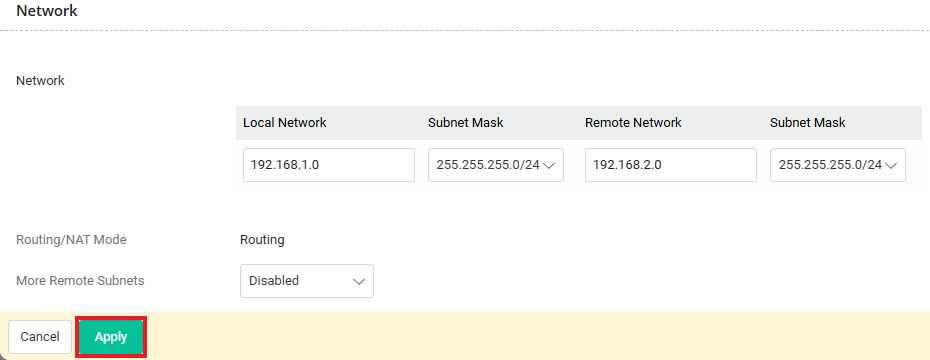
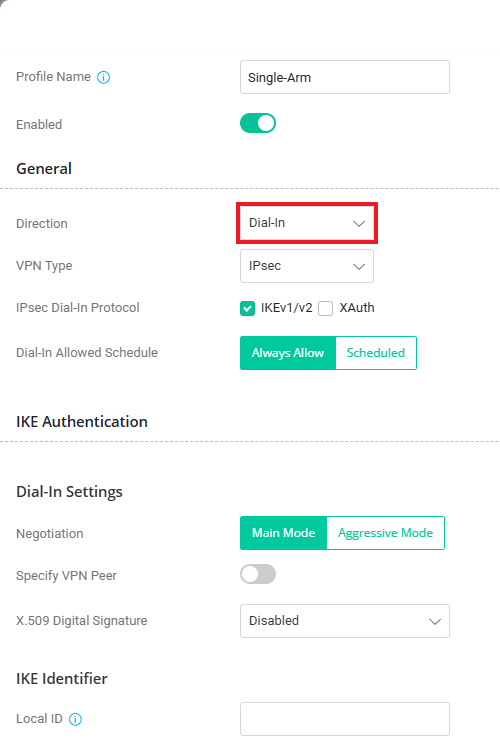
- Navigate to VPN / Site-to-Site VPN page, click Add and create a VPN profile as follows:
- Give a Profile Name.
- Enable the profile.
- Select Dial-in as the Direction.
- Choose the VPN Type, here we take IPsec for example.
- For Local Network and Subnet Mask, input the IP subnet used on the local router.
- For Remote Network IP and Subnet Mask, input the IP subnet used by the remote VPN client router.
-
Click Apply to save the profile.
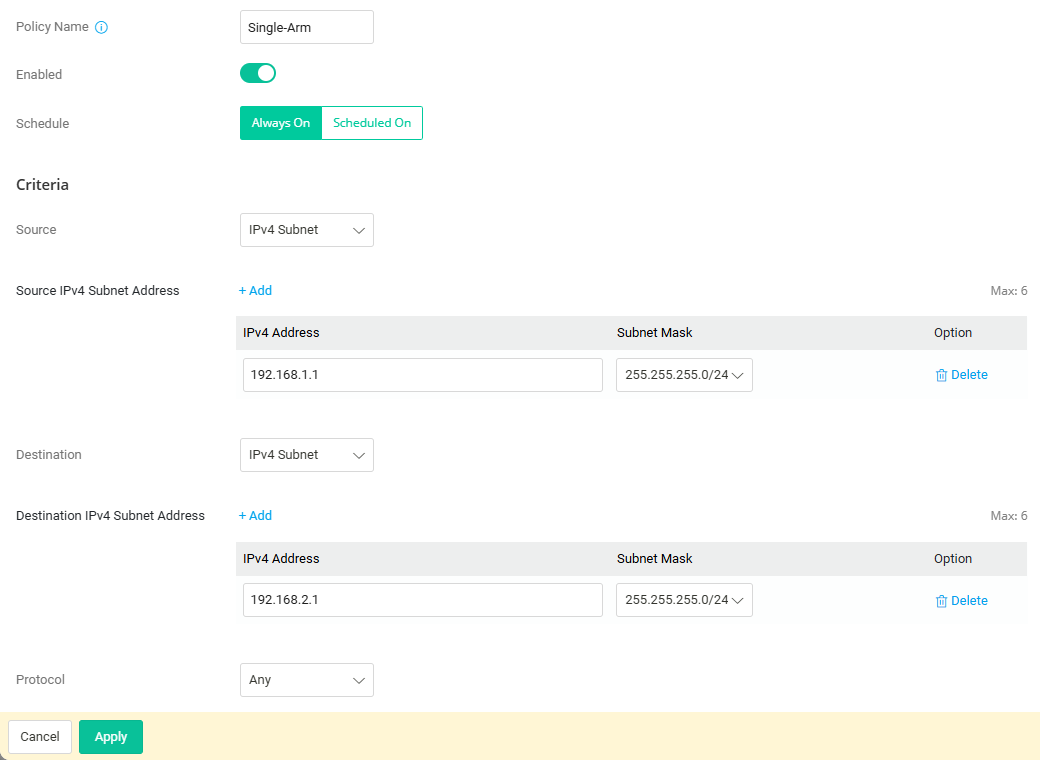
- Navigate to Configuration / Routing / Route Policy page, click Add and create a policy profile as follows:
- Give a Policy Name.
- Enable the profile.
- Choose IPv4 Subnet for Source and input the IP Address and Subnet mask used on the local router.
-
Choose IPv4 Subnet for Destination and input the IP Adress and Subnet Mask used by the remote VPN client router.
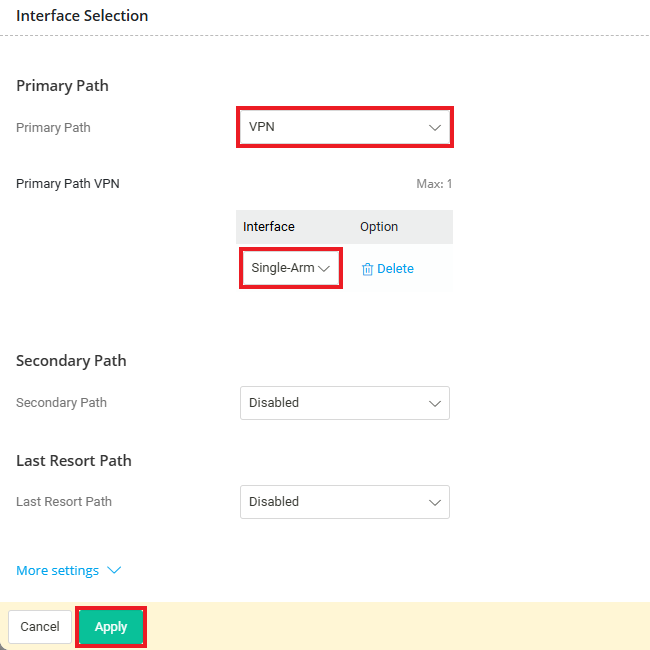
- Choose VPN for Primary Path.
- Click +Add and select the VPN Profile we just created in step 1
-
Click Apply to save the profile.
Remote Router Configuration (The Router on LAN B)
Here we take a Vigor2962 as the example for VPN client router.
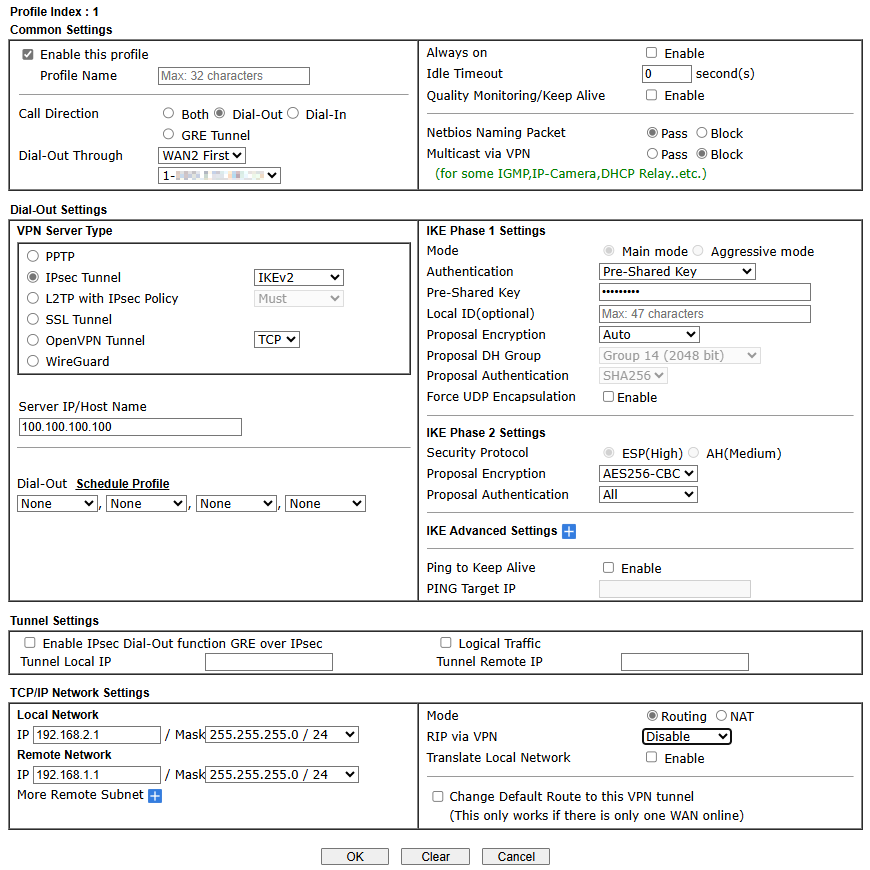
- Go to VPN and Remote Access >> LAN to LAN page, click an available index to add a new profile as follows:
- Enable the profile.
- Choose "Dial-Out" for Call Direction.
- Enter the WAN IP or Domain name of the Internet Gateway.
- Enter Pre-Shared Key.
- Enter the IP Address and Mask used by VPN server router as the remote Network IP and Mask.
-
Click OK to save the profile.
Published On:2017-01-11
ShareWas this helpful?