
How to configure multiple CPEs with an XML file through VigorACS?
Through the automatic provisioning function of ACS, users with multiple Vigor devices or service providers can provide appropriate settings for these CPEs in different network environments and at any times.
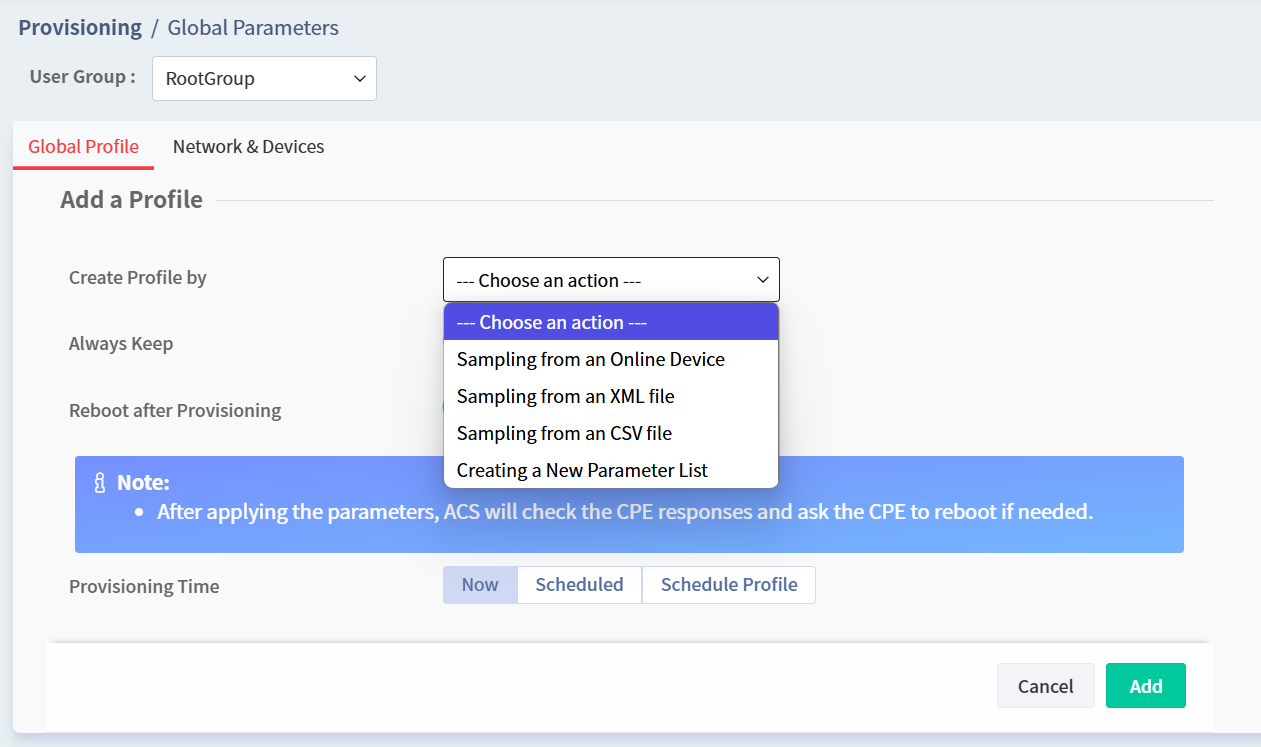
ACS supports 4 ways listed below to create the configuration profile for global provisioning.
1. Copy a configuration from an on-line CPE
2. Create an XML file
3. Create an CSV file
4. Create parameters list
In the following, we will focus on how to create an XML file to configure settings for a bulk of CPE at the same time.
Step 1, Learn how to get the TR-069 parameter name and value.
There are two ways to find the TR-069 parameters with required configuration:
1. Check it from the ACS server:
Select the one of the CPE from the network tree and go to CPE Configuration > Advanced.
(It is recommended to choose the same model and firmware version as the CPE which you'd like to apply so that you could make sure the best compatibility of TR-069 parameter.)
Expand the parameter tree based on the feature prefix name. Copy the TR-069 parameter name and value of the required setting:

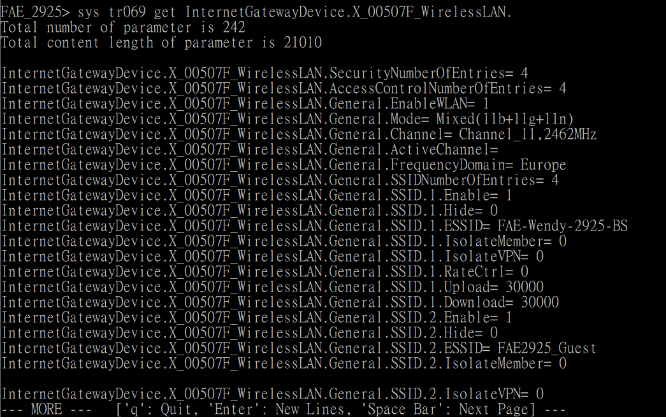
2. Check it by CLI cmd:
Using the "sys tr069 get <parameter name>" telnet command allows you to obtain one or a batch of TR-069 parameters with the current value.
If you'd like to get all parameters under "InternetGatewayDevice.X_00507F_WirelessLAN.", you could use the telnet CLI "sys tr069 get InternetGatewayDevice.X_00507F_WirelessLAN." as shown below.
Step 2, Learn how to create an XML file for global parameters
Download the XML template from ACS page (Provisioning > Global Parameters)

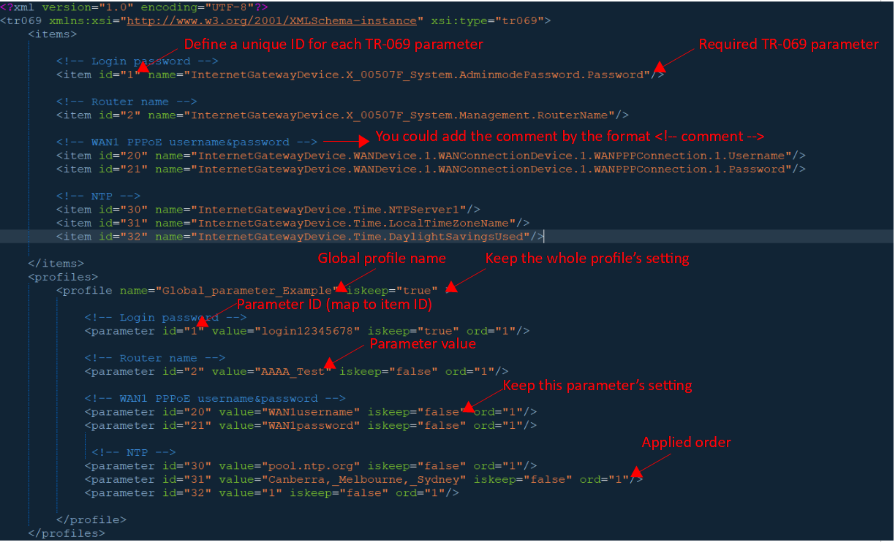
Open the XML file with editor(Notepad++ is recommended tool). The XML file is divided into two parts.
The first part <Item> is used to define a unique "item id" for each TR-069 parameter.
The second part <Profile> is used to set the value for each "parameter id".
ACS will check the parameter id with corresponding item id to get the parameter name.
Let's presume that the customer needs to set the following parameters for each CPE.
[LAN1]
LAN1 IP = 192.168.10.1
Subnet Mask = 255.255.255.0
DHCP enable
[Wireless Setup]
2.4G Channel = Channel 6
2.4G SSID1 = Draytek_Test
WPA2 PSK= 123456789
[System]
Router name=DraytekFAE
Login password=123qweasd
------------------------------------------------
According to the settings above, the XML content should look like this:
<?xml version="1.0" encoding="UTF-8"?>
<tr069 xmlns:xsi="http://www.w3.org/2001/XMLSchema-instance" xsi:type="tr069">
<items>
<item id="1" name="InternetGatewayDevice.X_00507F_System.AdminmodePassword.Password"/>
<item id="2" name="InternetGatewayDevice.X_00507F_System.Management.RouterName"/>
<item id="3" name="InternetGatewayDevice.X_00507F_WirelessLAN.General.Channel"/>
<item id="4" name="InternetGatewayDevice.X_00507F_WirelessLAN.General.SSID.1.ESSID"/>
<item id="5" name="InternetGatewayDevice.X_00507F_WirelessLAN.Security.1.WPAPSK"/>
<item id="6" name="InternetGatewayDevice.LANDevice.1.LANHostConfigManagement.DHCPServerEnable"/>
<item id="7" name="InternetGatewayDevice.LANDevice.1.LANHostConfigManagement.MinAddress"/>
<item id="8" name="InternetGatewayDevice.LANDevice.1.LANHostConfigManagement.MaxAddress"/>
<item id="9" name="InternetGatewayDevice.LANDevice.1.LANHostConfigManagement.SubnetMask"/>
<item id="10" name="InternetGatewayDevice.LANDevice.1.LANHostConfigManagement.IPRouters"/>
<item id="11" name="InternetGatewayDevice.LANDevice.1.LANHostConfigManagement.IPInterface.1.IPInterfaceIPAddress"/>
<item id="12" name="InternetGatewayDevice.LANDevice.1.LANHostConfigManagement.IPInterface.1.IPInterfaceSubnetMask"/>
</items>
<profiles>
<profile name="Global_parameter_Example" iskeep="false" >
<parameter id="1" value="123qweasd" iskeep="false" ord="0"/>
<parameter id="2" value="DrayTekFAE" iskeep="false" ord="0"/>
<parameter id="3" value="Channel_6,2437MHz" iskeep="false" ord="0"/>
<parameter id="4" value="Draytek_Test" iskeep="false" ord="0"/>
<parameter id="5" value="123465789" iskeep="false" ord="0"/>
<parameter id="6" value="1" iskeep="false" ord="0"/>
<parameter id="7" value="192.168.10.10" iskeep="false" ord="0"/>
<parameter id="8" value="192.168.10.209" iskeep="false" ord="0"/>
<parameter id="9" value="255.255.255.0" iskeep="false" ord="0"/>
<parameter id="10" value="192.168.10.1" iskeep="false" ord="0"/>
<parameter id="11" value="192.168.10.1" iskeep="false" ord="0"/>
<parameter id="12" value="255.255.255.0" iskeep="false" ord="0"/>
</profile>
</profiles>
</tr069>
Step 3, save the file and upload it to ACS server.
Go to Global Parameters and +Add a profile. Select the "sample from an XML file" and select the created XML file then upload it to VigorACS server.

Step 4, Go to "Network &Devices", select the global profile for your network or CPE, and save the setting.
ACS will apply the profile when receiving the "TR-069 inform" from the CPE.
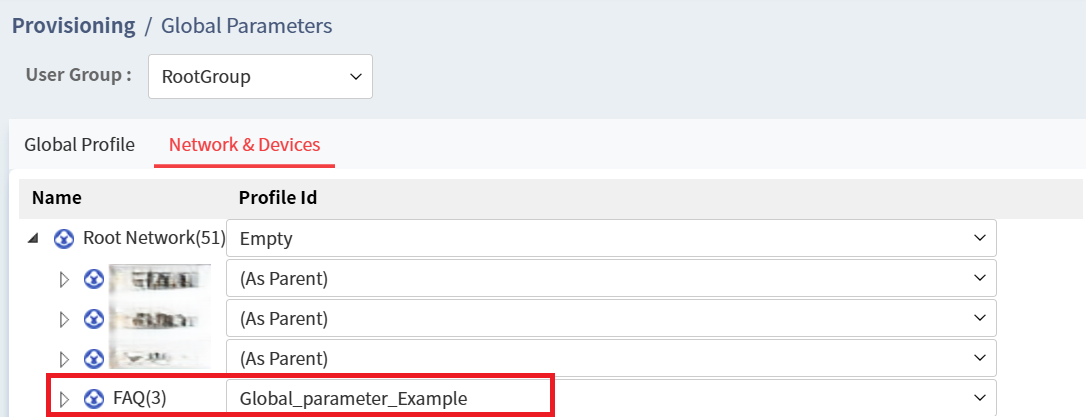
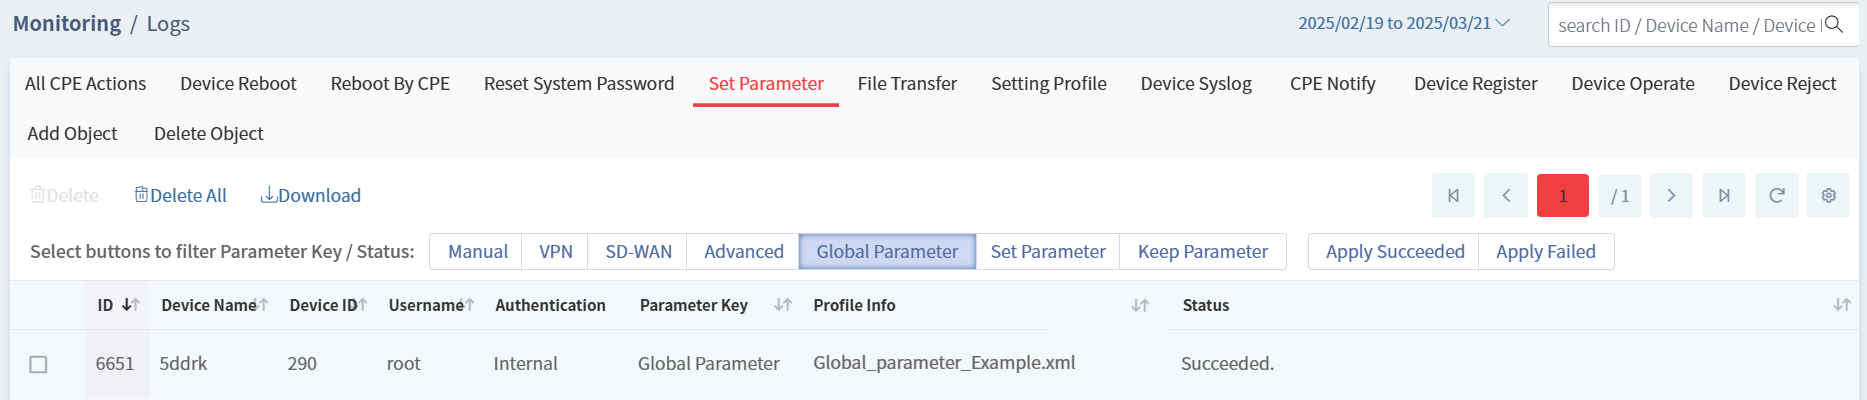
From the Monitoring > Log page, we are able to see the status when a global profile applied.
Published On:2019-12-03
ShareWas this helpful?