
How to use Bandwidth Limit
As the Internet gateway. Vigor router also offers Bandwidth Limit feature, which can avoid a few clients occupying all the bandwidth resources by restricting the amount of bandwidth each client can use.
| For controlling the bandwidth usage, the router offers: |
|
| This article also explains the priority between these methods above, the Auto Adjustment option for more flexibility, and using Time Schedule to turn on/off Bandwidth Limit. |
To add Bandwidth Limit rules, go to Bandwidth Management >> Bandwidth Limit. There are three major parts in Bandwidth Limit: Default Limit (Overall Regulation), Limitation List and Smart Bandwidth Limit. To use any of them, remember to enable Bandwidth Limit first.
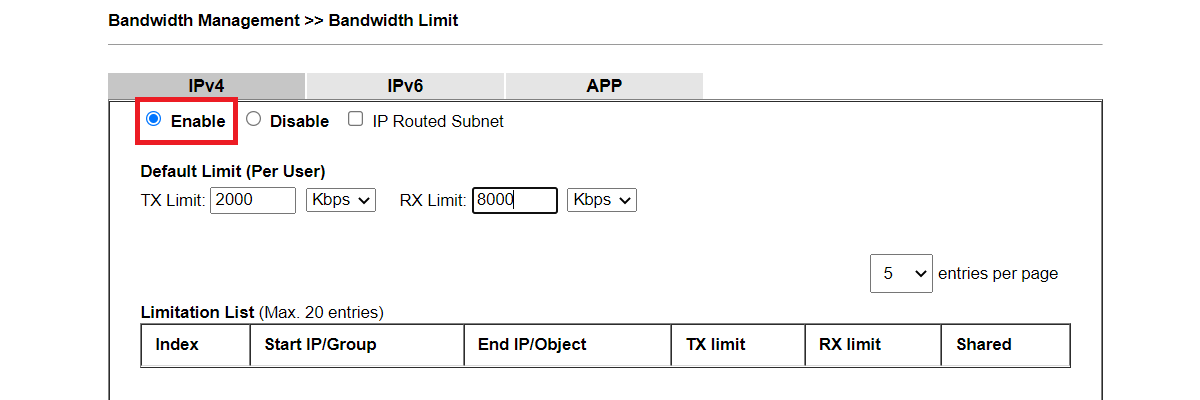
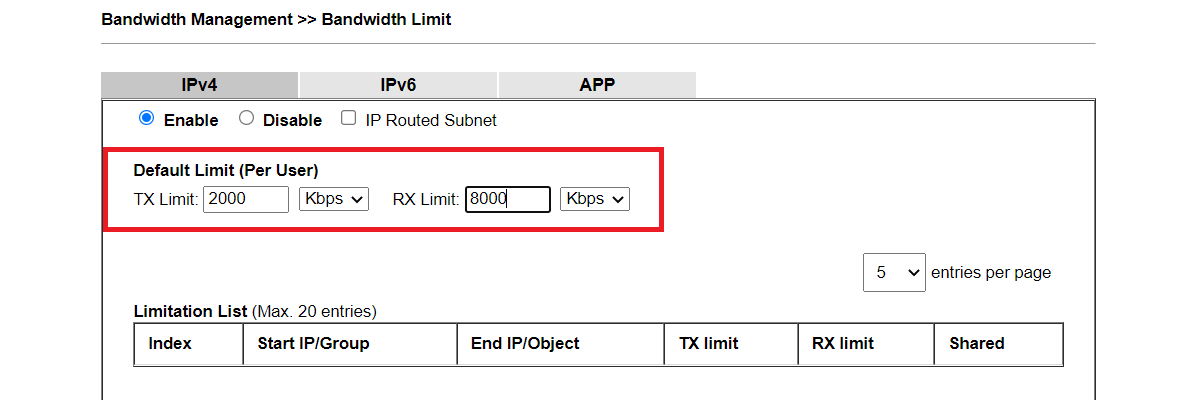
Default Limit
It's the general regulation. Input value here to set a limit for all LAN clients. Noted that "0" means unlimited. Therefore, if you want to enable Bandwidth Limit but only using the Limitation List, you should enter "0" here. Bandwidth limits routed subnet now supports IP Routed subnets, VPN, local Lan to Lan.
For example, the configuration below will limit every client's bandwidth usage to 2000 Kbps upload and 8000 Kbps download.
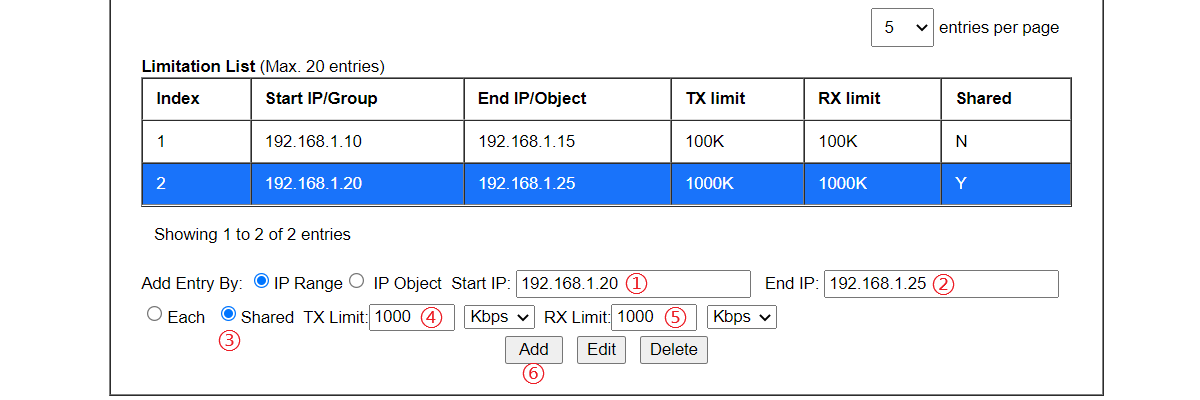
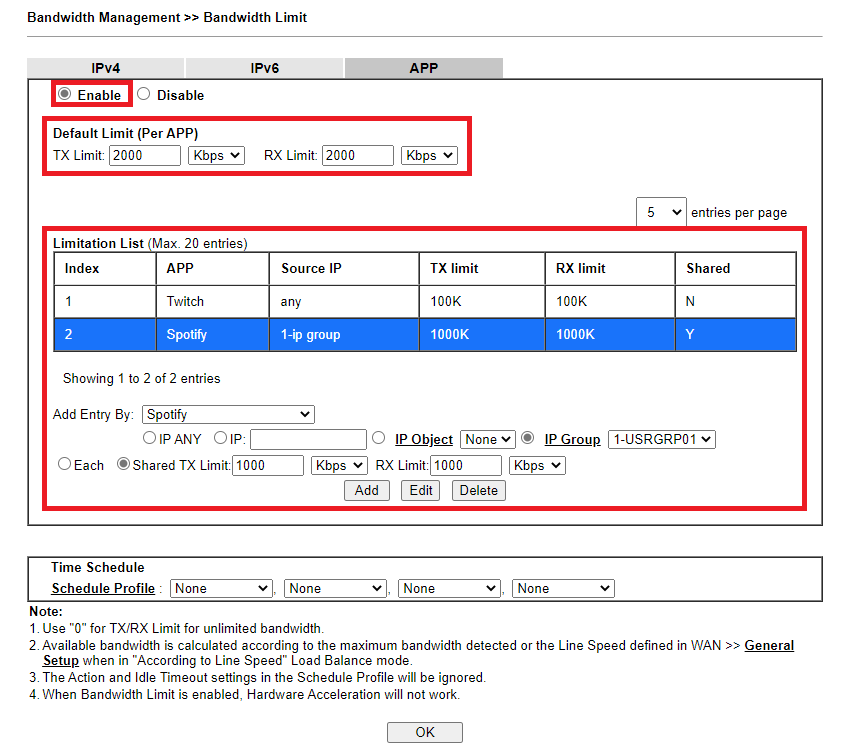
Limitation List
Network Administrator can add the bandwidth policy for the specific LAN client here.
Selecting "Each" to give each IP the particular bandwidth, or "Shared" to give a total bandwidth for a group of LAN clients.
For example, the configuration below has two rules.
Index 1, each of the six IPs from 192.168.1.10 to 192.168.1.15 has 100 Kbps for download and upload.
Index 2, the 6 IPs from 192.168.1.20 to 192.168.1.25, will share 1000 Kbps download and upload together.
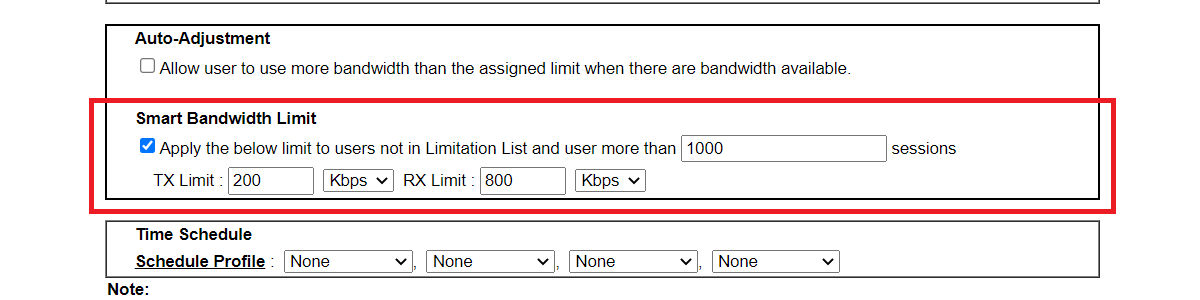
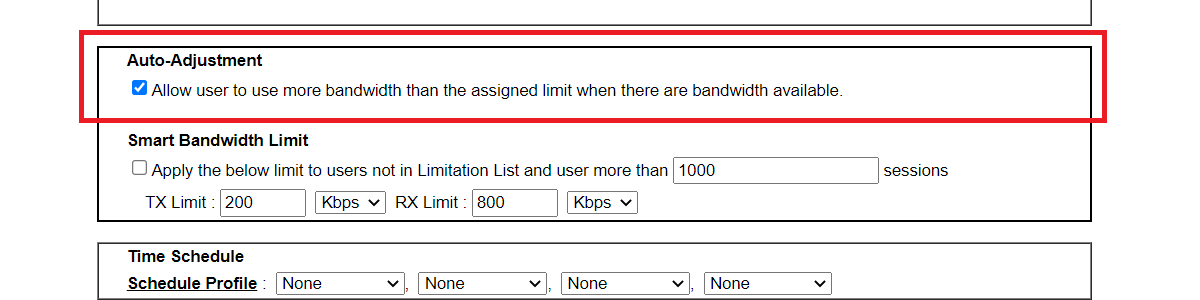
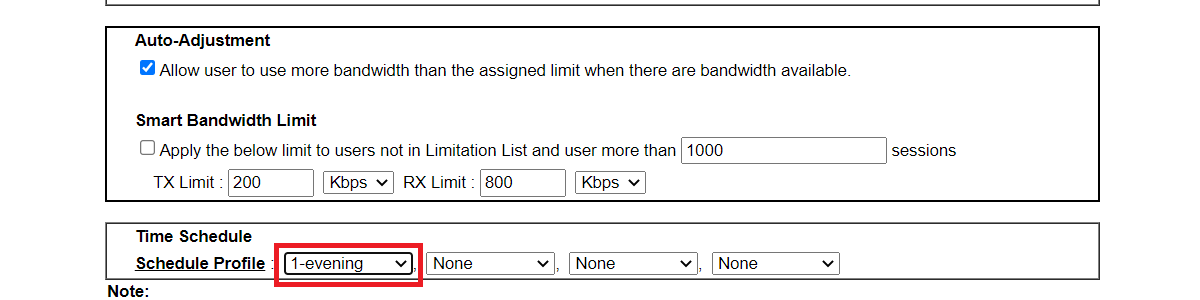
Smart Bandwidth Limit
"Smart Bandwidth Limit" is used to apply bandwidth limit to the only client whose session number has exceeded the defined value (probably using Peer-to-peer file sharing), while the others can have the bandwidth specified in the Default Limit.
For example, the setting below will regulate a transmission limit down to 200kbps for upload and 800kbps download to the LAN client who uses more than 1000 sessions.
The priority of each method
Specific Limitation has the highest priority. Among the limitation in the list, the one with the smallest index number has the highest priority.
Smart Bandwidth Limit will be the next if selected, and the last will be Default Limit.
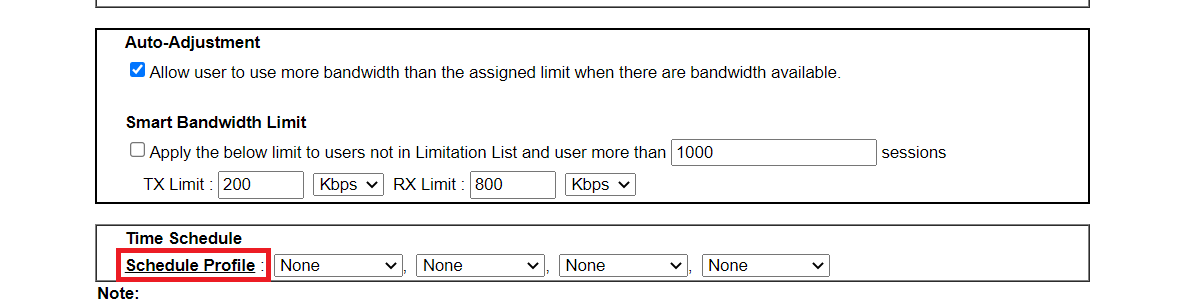
Auto Adjustment
To better use the bandwidth you subscribed, enable Allow auto adjustment… of available bandwidth to allow the clients to obtain more bandwidth when the total bandwidth is still sufficient.
App Bandwidth Limit
Since firmware 4.4.0, Vigor Router supports APP Bandwidth Limit. You can also apply bandwidth limit by APP-based instead of IP-based.
Default Limit and Limitation List settings are just as easy as the original ones but we can applied the limits to each APP in Default Limit or specific APP in Limitation List.
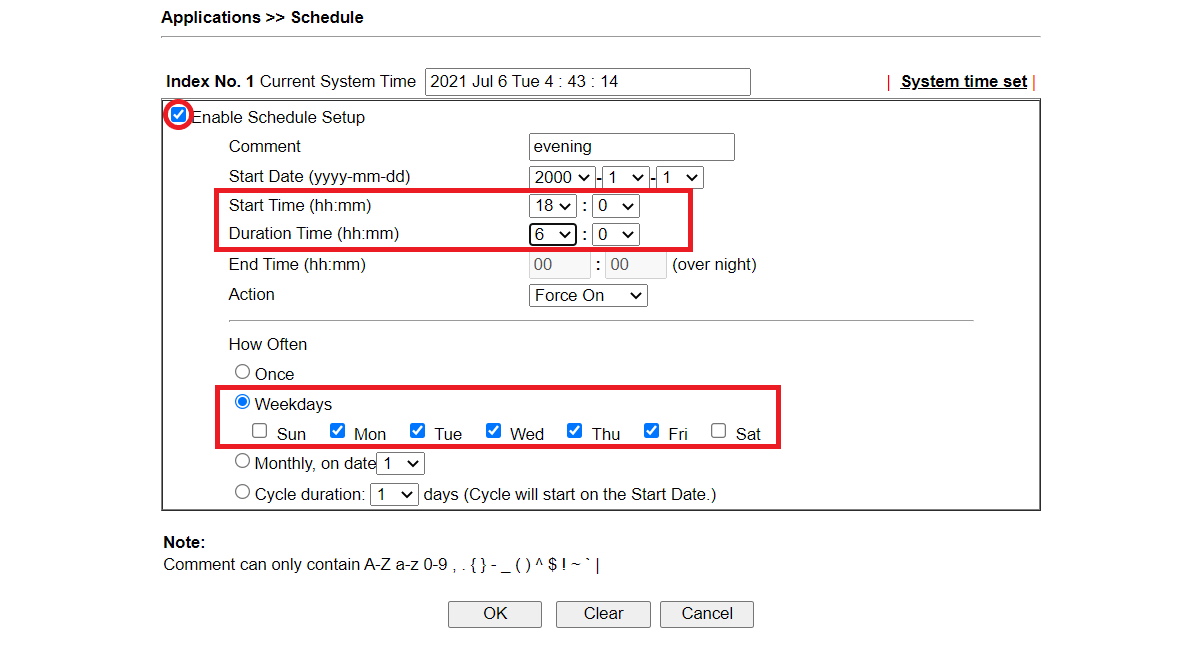
Enable with Schedule
You can apply bandwidth limit only during the peak hours.
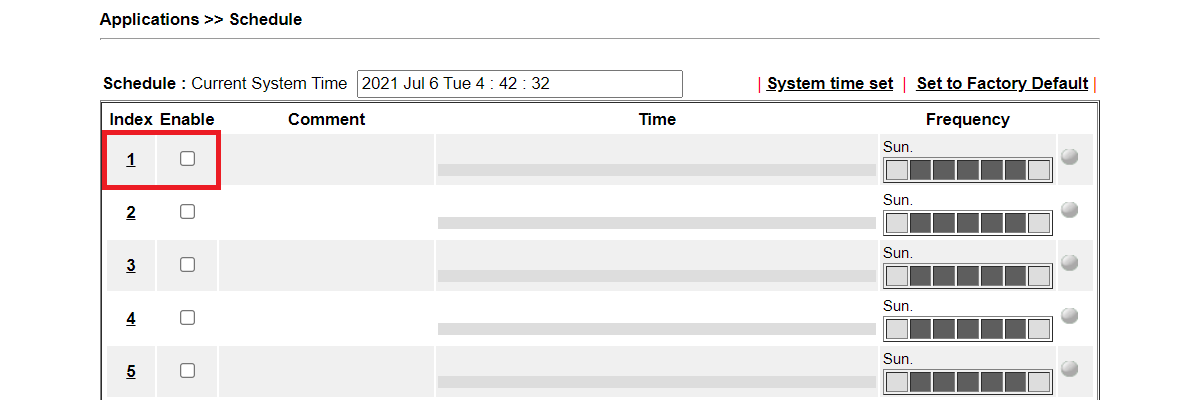
- To set a schedule for the bandwidth limit, click "Schedule Profile."
- Select an available index.
- Edit the schedule profile as follows,
- Check Enable Schedule Setup.
- Enter a Profile Name for identification.
- Set Start Date, Start Time, and Duration time.
- Set the How Often.
- Click OK to save the settings.
- Go back to Bandwidth Management >> Bandwidth Limit, scroll down to the Time Schedule part.
Fill in the index of schedule profile and click OK to save the settings.
Then only during the time specified in the schedule profile, will the Bandwidth Limit be applied.
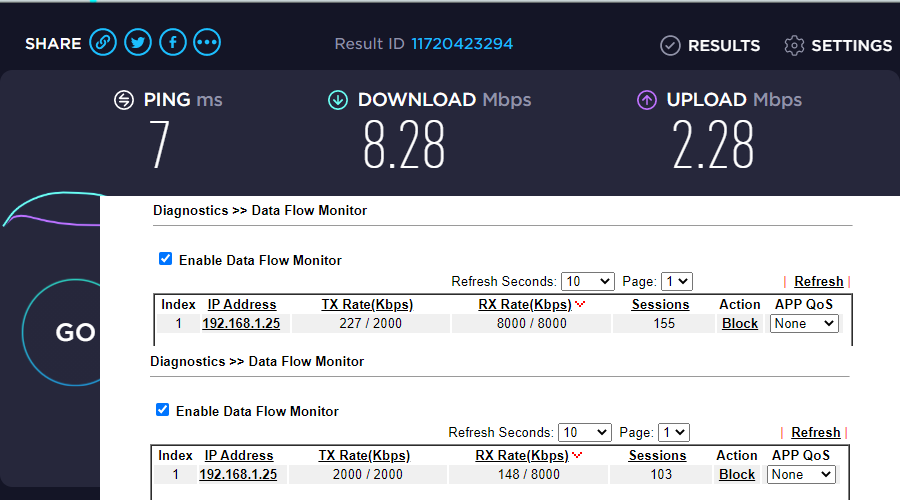
Check bandwidth usage of each host from Data Flow Monitor
Go to Diagnostics >> Data Flow Monitor, check Enable Data Flow Monitor, and it will show the current upload/download rate of each IP, and their limitations.
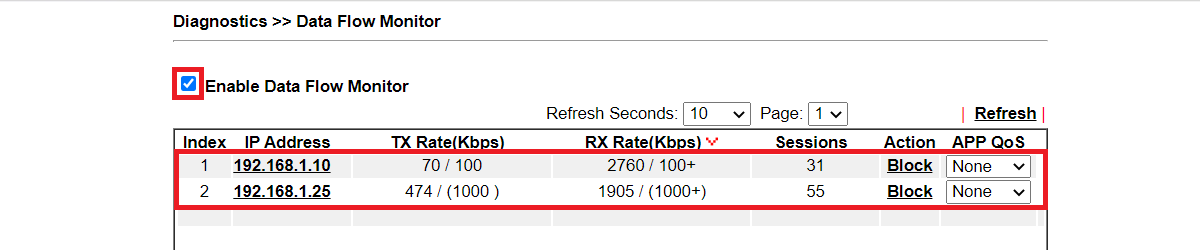
Note: The "+" symbol behind the rate number means Auto Adjustment is in use.
Users are allowed to use more bandwidth than the limit if the total bandwidth is still sufficient.
Check APP bandwidth usage
Here we take Twitch for example:
- Setup TX/RX: 2000k/2000k for Twitch.
- Go to any twitch live streaming page.
- Choose 480P quality which consumes 1200kbps approximately.
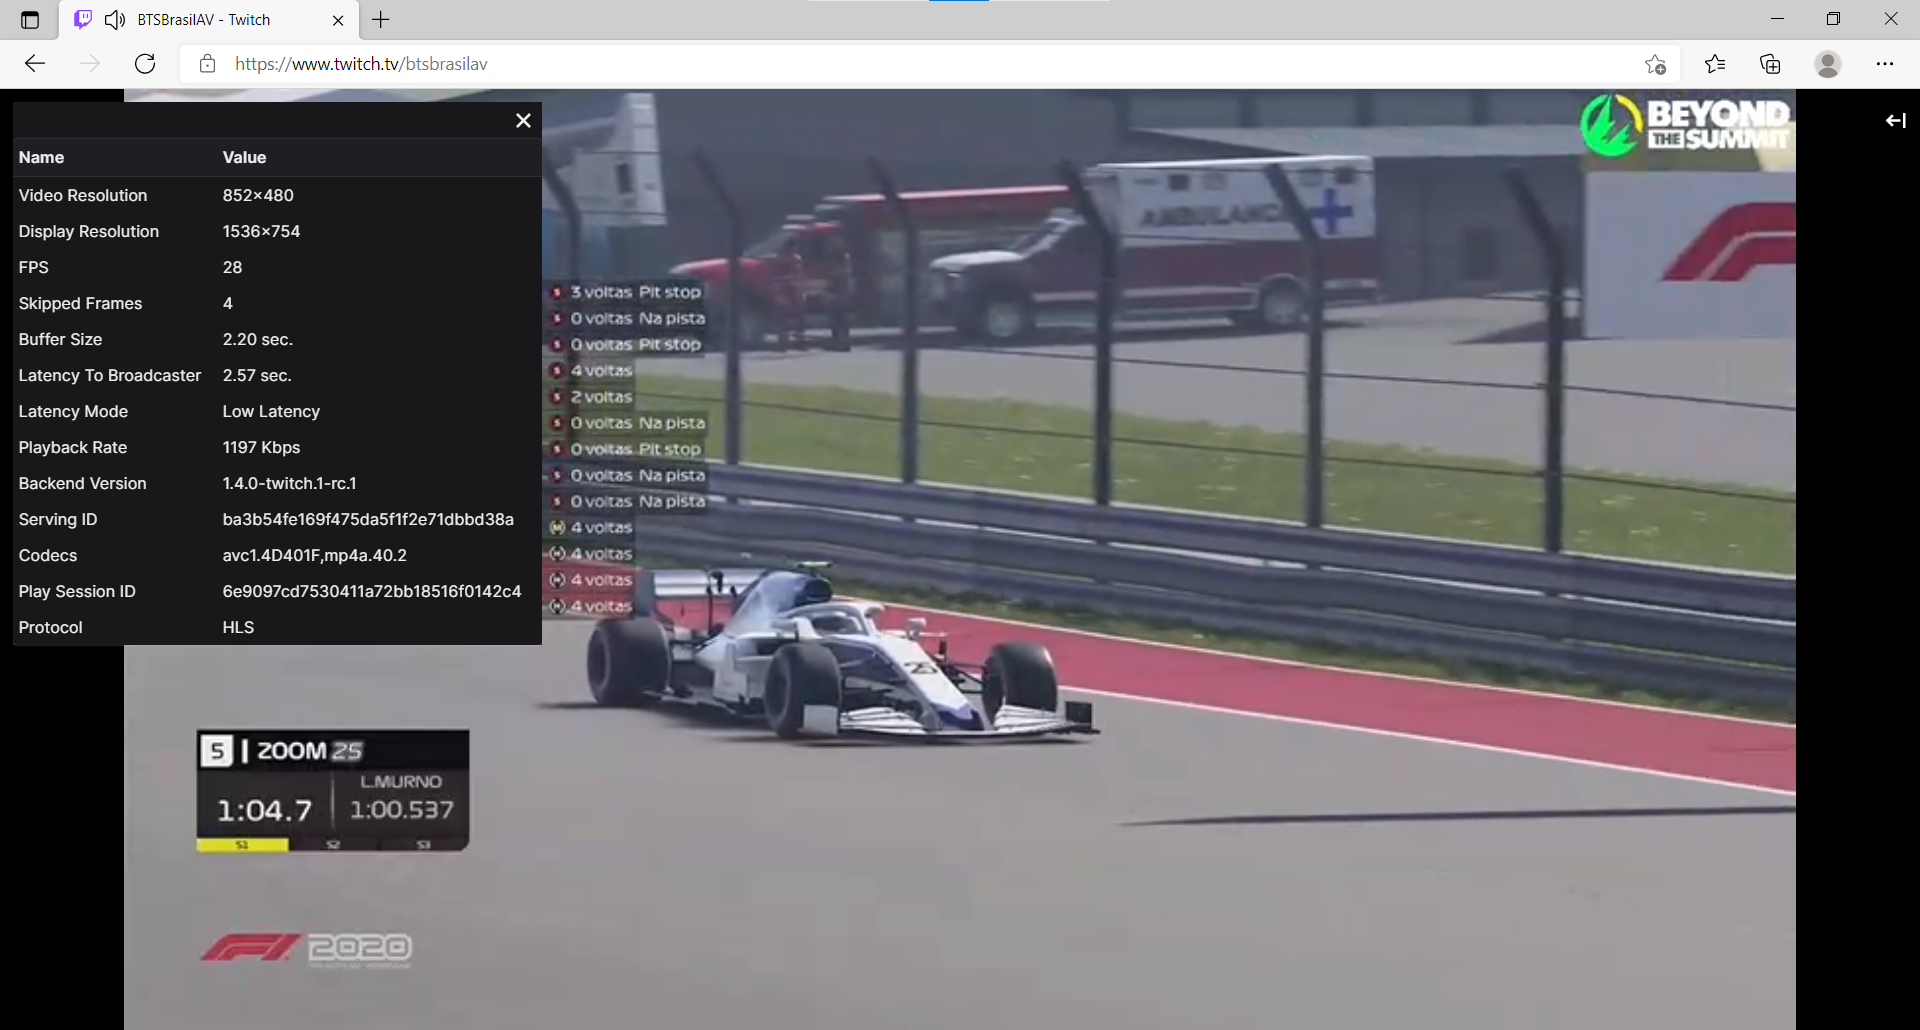
- Enable video stats in Settings >> Advanced
- ▲The picture above shows an example of watching streaming video under APP bandwidth limit without lagging.
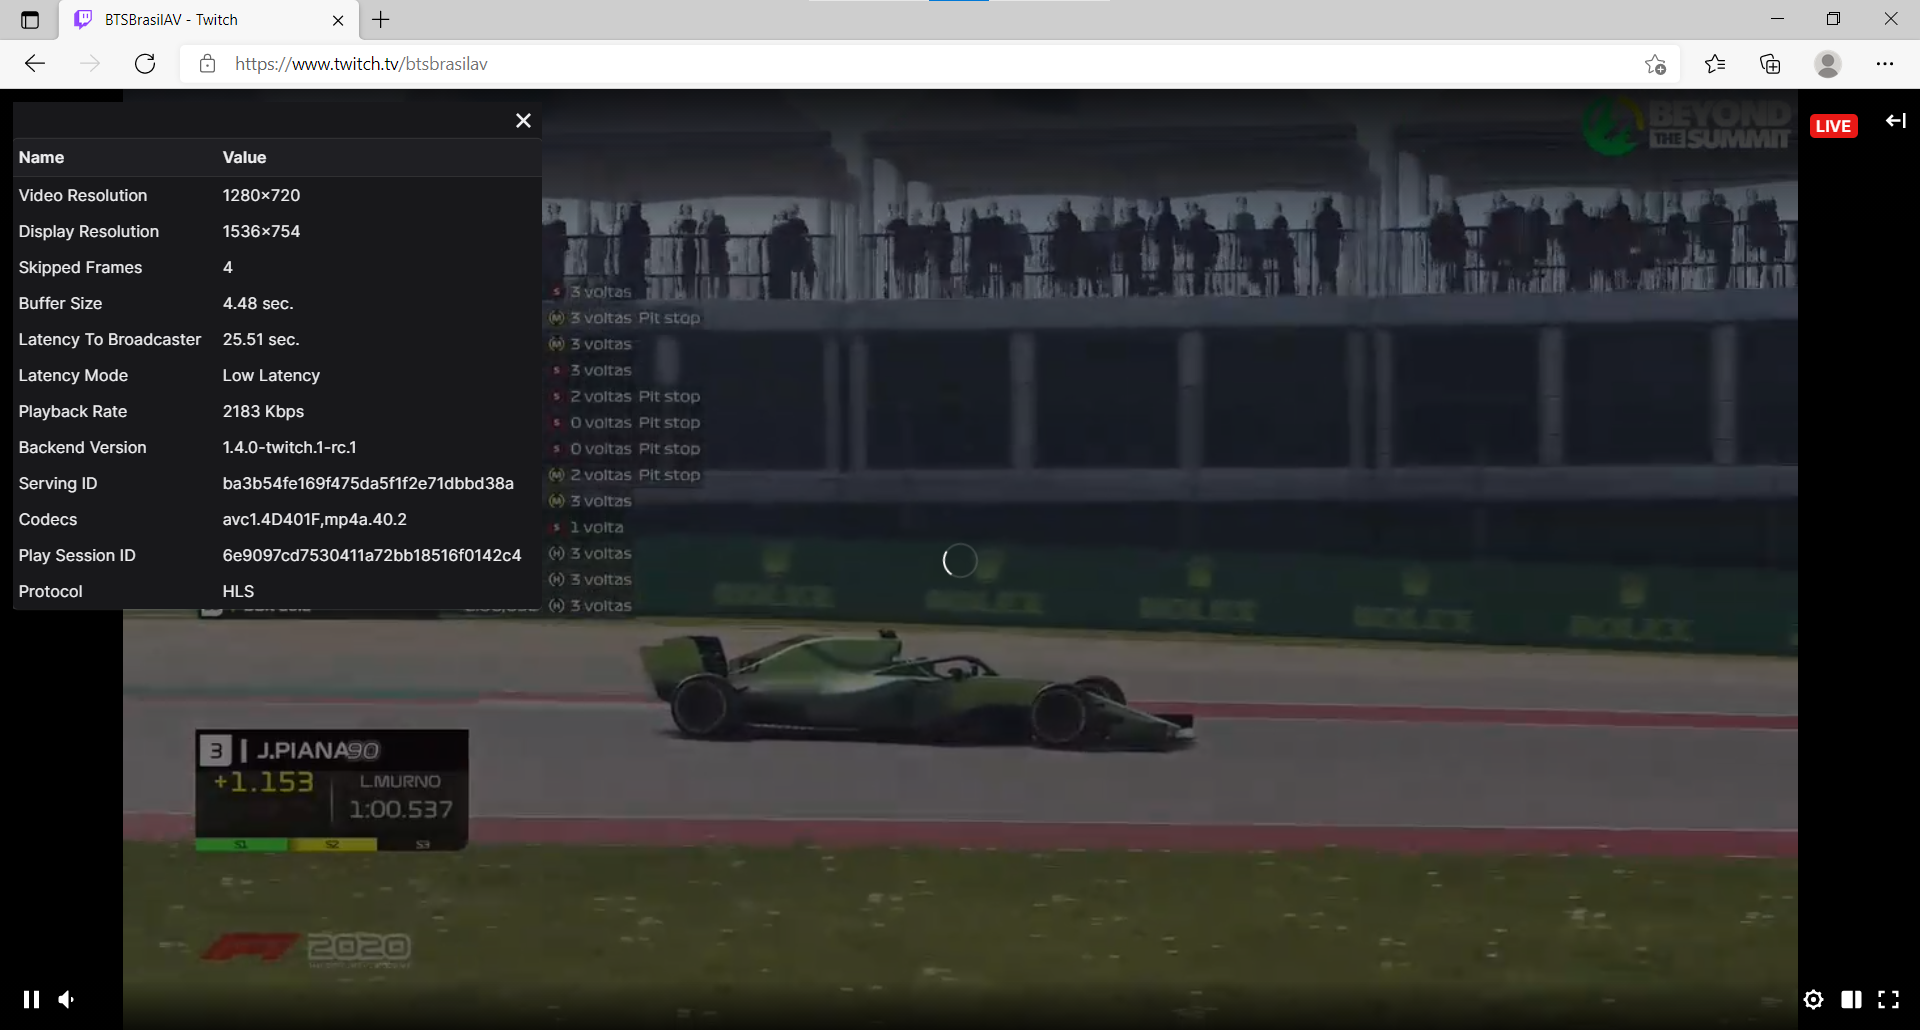
- Choose 720P quality which consumes over 2000kbps.
- ▲The picture above shows an example of watching streaming video over APP bandwidth limit keeps lagging.
1. Go to Bandwidth Management >> Bandwidth Limit and click "Add" to start the configuration.
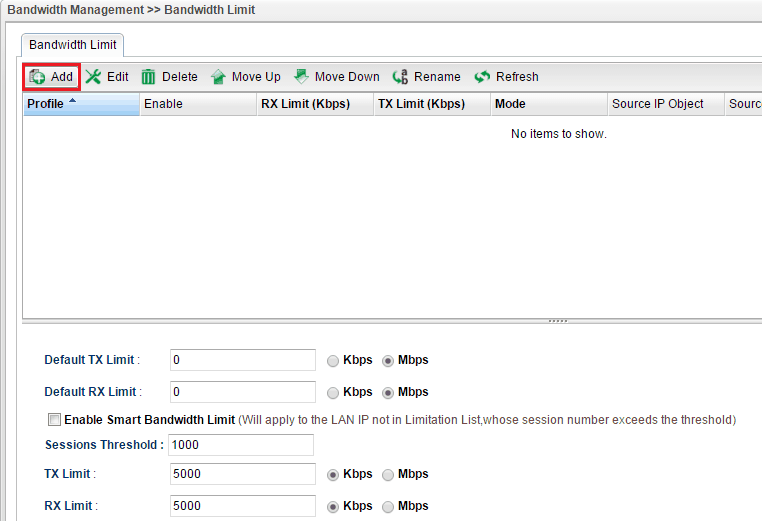
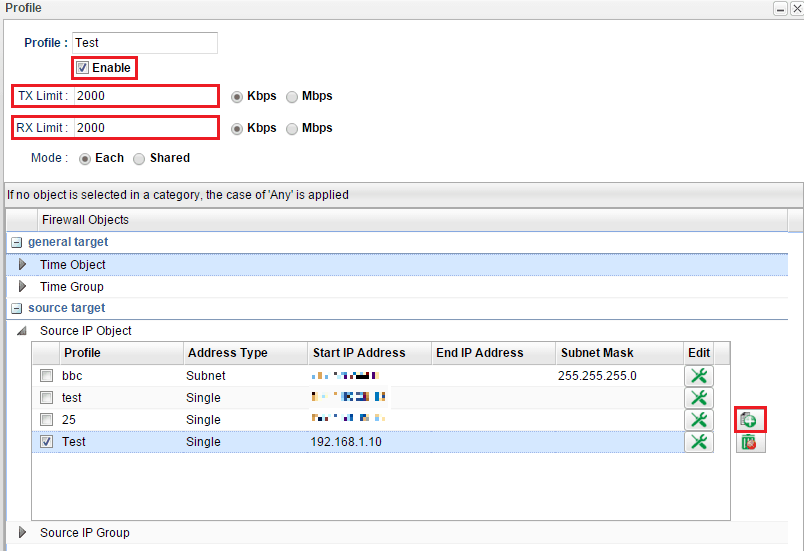
2. Set up the new rule as follows,
- Enter the profile name
- Check Enable
- Customize the TX (upload) Limit and RX (download) Limit
- Select Each or Shared Mode. (Each: Bandwidth Limit for each LAN client; Shared: Total
- Bandwidth Limit for a group of LAN clients)
- Go to source target and click the "+" icon to specify the IP address that should follow this rule
- Click Apply to save
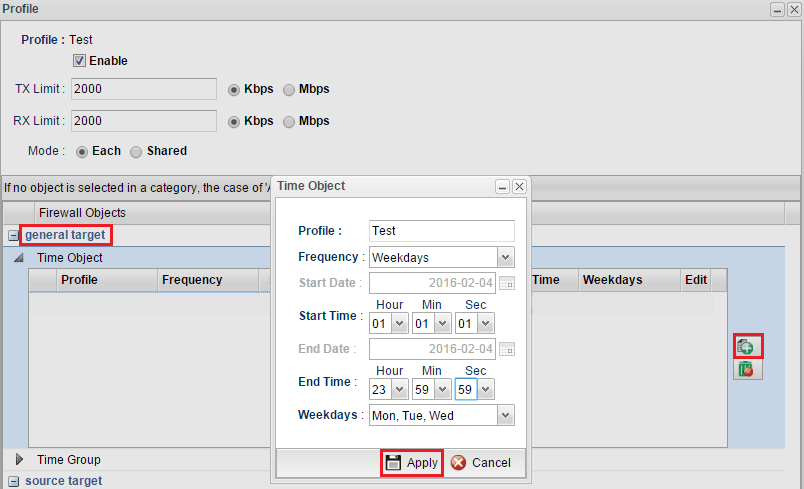
3. Bandwidth Limit can also be used with a schedule to restrict LAN clients' bandwidth usage only at a particular time. In the profile:
- Go to generate target >> Time Object
- Click the "+" icon to create a time object
- Set profile name, frequency, Start Time, and End Time
- Click Apply to save
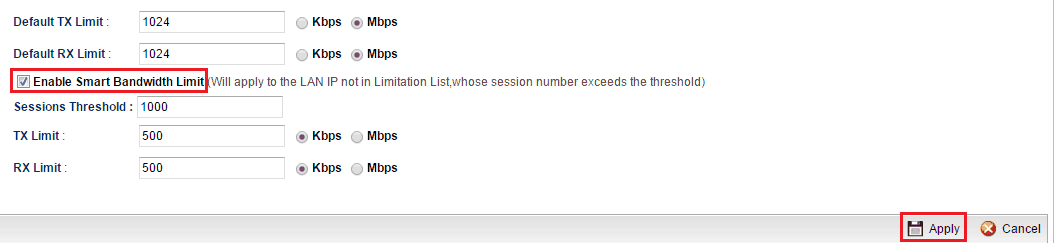
4. Furthermore, you may enable Default TX/RX Limit to apply restrictions the other unspecified LAN clients.
5. We can also enable Smart Bandwidth Limit to restrict the bandwidth of unspecified LAN clients only when their session number is over the threshold.
Data Flow Monitor
To check the bandwidth usage of each client, go to Diagnostics >> Data Flow Monitor and enable the monitor then we can check the transmission rate.

Published On:2016-05-17
ShareWas this helpful?