Vigor Router provides multiple IP subnets, which allows different groups of LAN clients to use a different range of IP address. More IP subnets are available when VLAN (Virtual LAN) is configured to partition the LAN clients.With a switch that supports VLAN tag, devices in different VLANs can all access the router from one LAN port, while the router can differentiate the traffic by the tags they are carrying. This article introduces how to use multiple subnets with tag-based VLAN.

Vigor Router Setup
1. Go to LAN >> VLAN, Enable VLAN Configuration. Create VLANs by selecting the LAN Port members and LAN Subnet, enabling VLAN Tag, and entering a unique VLAN ID for each VLAN. In the following example, LAN port 2 is the port to where the switch is going to connect. (Note: It is recommended to have a VLAN that has VLAN tag disabled so that the router still accepts untagged traffic on specific ports.)
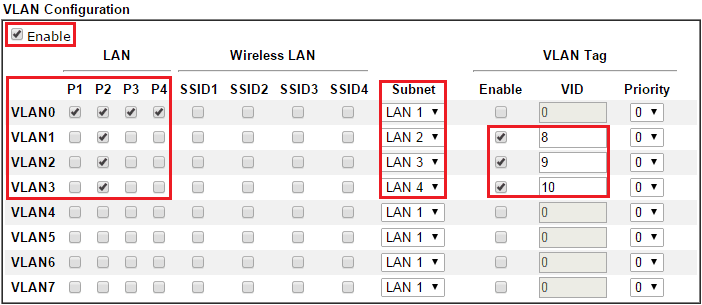
The above configuration implies that all the untagged inbound traffic, no matter which LAN port it is coming from, belongs to Subnet LAN 1. And only Port 2 accepts traffic from different VLANs, where traffic tagged "8", "9", "10" belongs to Subnet LAN2, LAN3, LAN4 respectively.
2. At LAN >> General Setup, check the Enable box of LAN 2, LAN 3 and LAN 4. Then click OK to save the configuration and reboot the router. You may edit the detailed network and DHCP configuration from "Details Page".

VigorSwitch Setup
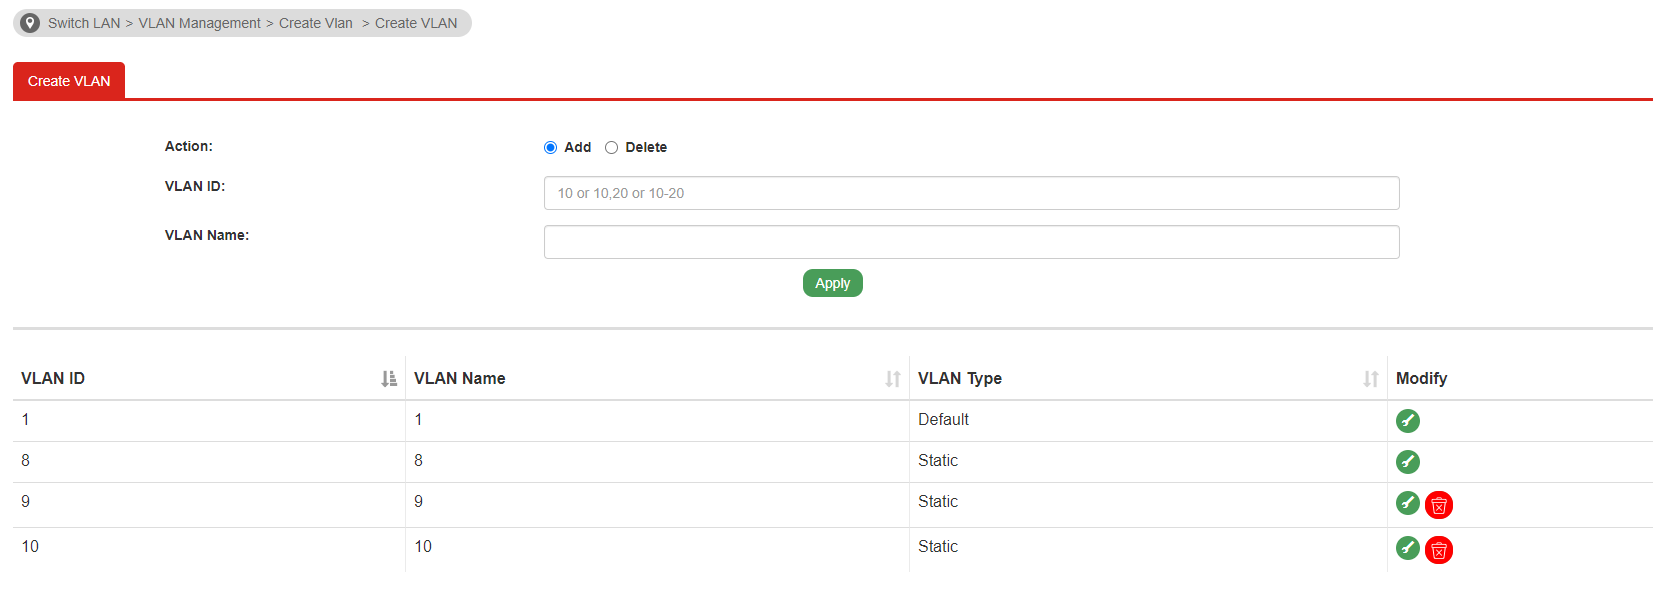
3. Go to Switch LAN>>VLAN Management>>Create VLAN, creating VLANs on VigorSwitch. Select “Add” as action and enter in tag number and VLAN name. The tag number should correspond to the tag set up on VigorRouter.
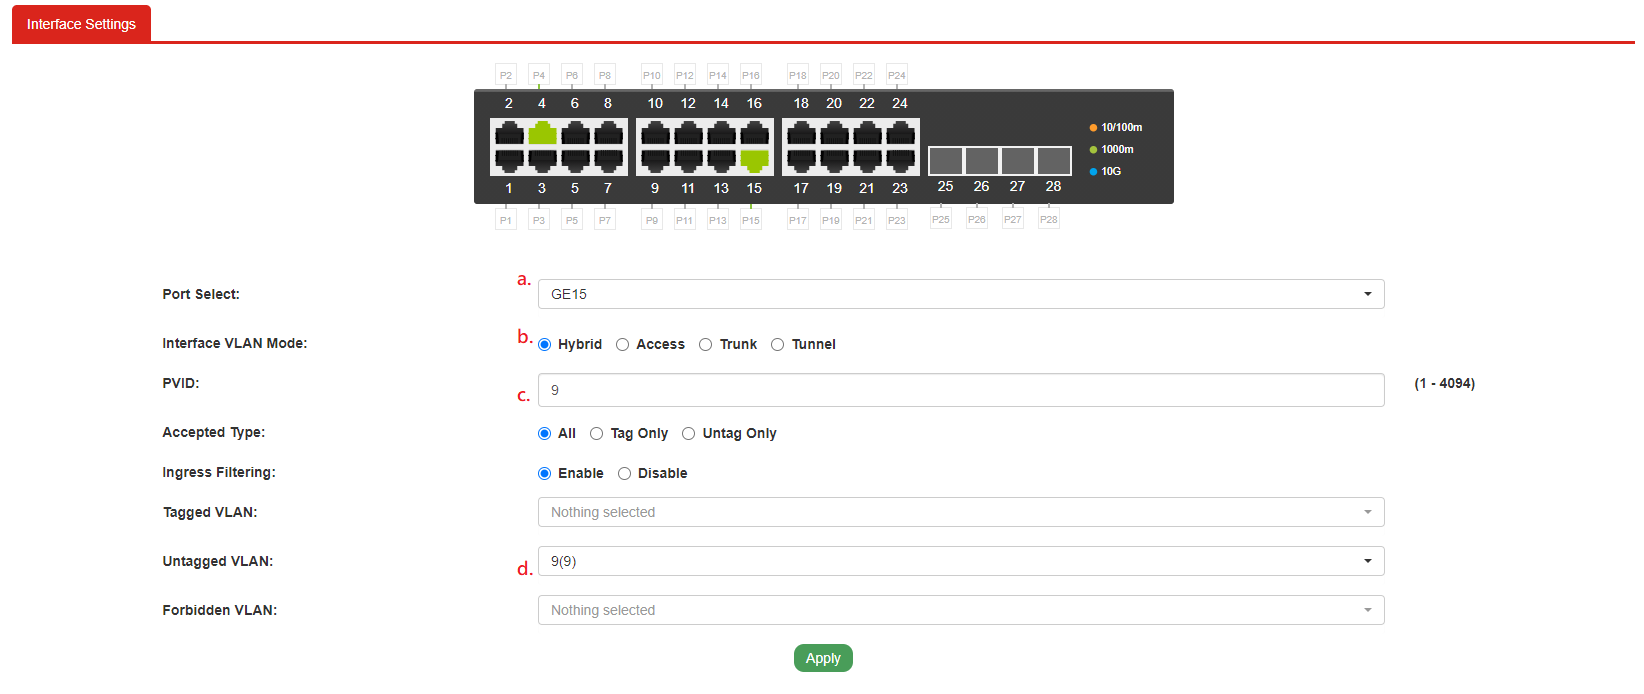
4. Go to Switch LAN>>VLAN Management>>Interface Settings.
-
Set up the ports as Port Select. Here I take GE15 for example.
-
Select Access as Interface VLAN mode.
-
Enter in the VID into PVID. Please note that the PVID should correspond to VID.
-
Click Apply.
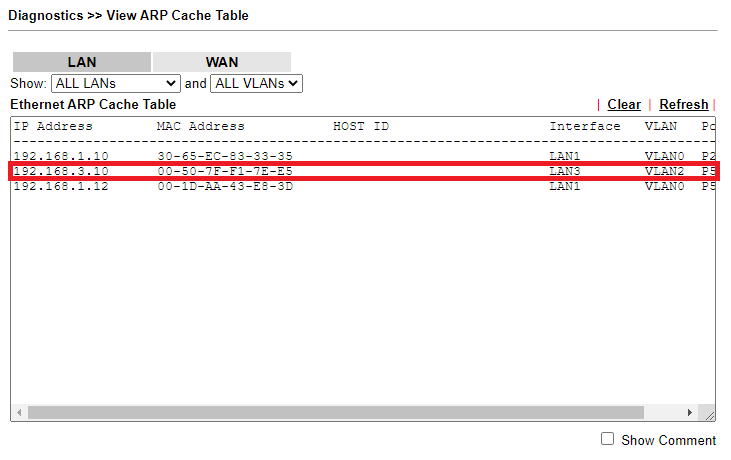
With the above configuration, the device connecting to the Port 15 of the switch belongs to Router's Subnet LAN3 and should get an IP address in subnet 192.168.3.0/24. And we can see it on the VigorRouter ARP table.
Vigor Router Setup
1. Add a new VLAN via LAN >> Switch >> 802.1Q VLAN, edit the profile as follows:
- Input VLAN ID (VLAN ID for each VLAN must be unique)
- Select Member for this VLAN Group. In this example, we will use LAN_Port_1 as the trunk port connecting to the switch, so each VLAN Group should have LAN_Port_1 as Member.
- Untag should set to None for the new created VLAN Groups.
- Apply the settings.
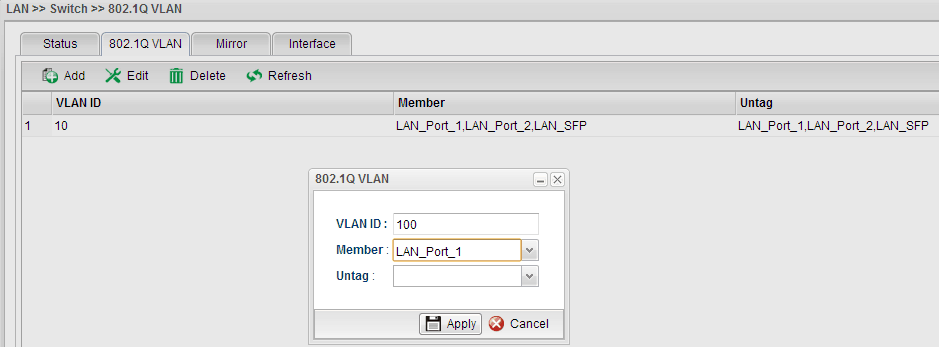
2. Add another 802.1Q VLAN with the same steps.
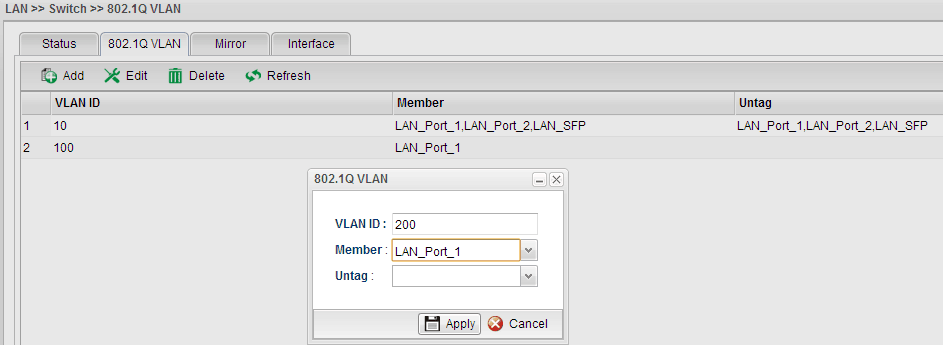
3. After the above configurations, there will be three VLAN groups on the router.

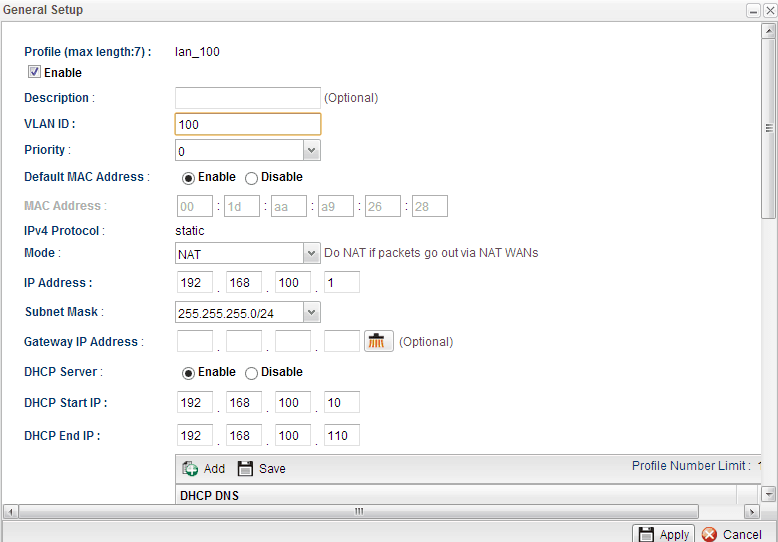
4. Add a new LAN profile for VLAN ID 100 from LAN >> General Setup, and edit the profile as follows:
- Input Profile Name
- Input the VLAN ID as 100
- Input the LAN IP address
- Input DHCP Server Start and End IP
- Apply the configurations
5. Add another LAN profile for VLAN ID 200 with same steps.
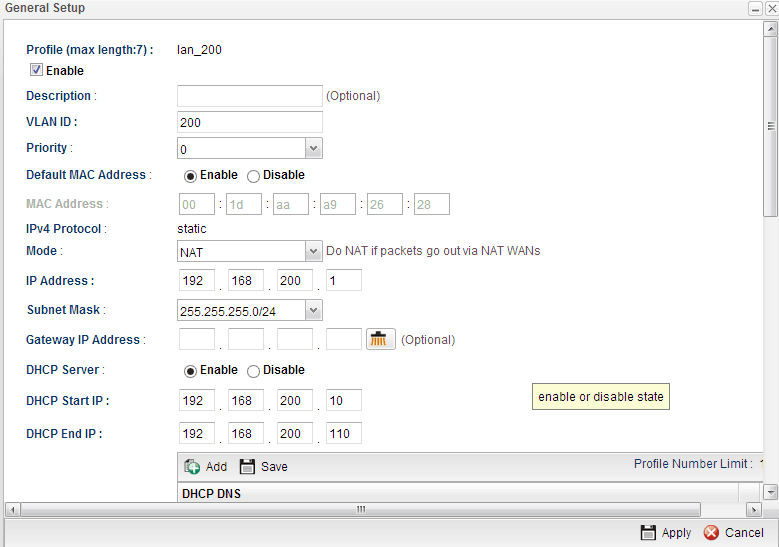
6. After the above configurations, Vigor3900 now has three LAN profiles. When the router receives packets with no tags from LAN_Port_1 and LAN_Port_2, it will assign LAN1 IP address (192.168.1.x) to the host; when receives packets with VLAN ID 100, it will assign LAN_100 IP address (192.168.100.x) to the host; when receives packets with VLAN ID 200, it will assign LAN_200 IP address (192.168.200.x) to the host.

However, since PC doesn't send packets with VLAN tags, we need a switch to add VLAN ID 100 or VLAN ID 200 for hosts belongs to different VLAN.
VigorSwitch Setup
Here we use a VigorSwitch G2260 for example.
1. Add two VLANs for VLAN ID 100 and 200 from VLAN Membership settings. In this example above, Port 1 to Port 4 belongs to VLAN 100. Port 5 to Port 8 belong to VLAN 200. Other ports belong to the default VLAN (no TAG).
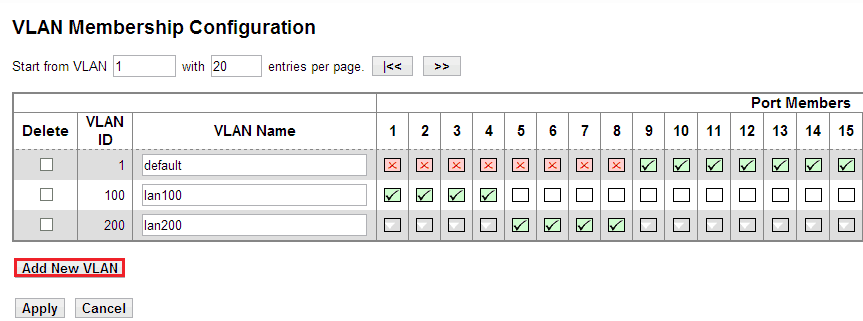
2. In this example, we will use Port 24 of the switch as the trunk port and connect to Vigor3900 LAN Port 1, so Port 24 must be a member to all VLAN Groups.

3. Port 1 to Port 8 don't belong to the default VLAN group (untagged), so we need to uncheck these Ports from the default VLAN group.

4. Configure Port PVID. In this example, the PVID for Port 1 to Port 4 should be 100, and the one for Port 5 to Port 8 should be 200.
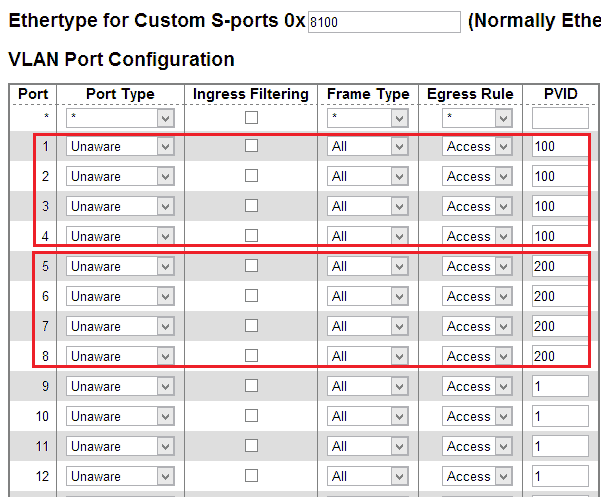
5. Port 24 is the port to connect to the router, so please configure it as "S-custom-port" for port type and "Hybrid" for egress rule.
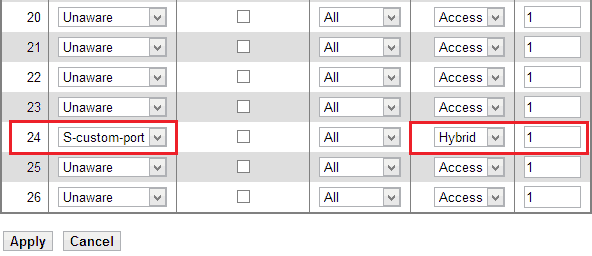
With the above configurations, the switch will add VLAN ID 100 for the packets sending out from Port 1 to Port 4. While switch receives packets with VLAN ID 100, it will untag VLAN ID 100 before sending the packets back to PC on Port 1 to Port 4.
Now, we've set up three LAN networks with Vigor3900 and a managed switch. PC on Port 1 to Port 4 of the switch will belong to Vigor3900 LAN_100; PC on Port 5 to Port 8 of the switch will belong to Vigor3900 LAN_200; PC on Port 6 to Port 23 of VigorSwitch will belong to Vigor3900 LAN 1.
Published On: 2015-11-18
Was this helpful?
