
Local Network Setup and Management
This article introduces the LAN configuration of Vigor Router, including the basic TCP/IP settings, the DHCP options, and the VLAN configuration.
Contents
- Router's LAN Interface
- TCP/IP Settings
- DHCP Server Options
- Bind-IP-to-MAC (DHCP Reservation)
- DHCP Relay
- Virtual LAN & Multiple Subnet
- VLAN Configuration
- Inter-LAN Routing
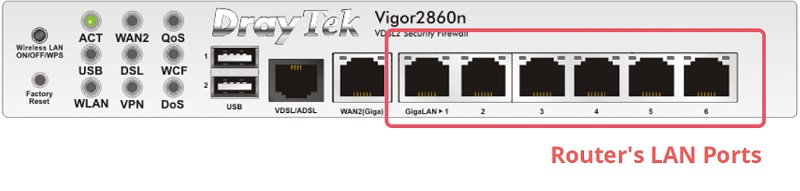
Router's LAN Interface
A router usually has two types of interface, the WAN (Wide Area Network) interface, and LAN (Local Area Network) interface. While WAN is the interface for connecting to the ISP and the Internet, LAN is the interface for communicating with the private network. Vigor Router usually has more than one LAN port, but keep in mind that all of the LAN ports are sharing the same MAC address, so you should regard them as a single interface. Without the VLAN (Virtual LAN) settings, there is no difference between the LAN ports.
TCP/IP Settings
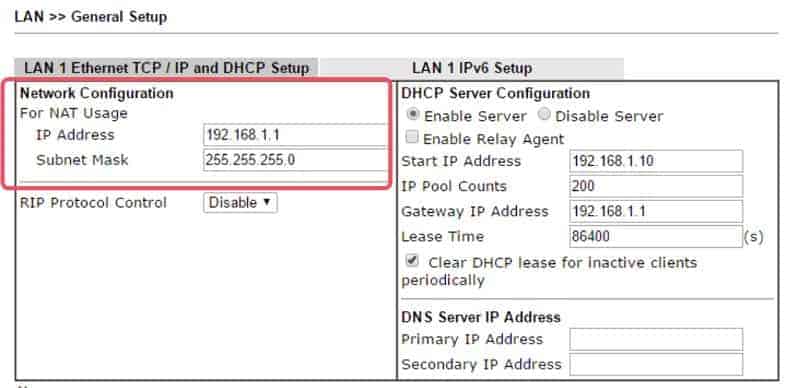
On LAN >> General Setup >> LAN 1 Details page, you can change the IP settings. Network Administrators may use any IP subnet that is preferred, as long as it does not conflict with the WAN IP settings. By default, Vigor Router uses the subnet 192.168.1.0/255.255.255.0 for the LAN interface, and 192.168.1.1 for itself. With such configuration, to access the router from its LAN, the network interface of the PC should be configured with an IP address also in the 192.168.1.0/255.255.255.0 subnet.
DHCP Server Options
The IP configuration on the LAN hosts can be done by DHCP (Dynamic Host Configuration Protocol). DHCP is a very common protocol which allows a DHCP server on the network to distribute the necessary configuration to the DHCP clients automatically, thus reducing the need for configuring the settings on LAN hosts individually.
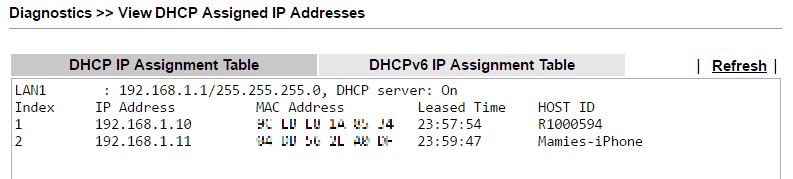
Vigor Router is by default a DHCP Server, so if a PC has its network interface configured as “Obtain an IP address automatically,” it will get an IP address from the router when it connects to the router's LAN. On Diagnostics >> DHCP Table page, Network Administrator may check the IP addresses assigned and the MAC address of the device which is using the IP address.
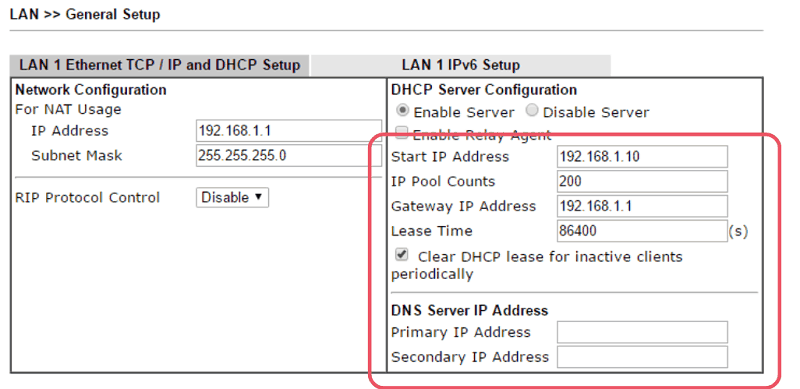
On the router, the DHCP Server Configuration can be customized at LAN >> General Setup >> LAN 1 Details page. The network administrator may specify the range of IP address to be allocated by configuring “Start IP Address” and “IP Pool Counts.” You can also set other common DHCP server options, such as the Gateway IP, Lease Time, and DNS Server on the same page. For advanced options, go to LAN >> General Setup >> DHCP Server Option (Advanced) Page to identify the option number, data type, and the value. (Visit DHCP Server Option for Vigor Router for some examples.)
Router assign DNS server of DHCP by the following order:
1. DNS server setting in LAN profile.
2. DNS server setting in force-specified LAN profile(LAN>General Setup).
3. DNS server on primary WAN interface.
4. DNS server setting in LAN1 profile.
5. Router LAN IP.
Note: Router default DNS servers are 8.8.8.8 & 8.8.4.4
Bind-IP-to-MAC (DHCP Reservation)
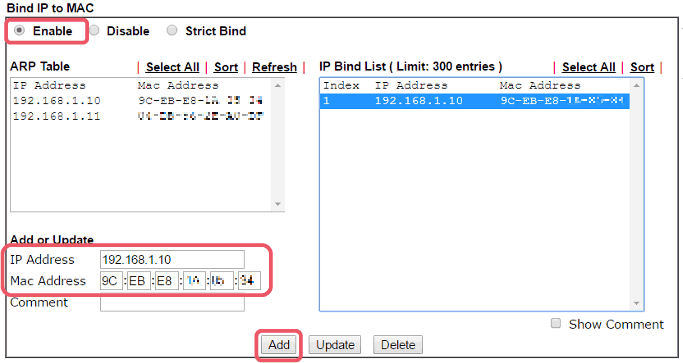
The IP address obtained by DHCP is dynamic. The DHCP lease has an expiration time, and the IP address will be reclaimed by the DHCP server and may be allocated to other devices when the lease expires. However, Vigor Router supports “Bind-IP-to-MAC” which allows Network Administrator to reserve an IP address for certain MAC address and exclude the IP address from the IP pool; on the other hand, the device of certain MAC address will always obtain the reserved IP address., therefore can get a fixed IP address through DHCP. Bind IP to MAC is useful when there are service-critical devices on the network, such as a printer, which may need a fixed IP address but does not have the interface for manual configuration. To set up Bind-IP-to-MAC, go to LAN >> Bind IP to MAC, select “Enable” and add entries into the “IP Bind List.” (For more details, visit Introduction to Bind IP to MAC)
DHCP Relay
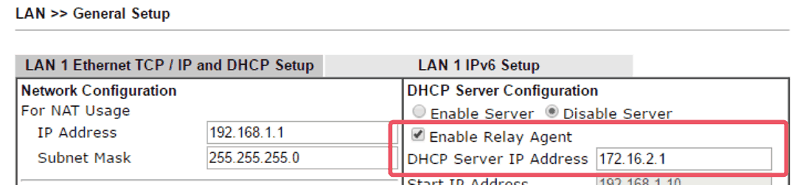
On LAN >> General Setup >> LAN 1 Details page, Network Administrator may turn off the router's DHCP Server function by selecting “Disable Server.” If DHCP Server is disabled, the hosts will need to configure an IP address manually to join the LAN network; sometimes this can add a layer of security to your private network. You can also configure the Vigor Router to be a DHCP Relay Agent. When “Enable Relay Agent” is enabled, the router will not reply the DHCP requests but forward them to the DHCP Server specified at “DHCP Server IP Address” instead.
Virtual LAN & Multiple Subnet
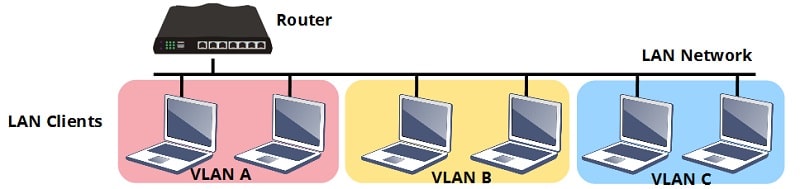
Virtual LAN (VLAN) is commonly implemented to partition the local network and divide the broadcast domain. By adding a VLAN tag to the packets and indicate the VLAN ID, traffic from or to specific VLAN can be differentiated; therefore we can logically separate the LAN clients who physically are on the same network. VLAN allows the network administrator to control the access to a particular part of the network. For example, we may create a VLAN for the staff and another for the guests, then we can allow both the staff and guests to be connected to the same router but ensures that the guests will not have access to the staff-only resources. Another benefit of setting up VLAN is to partition the broadcast domain. VLAN will reduce the nodes that the broadcast packets can reach and thus prevent too much broadcast traffic among the network.
Vigor Router is compatible with 802.1Q VLAN; moreover, it supports multiple subnets, which means the router can use different TCP/IP and DHCP settings to communicate with clients from different VLANs. With multiple subnets, we not only can separate the LAN clients into different groups but also use different IP subnet for each group; this helps Network Administrator to apply group-based policies efficiently, since many of the router's applications (e.g., Firewall, QoS, Policy-based Routing) can be configured base on the IP subnet.
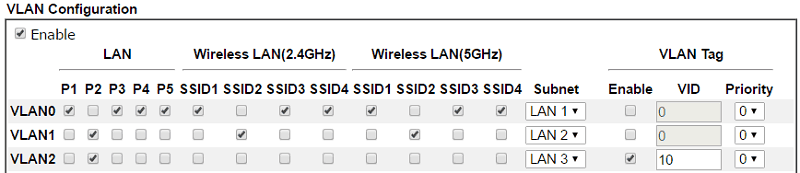
VLAN Configuration
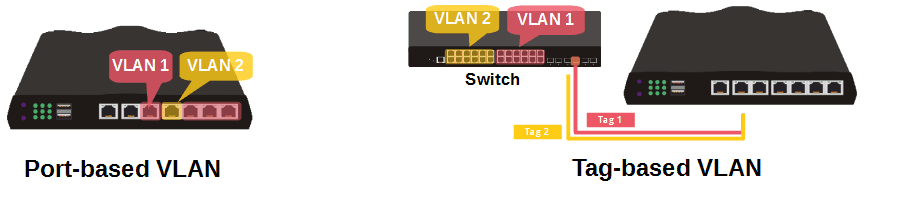
On Vigor Router, we may divide the router's LAN ports into different VLANs. For the cases that a LAN port will be connecting to only one VLAN, we simply specify which VLAN does the LAN port belong to, then the router can differentiate the traffic by which port it receives them. It is also known as “port-based VLAN.”
However, if there is a VLAN-supported device on the network, for example, a managed switch, the router may accept more than one VLAN through a single LAN port, then that LAN port should be members of multiple VLANs. In this case, the network administrator will need to specify the VLAN tag of each VLAN (one of them can be untagged) and make sure the traffic received by the router still keep the VLAN tag so that the router can differentiate the traffic by the VLAN ID on their VLAN tag. It is also known as “tag-based VLAN”.
To create VLAN on Vigor Router, go to LAN >> VLAN,
- Check “Enable” to enable VLAN configuration on the router.
- Choose an available VLAN, select the physical port member (and SSID members for Wi-Fi models) of this VLAN.
- Select a LAN Subnet to determine which IP network settings should the router use on this VLAN.
- Enable VLAN Tag and enter a number as VLAN ID (VID) if necessary. It is required if one of the port members is also a member of another VLAN.
- Click “OK” to save the settings.
- If you use a Subnet other than LAN1, go to LAN >> General Setup to enable that LAN Subnet. You may also configure its TCP/IP and DHCP configurations in “Details Page.” (Visit Use Multiple LAN Subnets with Port-Based VLAN and Use Multiple LAN Subnets with Tag-Based VLAN for some configuration examples.)
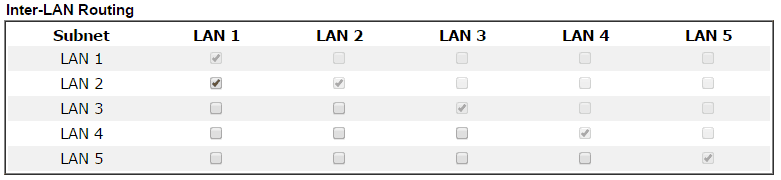
Inter-LAN Routing
Note that the clients belong to different VLAN are not able to access each other by default. However, to allow traffic across VLAN, we can enable “Inter-LAN Routing” on the bottom of LAN >> General Setup, this is an option when the VLAN was created to separates the IP range but not to block the LAN clients from each other.
Summary
In summary, on LAN >> General Setup >> Details page, we can configure the TCP/IP settings as well as the DHCP server options. Vigor Router is a DHCP server by default, and it can be turned off or be a DCHP relay agent to forward the DHCP request to another DHCP server. Vigor Router is compatible with 802.1Q VLAN, we can have either port-based VLAN or tag-based VLAN setup on the router, and the router provides multiple subnet which allows us to have different TCP/IP settings and DHCP server configuration for each VLAN.
Published On:2017-06-19
ShareWas this helpful?