
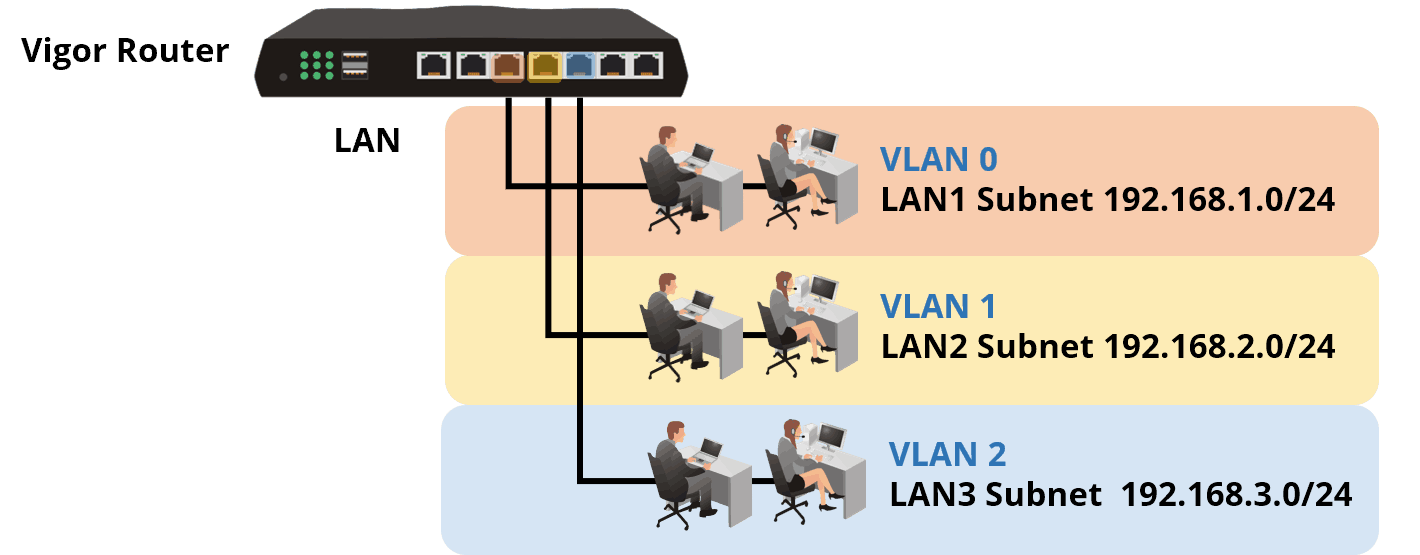
Use Multiple LAN Subnets with Port-Based VLAN
Vigor Router provides multiple IP subnets, which allows different groups of LAN clients to use a different range of IP address. More IP subnets are available when VLAN (Virtual LAN) is configured to partition the LAN clients. This article introduces how to use multiple subnets with port-based VLAN.
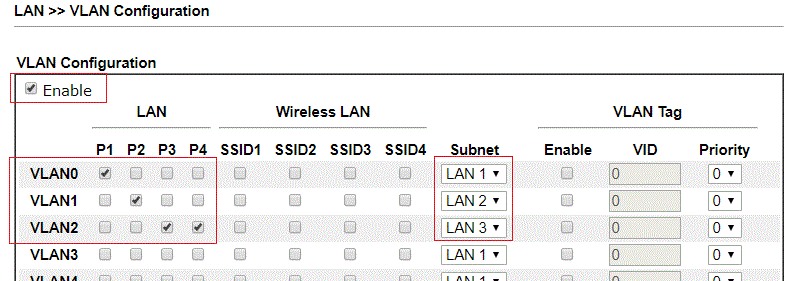
1. Suppose we would like to use three LAN subnets on the router. At LAN >> VLAN Configuration page, and check Enable set the VLAN as follows:
- For "VLAN0", select Port 1 as a member, and set Subnet to "LAN1".
- For "VLAN1", select Port 2 as a member, and set Subnet to "LAN2".
- For "VLAN2", select Port 3 and Port 4 as a member, and set Subnet to "LAN3". (Note that once VLAN configuration is enabled, make sure every LAN port is a member of at least one VLAN.)
2. At the page of LAN >> General Setup, check the "Enable" box of LAN2 and LAN3. Then click OK to save the configuration and reboot the router.
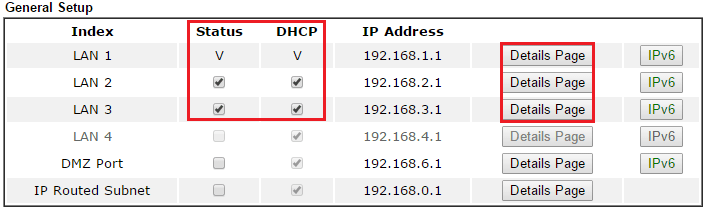
3. You can edit the detailed IP and DHCP settings by entering Details Page.

With the above configuration, the device connecting to LAN Port 1 will belongs to LAN1, and get an IP address in the 192.168.1.0/24 subnet; The device connecting to LAN Port 2 will belongs to LAN2, and get an IP address of 192.168.2.0/24 subnet; The device connecting to LAN Port 3 and Port 4 will belong to LAN3 and get an IP address in 192.168.3.0/24 subnet.
- Go to Configuration / LAN / LAN Networks, click “Add” to create LAN Networks as follows:
- Enter a Name of the LAN Network.
- Enter the private IPv4 Address.
- Setup DHCP Server Configuration.
- Click Apply to save the profile.
- Go to Configuration / LAN / VLAN List, click “Add” to create VLAN ID as follows:
- Input the VLAN ID number in range 1~4096.
- Enter a Name of the VLAN
- Select the LAN network we just created.
- Click Apply to save the profile.
- Go to Configuration / LAN / Interface VLAN, configure the Interface VLAN Settings as follows:
- For Port 1, select “Access” as Port Type and set 1 as Untagged VLAN.
- For Port 2, select “Access” as Port Type and set 2 as Untagged VLAN.
- For Port 3, select “Access” as Port Type and set 3 as Untagged VLAN.


With the above configuration, the device connecting to LAN Port 1 will belong to LAN1 and get an IP address in the 192.168.1.0/24 subnet; the device connecting to LAN Port 2 will belong to LAN2 and get an IP address in the 192.168.2.0/24 subnet; the device connecting to LAN Port 3 will belong to LAN3 and get an IP address in the 192.168.3.0/24 subnet.
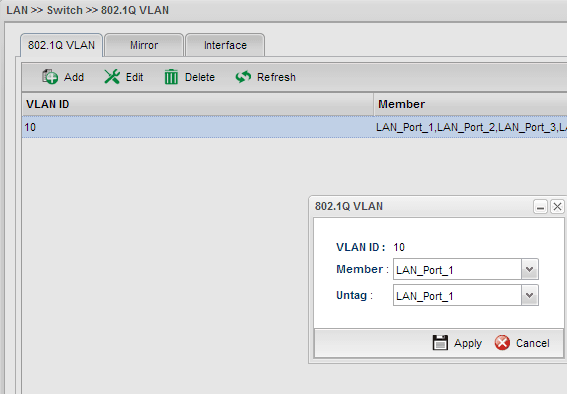
1. Edit the default 802.1Q VLAN ID 10 via LAN >> Switch >> 802.1Q VLANas follows:
- In Member, un-select LAN_Port_2, LAN_Port_3 and LAN_Port_4, leave only LAN_Port_1
- In Untag, un-select LAN_Port_2, LAN_Port_3 and LAN_Port_4, leave only LAN_Port_1
- Apply the settings.
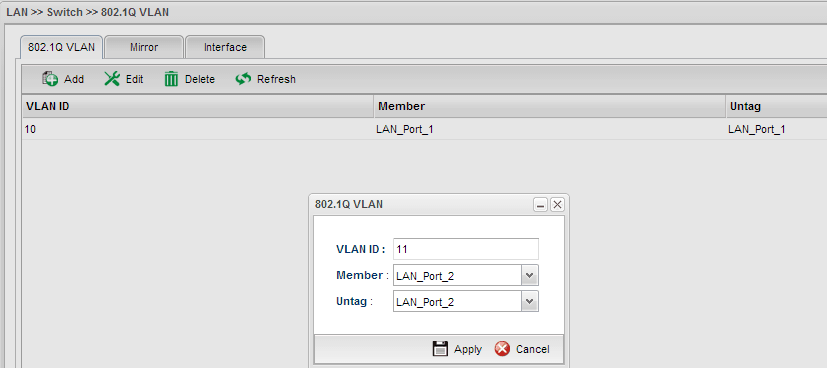
2. Add a new 802.1Q VLAN via LAN >> Switch >> 802.1Q VLAN, edit the profile as follows:
- Enter VLAN ID as 11
- Select LAN_Port_2 as Member
- Select LAN_Port_2 as Untag
- Apply the settings.
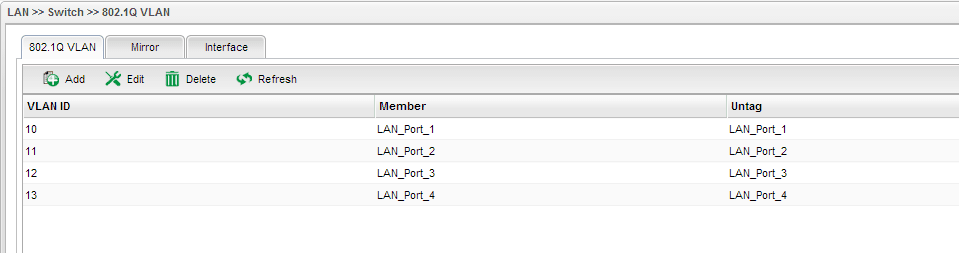
3. Add two more 802.1Q VLAN groups for VLAN ID 12 and VLAN ID 13 with the same steps. After completing the above configurations, there will be 4 VLAN groups.
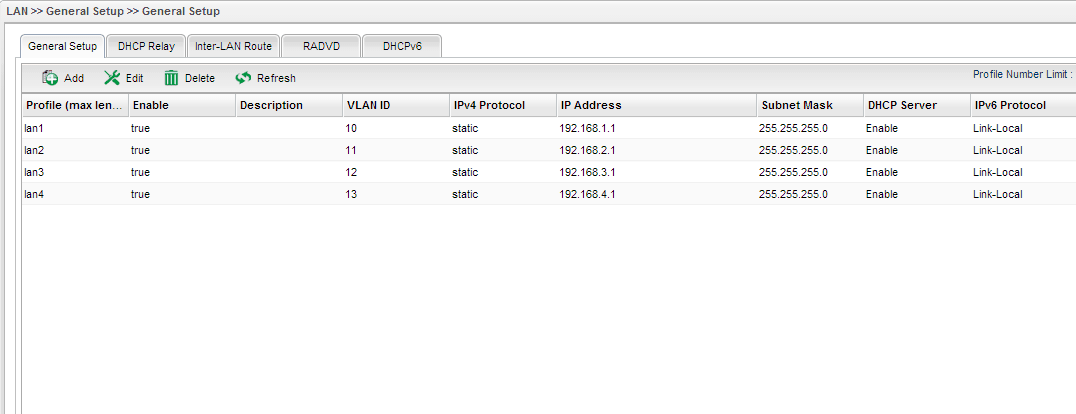
4. Add a new LAN profile with VLAN ID 11 via LAN >> General Setup page, edit the profile as follows:
- Input LAN Profile Name
- Input the VLAN ID
- Input the LAN IP address as 192.168.2.1
- Input DHCP Server Start IP and End IP as 192.168.2.x
- Apply the configurations

5. Similarly, add two more LAN profiles for VLAN ID 12 and VLAN ID 13. After completing the above configurations, the router will have 4 LAN profiles. When a PC connects to LAN Port 1, it will obtain IP 192.168.1.x; when connects to LAN Port 2, it will obtain IP 192.168.2.x; LAN Port 3 for IP 192.168.3.x; and LAN Port 4 for IP 192.168.4.x. By default, the PCs connecting to different LAN ports cannot access each other because they belong to different VLANs.
Published On:2016-05-12
ShareWas this helpful?