
Create multiple Phase 2 SA for IPsec tunnel to connect multiple subnets in one VPN profile
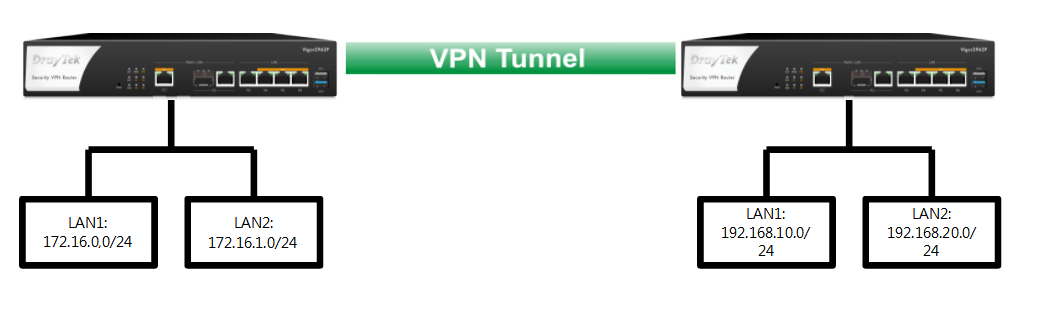
This document introduces how to use the IPsec Multiple SA feature to access more than one remote subnets over one VPN profile. Multiple SA is for connecting to a non-DrayTek VPN server with multiple subnets. When connecting to another Vigor Router with multiple subnets, multiple IPsec SA is not required, we should use the "More" Remote Subnet feature to add additional routes over the same tunnel.
Configuring DrayTek router as a VPN Server
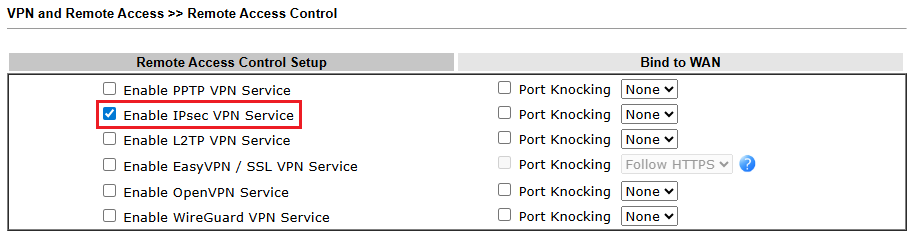
1. Go to VPN and Remote Access >> Remote Access Control. Enable IPsec VPN service.
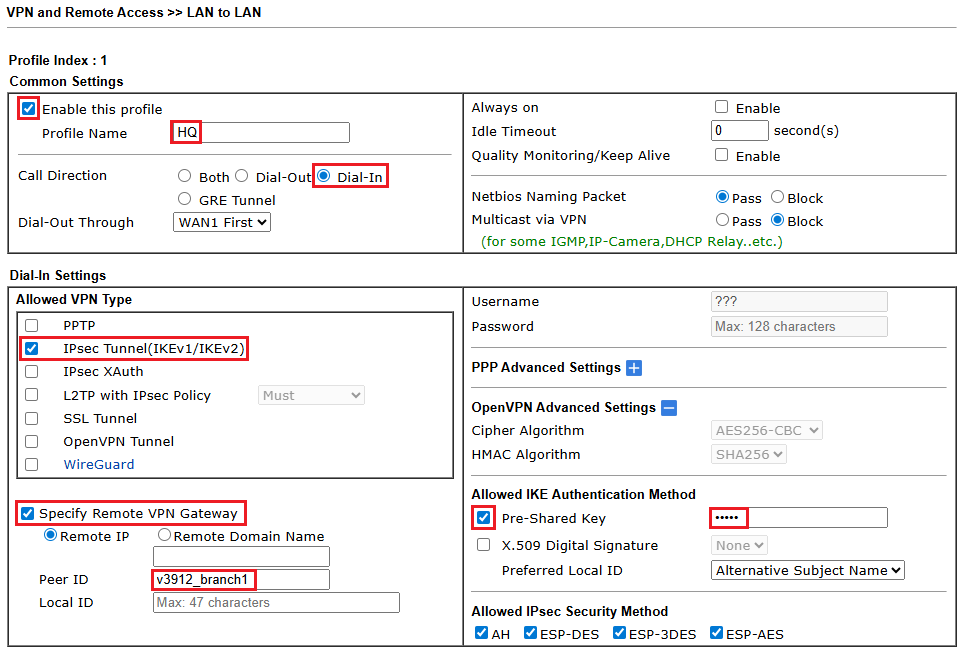
2. Go to VPN and Remote Access >> LAN to LAN. Click on an index number to create a new IPsec profile.

3. Set configurations of IPsec profile.
- Enter a profile name, and check Enable this profile.
- Choose Dial-In for Call Direction.
- Choose IPsec Tunnel(IKEv1/IKEv2) for Allowed VPN Type.
- Check Specify Remote VPN Gateway and define a Peer ID for the VPN client. (If the VPN client is using a static IP, we can enter the client's IP in Remote IP directly without using the peer ID.)
- Check Pre-Shared Key and enter the pre-shared key for this VPN client.
- Enter the local network of the VPN server and the remote network of the VPN client.
- Expand More Remote Subnet menu, then check Create a unique SA for each subnet(IPsec)
- Add the second local network and the remote network.
- Click OK to save the profile.

Configuring DrayTek router as a VPN Client
1. Go to VPN and Remote Access >> Remote Access Control. Enable IPsec VPN service.
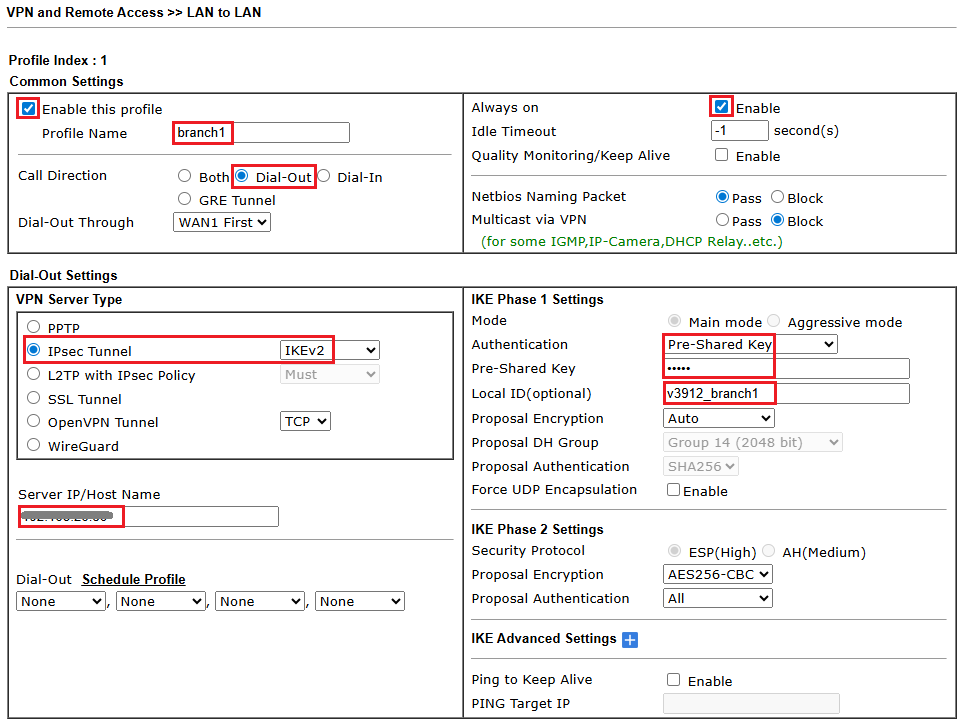
2. Go to VPN and Remote Access >> LAN to LAN. Click on an index number to create a new IPsec profile.
3. Set configurations of IPsec profile.
- Enter a profile name, and check Enable this profile.
- Choose Dial-Out for Call Direction.
- Enable Always on.
- Choose IPsec Tunnel and select IKEv2 for VPN Server Type.
- Enter the remote server address or domain name
- Select Pre-Shared Key for Authentication and enter the pre-shared key configured on the VPN server.
- Enter the Local ID that the VPN server requires. (We can ignore it if the VPN server specifies the VPN peer with the IP or domain name.)
- Enter the local network of the VPN client and the remote network of the VPN server.
- Expand More Remote Subnet menu, then check Create a unique SA for each subnet(IPsec)
- Add the second local network and the remote network.
- Click OK to save the profile.

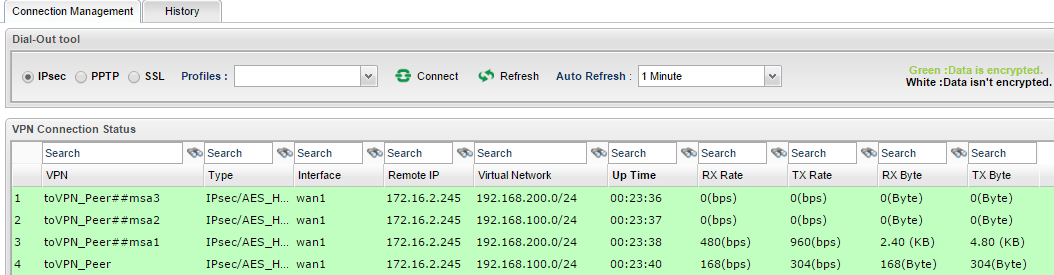
Check VPN connectivity
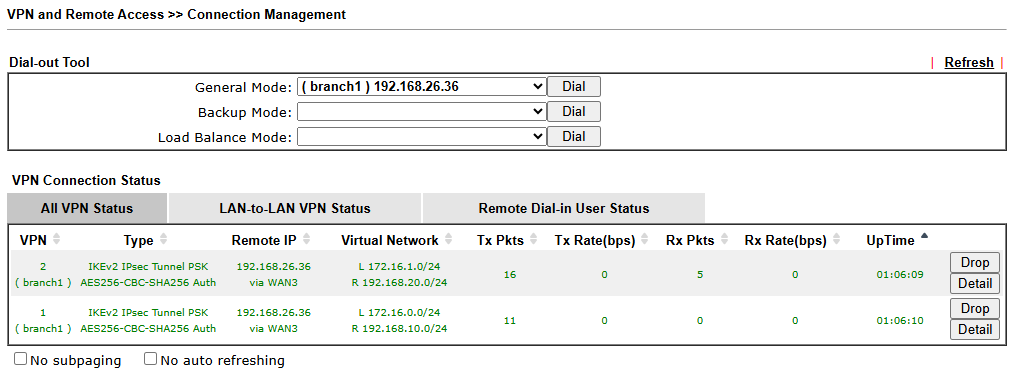
In VPN and Remote Access >> Connection Management, we can see 2 VPN tunnels are established as per VPN network configuration.
This document introduces how to use the IPsec Multiple SA feature to access multiple remote subnets through a single VPN profile. The Multiple SA function is intended for creating an IPsec connection to non-DrayTek VPN servers that have multiple subnets, where each subnet requires a separate Security Association (SA).
When connecting to another Vigor Router with multiple subnets, multiple IPsec SA is not required, we can simply define the subnets using route policy.
This example uses two Vigor2136 routers.
Configuring DrayTek router as a VPN Server
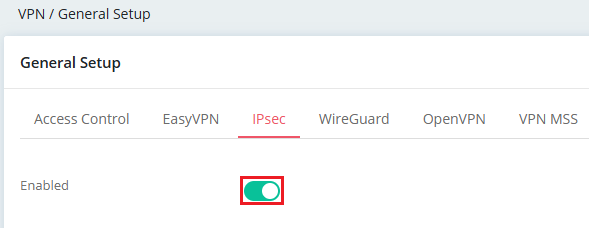
1. Go to VPN / General Setup. Enable IPsec VPN service in the IPsec menu.
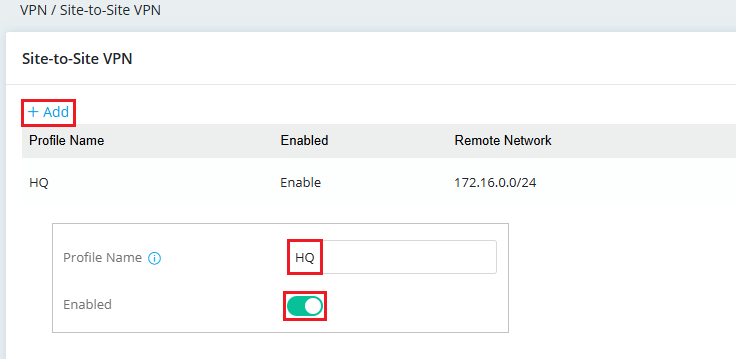
2. Go to VPN / Site-to-Site VPN.
- Click +Add to create a VPN profile.
- Enter the profile name and enable this profile.
General
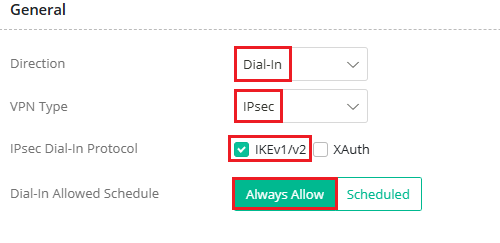
- Select Dial-In for the direction.
- Select IPsec as the VPN type.
- Check IKEv1/v2.
- Choose a dial-in allowed schedule. Here, we choose Always Allow.
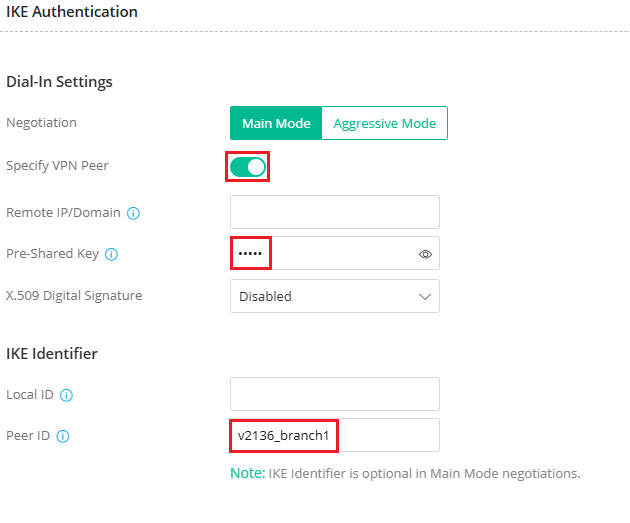
IKE Authentication
- Enable the option Specify VPN Peer.
- Enter the pre-shared key for this VPN client.
- Enter the peer ID for this VPN client. (If the VPN client is using a static IP, we can enter the client's IP in Remote IP/Domain directly without using the peer ID.)
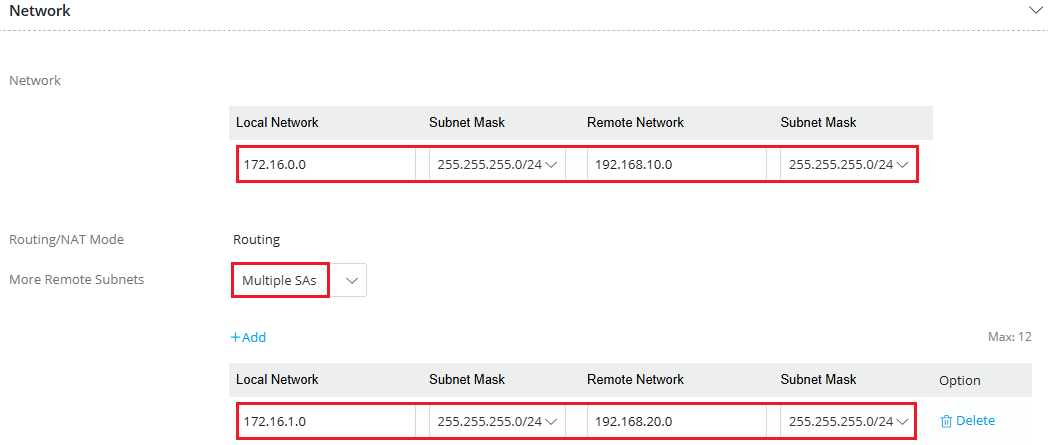
Network
- Enter the local network of the VPN server and the remote network of the VPN client.
- Select Multiple SAs in More Remote Subnets.
- Add the second local network and the remote network.
Click Apply to save.
Configuring DrayTek router as a VPN Client
1. Go to VPN / General Setup. Enable IPsec VPN service in the IPsec menu.
2. Go to VPN / Site-to-Site VPN.
- Click +Add to create a VPN profile.
- Enter the profile name and enable this profile.

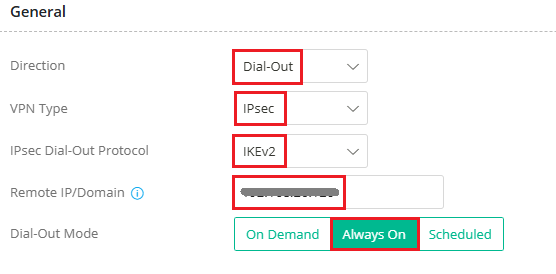
General
- Select Dial-Out for the direction.
- Select IPsec as the VPN type.
- Select IKEv2 as the IPsec dial-out protocol.
- Enter the remote server address or domain name.
- Choose a dial-out mode. Here, we choose Always On.
IKE Authentication
- Choose Pre-Shared Key as the authentication and enter the pre-shared key configured on the VPN server.
- Enter the local ID that the VPN server requires. (We can ignore it if the VPN server specifies the VPN peer with the IP or domain name.)

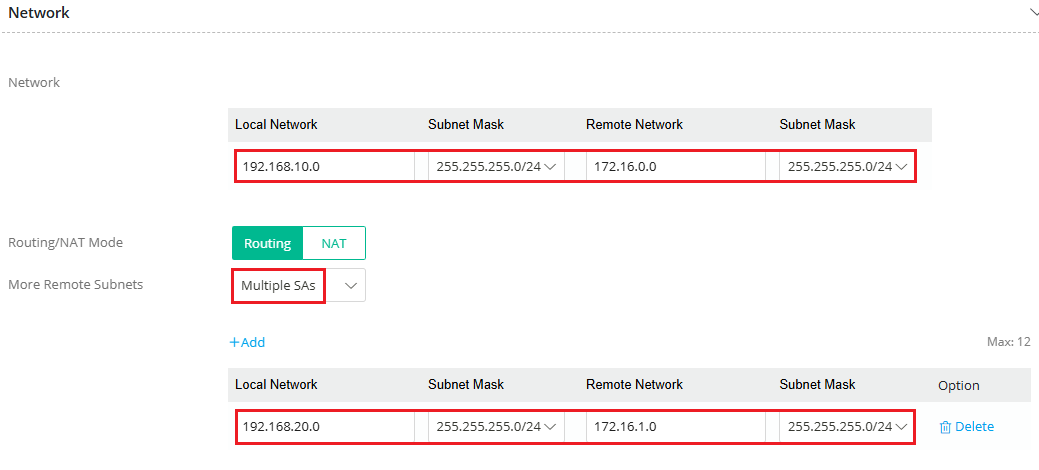
Network
- Enter the local network of the VPN client and the remote network of the VPN server.
- Select Multiple SAs in More Remote Subnets.
- Add the second local network and the remote network.
Click Apply to save.
Check VPN connectivity
In VPN / VPN Connection Status, we can see 2 VPN tunnels are established as per VPN network configuration.

This document introduces how to use the IPsec Multiple SA feature to access more than one remote subnets over one VPN profile. Multiple SA is for connecting to a non-DrayTek VPN server with multiple subnets. When connecting to another Vigor Router with multiple subnets, multiple IPsec SA is not required, we should use the "More" Remote Subnet feature to add additional routes over the same tunnel.
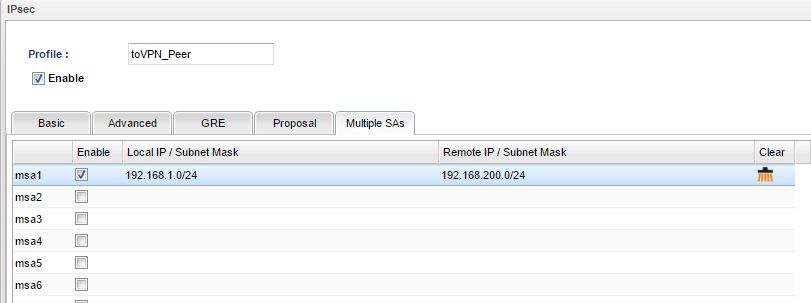
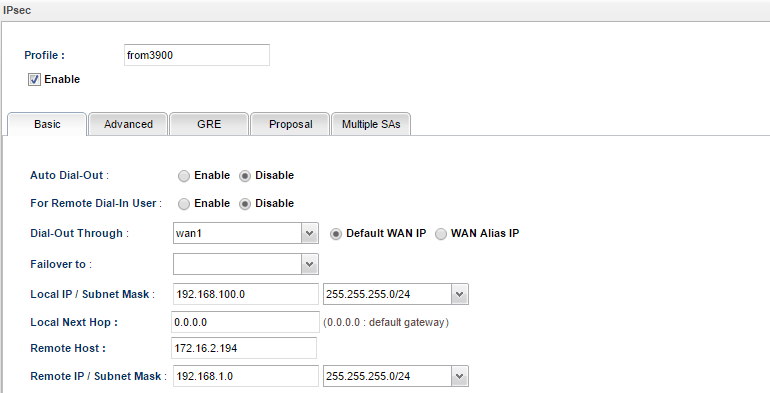
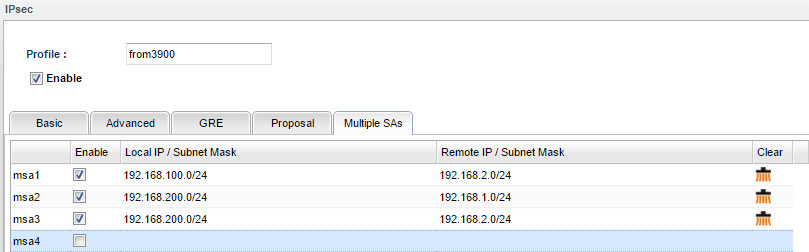
Case 1: Vigor3900 has one local network while the VPN Peer has two
In this example, Vigor3900's LAN network is 192.168.1.0/24. VPN Peer's LAN1 network is 192.168.100.0/24 and LAN2 is 192.168.200.0/24.

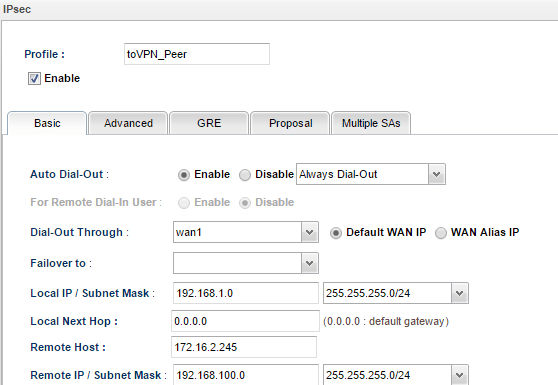
1. In the Basic tab, we may configure Vigor3900's LAN network (192.168.1.0/24) as Local IP/Subnet Mask and VPN Peer's LAN1 network (192.168.100.0/24) as Remote IP/ Subnet Mask.

2. In Multiple SA tab, input Vigor3900's LAN network for Local IP/ Subnet Mask again and VPN Peer's LAN2 network for Remote IP/ Subnet Mask.
3. We need to configure the similar Multiple SA setting or create two IPsec VPN dial-in profiles on the remote site Vigor3900.
4. During IPsec connection establishment, Vigor3900 will create two IPsec SA. One is to encrypt the data between network 192.168.1.0/24 and 192.168.100.0/24. The other is to encrypt the data between network 192.168.1.0/24 and 192.168.200.0/24.
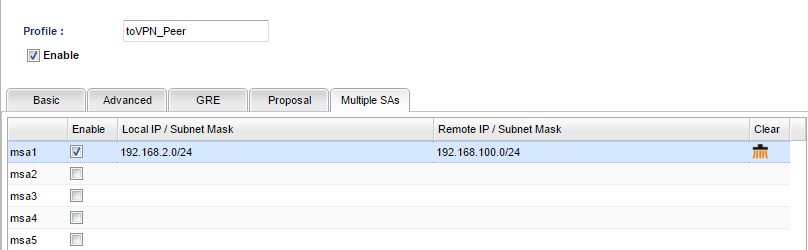
Case 2: Vigor3900 has two local networks while the VPN Peer has one
In this example, Vigor3900's LAN1 network is 192.168.1.1/24, and LAN2 is 192.168.2.1/24. VPN Peer's LAN network is 192.168.100.1/24.

1. In Basic Tab, we may configure Vigor3900's LAN1 network as Local IP/ Subnet Mask, and VPN Peer's LAN network (192.168.100.0/24) as Remote IP/ Subnet Mask.
2. Then in Multiple SA tab, input Vigor3900's LAN2 network and VPN Peer's LAN network.
3. We need to configure the similar Multiple SA setting or create two IPsec VPN dial-in profiles on the remote site Vigor3900.
4. During IPsec connection establishment, Vigor3900 will create two IPsec SA. One is to encrypt the data between network 192.168.1.0/24 and 192.168.100.0/24. The other is to encrypt the data between network 192.168.2.0/24 and 192.168.100.0/24.
Case 3: Both Vigor3900 and the VPN Peer have two local networks
In this example, Vigor3900's LAN1 network is 192.168.1.0/24, and LAN2 is 192.168.2.0/24. VPN Peer's LAN1 network is 192.168.100.0/24 and LAN2 network is 192.168.200.0/24.

1. In the Basic tab, we may configure Vigor3900's LAN1 network as Local IP/ Subnet Mask, and VPN Peer's LAN1 network (192.168.100.0/24) as Remote IP/ Subnet Mask.

2. In Multiple SA tab, input the following three settings:
- Vigor3900's LAN2 network to VPN Peer's LAN1 network
- Vigor3900's LAN2 network to VPN Peer's LAN2 network
- Vigor3900's LAN1 network to VPN Peer's LAN2 network
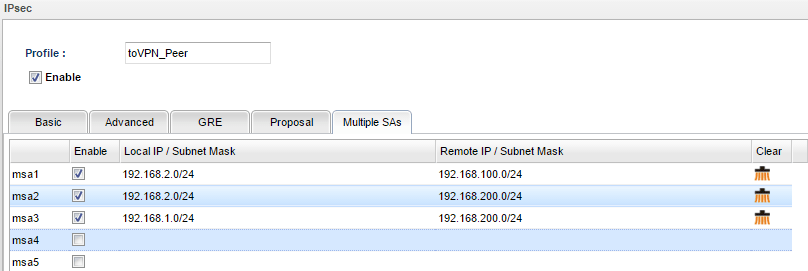
3. During the IPsec connection establishment, Vigor3900 will create 4 IPsec SAs. One is to encrypt data between network 192.168.1.0/24 and 192.168.100.0/24; and the rest of them are to encrypt data between network 192.168.1.0/24 and 192.168.200.0/24, network 192.168.2.0/24 and 192.168.100.0/24, and between network 192.168.2.0/24 and network 192.168.200.0/24.
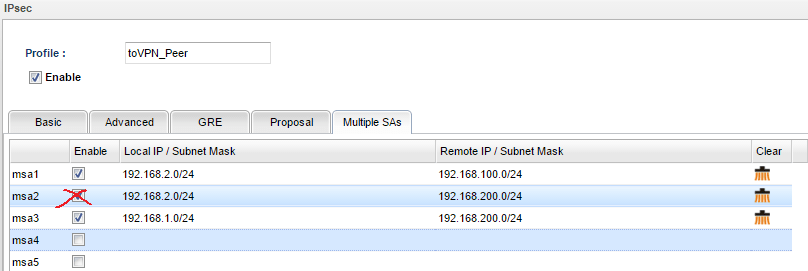
4. Of course, VPN Peer should have corresponding configurations. Take another Vigor3900 acting as VPN Peer for example. In the Basic tab, we may configure LAN network (192.168.100.0/24) as Local IP/ Subnet Mask, and the other Vigor3900's LAN network (192.168.1.0/24) as Remote IP/ Subnet Mask.
5. Then in Multiple SA tab, input the following three settings:
6. After the above configurations, we should see 4 IPsec connections between the two routers. The data transferring between different networks are encrypted by four different IPsec SAs.
7. And what could we do if we don't want local network 192.168.2.0/24 to access remote network 192.168.200.0/24? Just remove msa2 in Multiple SAs tab!
Published On:2016-05-18
ShareWas this helpful?