
IKEv2 VPN between Microsoft Azure and Vigor Router
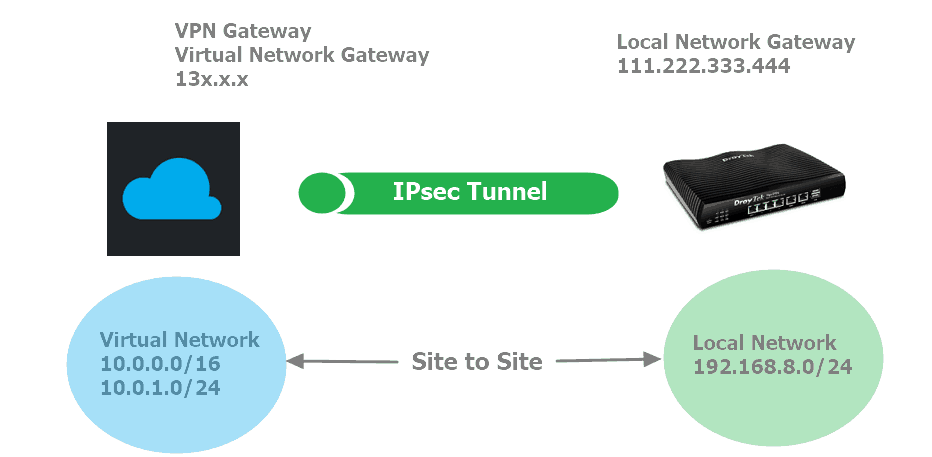
This article introduces how to set up IPsec tunnel between Microsoft Azure Server and Vigor Router in Dynamic Routing mode. The network topology is illustrated below.
Microsoft Azure Server Setup
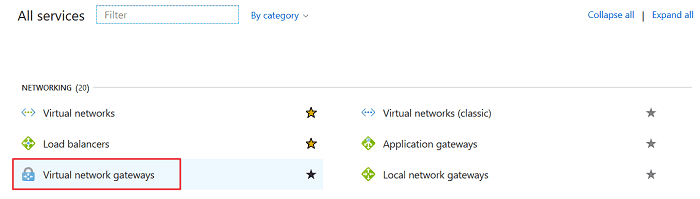
1. Create Virtual Networks by clicking Virtual Networks under All services >> NETWORKING, or search virtual networks.

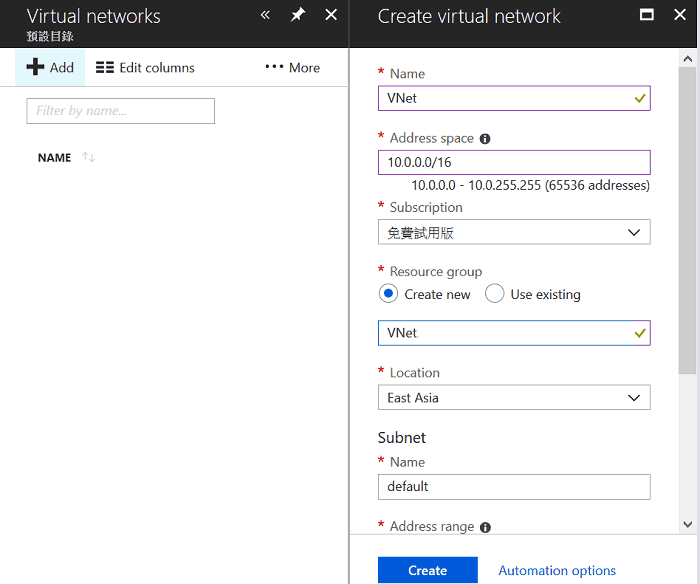
2. Click Add to create Virtual networks then enter the necessary settings:
- Enter Name
- Enter Address Space, e.g. 10.0.0.0/16
- Select "Create" New for Source Group
- Select a Location close to your router
- Leave Subnet settings as default (Azure will create the Subnet automatically then)
- Click Create
3. Create Virtual Network Gateways by clicking Virtual network gateways under All services >> NETWORKING. In this step, Azure will allocate a public IP for VPN service.
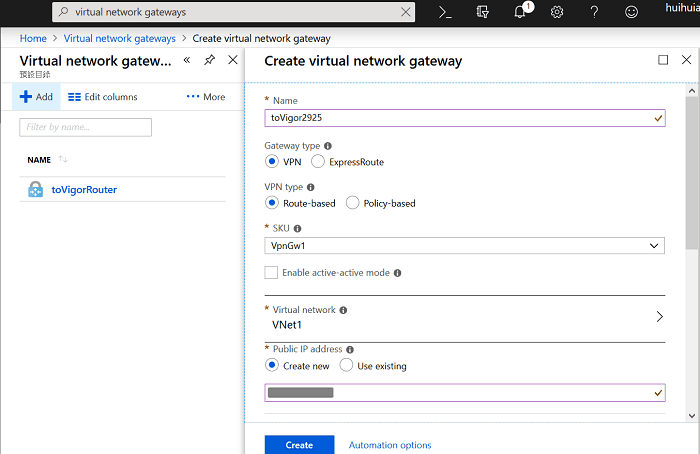
4. Click Add to create Virtual network gateway then enter the necessary settings:
- Enter Name
- Select "VPN" for Gateway type
- Select "Route-Based" for VPN type
- Select "VpnGw1" for SKU
- Select VNet1 for Virtual Network (VNet1 is the virtual network we created in step1)
- Select "Create New" for Public IP and enter any IP. (Not sure why Azure requests to enter an IP address)
- Click Create
5. It may take some time for Azure to arrange the public IP for VPN Network Gateway. After it finishes, we will see the public IP on the same page.

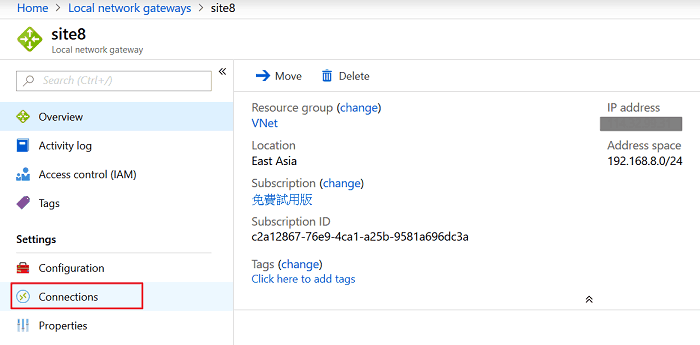
6. Create Local Network Gateway on Azure. We need to input Vigor Router’s Internet IP and its local network in this step, and Vigor Router must connect to the Internet directly, cannot behind a NAT device. Click Add to create Local network gateway then enter the necessary settings:
- Enter Name
- Enter the WAN IP address of Vigor Router at IP Address
- Enter the LAN network of Vigor Router at Address space, in this example it's 192.168.8.0/24.
- Click "Use Existing" for Resource group and select VNet.
- Click Create

7. Wait for a few minutes, and we will see the Local Network Gateway profile created on the same page. Click Connections for configuring the VPN connection between Azure to Vigor Router.
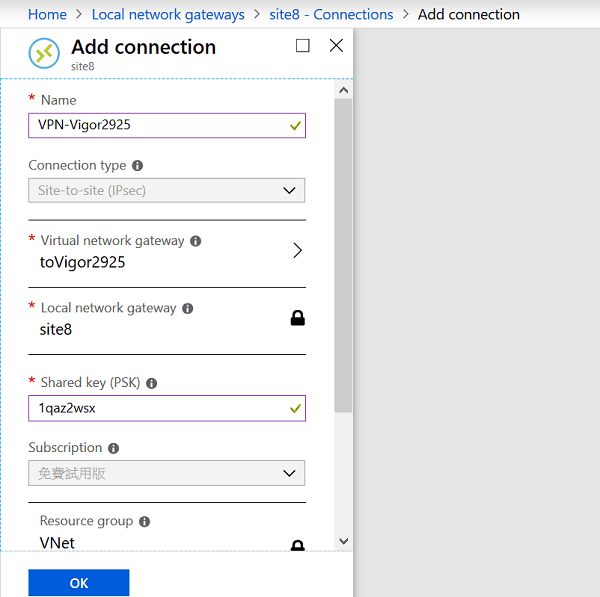
8. Create VPN connection in Azure and enter the necessary settings:
- Enter Name
- Connection type is fixed to Site-to-Site (IPsec)
- Select Virtual Gateway as the Azure VPN Public IP we created in step 3.
- Select Local Network Gateway which is the remote VPN router’s Public IP and network we created in step 5.
- Enter Shared Key (PSK)
- Select VNet for Resource Group
- Click OK
We’ve finished the VPN configurations on Azure. Next, we will configure VPN profile on Vigor Router.
Vigor VPN Profile Setup
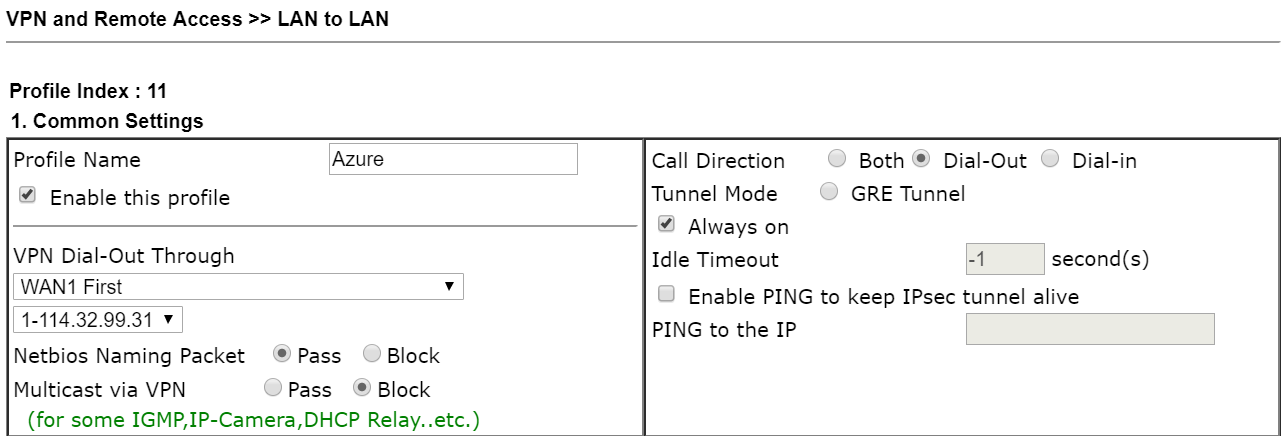
8. Click an index to Edit VPN profile on Vigor Router via VPN and Remote Access >> LAN to LAN. In Common setting field,
- Enable this VPN profile
- Select the WAN which is configured for creating Azure VPN for Dial-Out Through
- Select Dial-Out for Call Direction
- Tick to Enable Always On
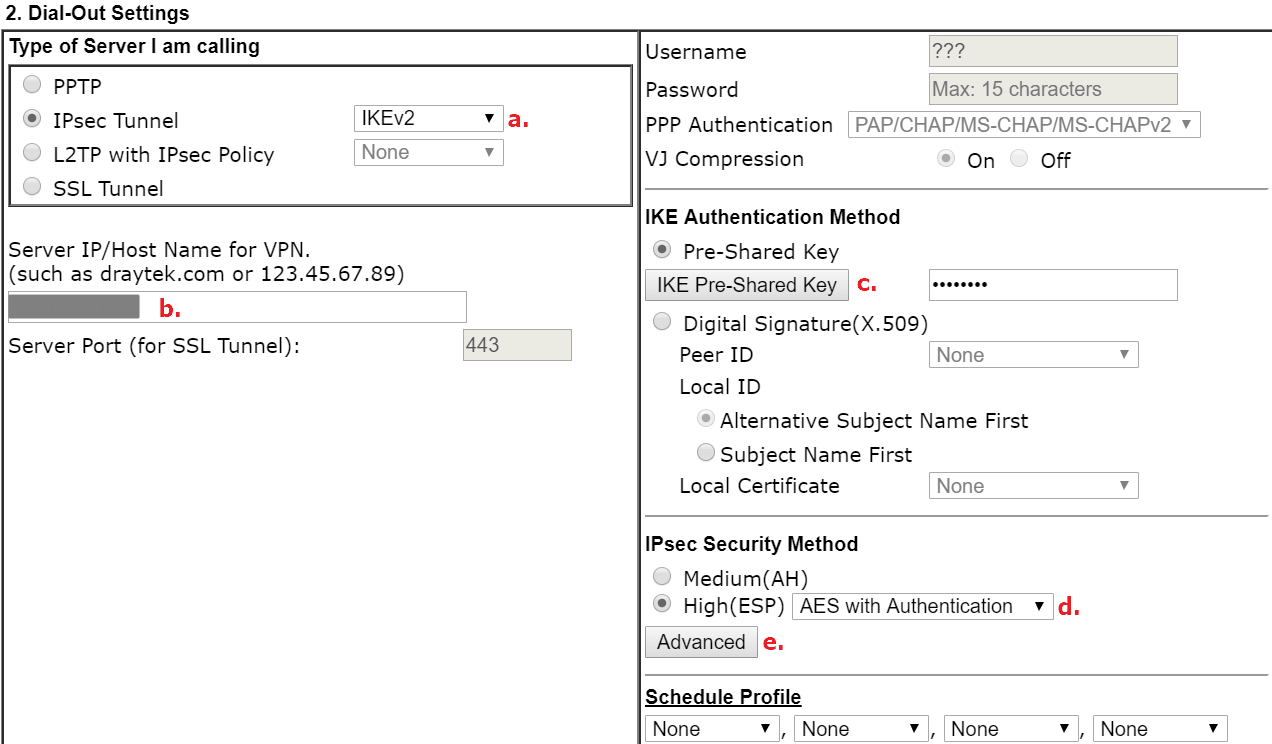
In Dial-Out setting field,
- Tick IPsec Tunnel and select IKEv2
- Enter Azure VPN Server’s Public IP address
- Enter IKE Pre-Shared Key
- Select AES with Authentication for IPsec Security Method
- Click Advanced button for configuring Proposal and Key Lifetime settings
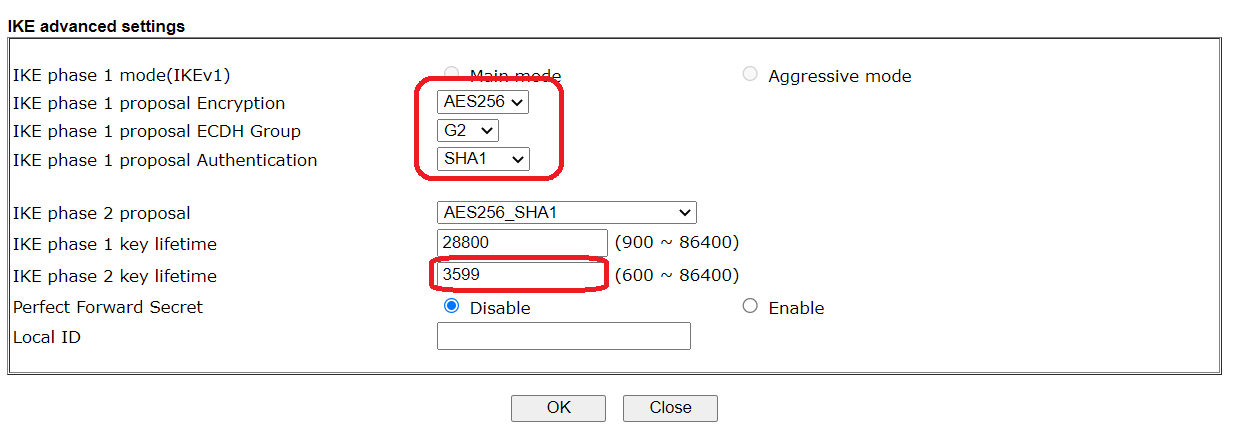
In IKE advanced Setting window,
- Select AES 256_SHA1_G2 for the phase1 proposal
- Change IKE phase2 key lifetime to 3599 seconds
- Click OK
Microsoft Azure VPN server supports Diffie-Hellman Group G2 only so it is necessary for Vigor Router to specify the phase 1 proposal to using G2.
See more details for the Azure VPN setups Here.
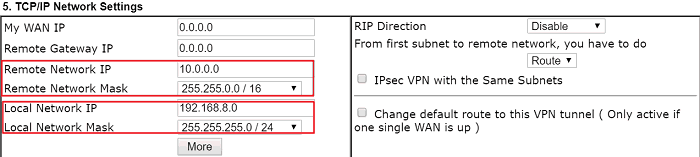
In TCP/IP Network Settings field,
- Enter 10.0.0.0/16 in Remote Network and Mask field (It is Azure’s virtual network)
- Enter 192.168.8.0/24 in Local Network and Mask field
- Click OK to save the settings
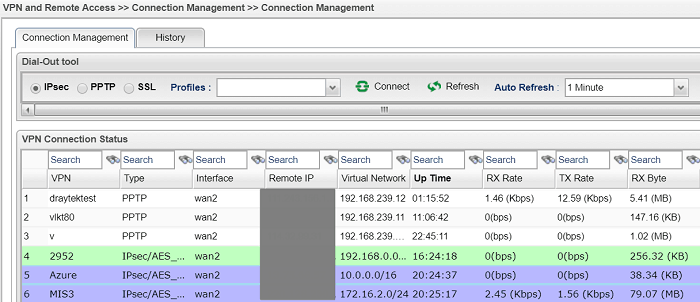
9. After that, VPN connection from Vigor Router to Azure will be up. We may check the VPN connection status via VPN and Remote Access >> Connection Management page.
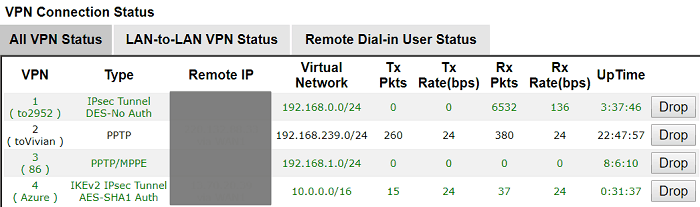
For verifying if the packet can be passed correctly through the VPN tunnel, we may try to ping the Virtual Server or Virtual machine in the same Azure Virtual Network.
Vigor VPN Profile Setup
8. Create IPsec VPN profile on Vigor3900 to Microsoft Azure.
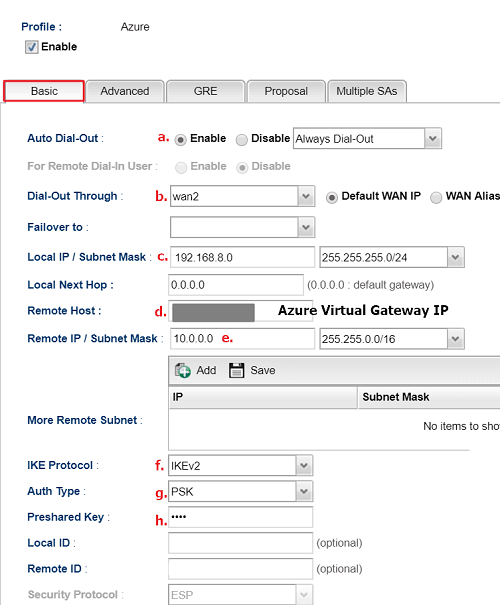
Open VPN and Remote Access >> VPN profiles >> IPsec page and then click Add. In Basic tab,
- Enable this VPN profile
- Enable Auto Dial-Out and select Always On
- Select the Dial-Out through Interface (It should be the WAN with the IP which is configured in Azure Local Network Gateway)
- Input Vigor3900's local IP in local IP /Subnet Mask
- Input Azure Gateway IP as the Remote Host IP
- Input Azure Virtual Network Address Space as the Remote IP/ Subnet Mask
- Select IKEv2 as IKE Protocol. (Azure Dynamic Routing uses IKEv2)
- Enter the Pre-Shared Key we configure in Azure
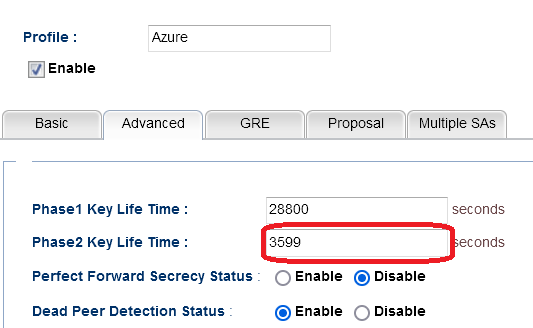
In Advanced tab, configure 3599 sec for IKE Phase2 key lifetime.
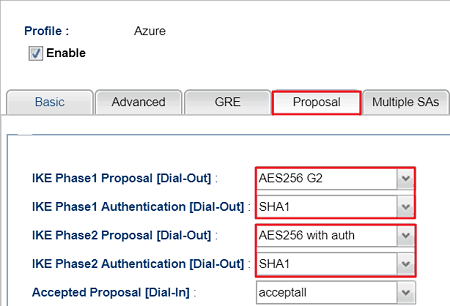
In Proposal tab,
- Select AES 256_G2 for the IKE Phase1 proposal
- Select SHA1 for IKE Phase1 Authentication
- Select AES 256 with auth for the IKE Phase2 proposal
- Select SHA1 for IKE Phase2 Authentication
- Apply the setting
Microsoft Azure VPN server supports Diffie-Hellman Group G2 only and Phase2 Key Lifetime is 27000 seconds so it is necessary for Vigor Router to specify the phase 1 proposal to using G2.
See more details for the Azure VPN setups Here.
9. After that, VPN connection from Vigor Router to Azure will be up. We may check the VPN connection status via VPN and Remote Access >> Connection Management page.
For verifying if the packet can be passed correctly through the VPN tunnel, we may try to ping the Virtual Server or Virtual machine in the same Azure Virtual Network.
Published On: Dec 05, 2018
ShareWas this helpful?