
Set up BGP Routing between Vigor Routers
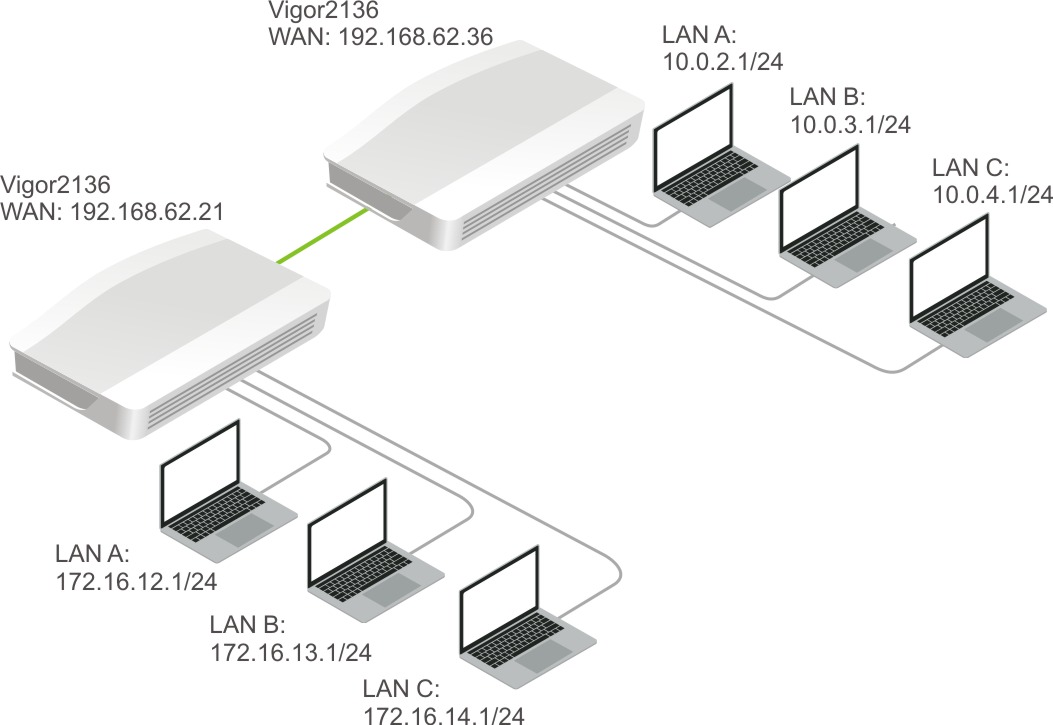
This article demonstrates how to set up BGP routing between two Vigor Routers which are connecting on the WAN. Suppose the two routers both have several routing subnets, and we would like them to exchange the routing information with each other. In this example, we use a different Autonomous System (AS) number for each router to make them External BGP (eBGP) peers.
Note: The BGP peers with the same AS number are referred to as Internal BGP (iBGP) peers, and to as External BGP (eBGP) peers if they have different AS number. The main difference between iBGP and eBGP is that routes learned from an eBGP peer will be re-advertised to both iBGP peers and eBGP peers. However, routes learned from an iBGP peer will only be re-advertised to eBGP peers.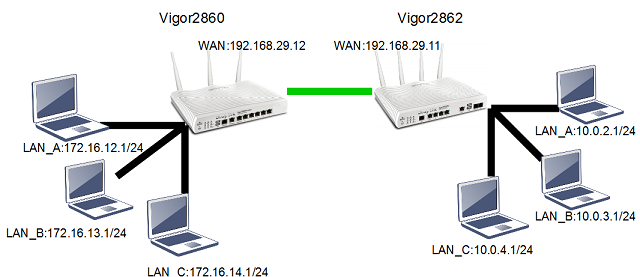
The Configuration of Router A (Vigor2862)
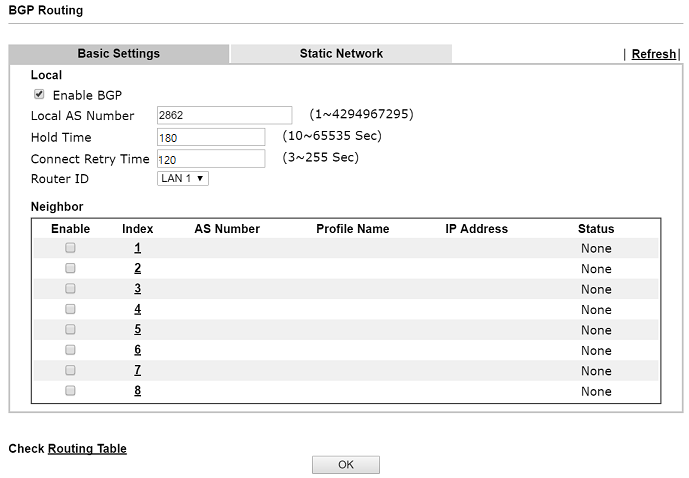
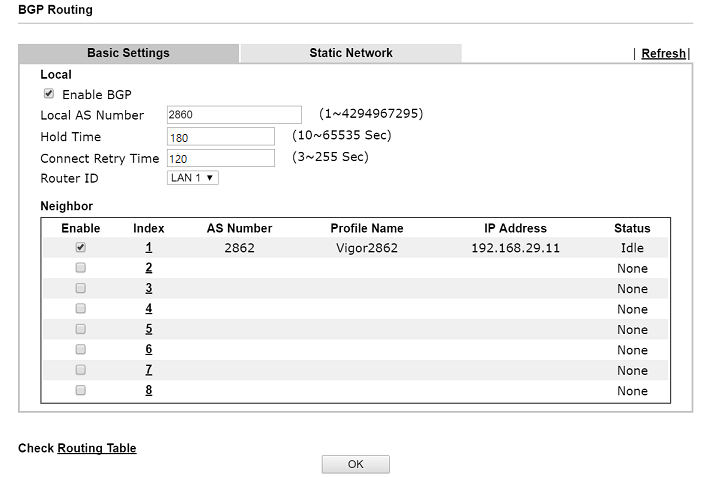
1. Go to Routing >> BGP, in the Basic Settings tab,
- Check Enable BGP
- Give it a Local AS Number
- (Optional) Configure Hold Time for the routes received
- (Optional) Configure Connect Retry Time
- Click on an index number in Neighbor
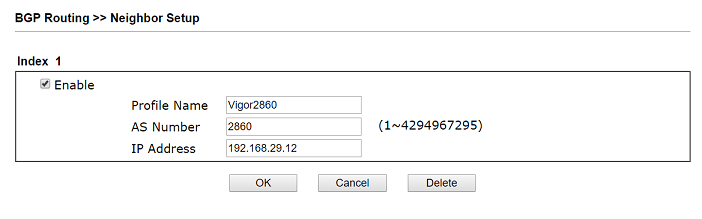
2. Edit the Neighbor Setup as follows:
- Check Enable
- Enter Profile Name
- Enter the AS Number of the peer router
- Enter the WAN IP address of the peer router at IP Address
- Click OK to save
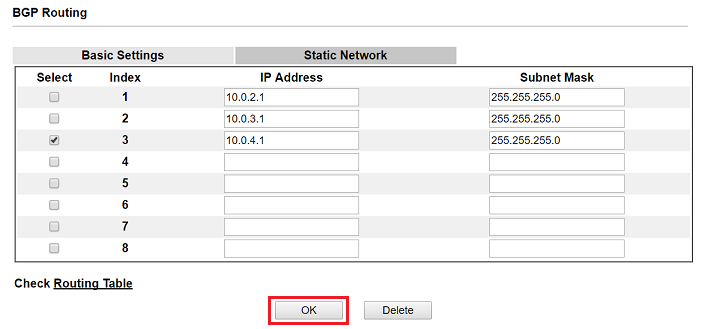
3. Go to the Static Network page, enter the IP address and Subnet Mask of the local subnet you want to advertise.
The Configuration of Router B (Vigor2860)
4. Go to Routing >> BGP, set up Basic Settings, Neighbor and Static Network similarly, here we use a different AS number to make the routers External BGP (eBGP) peers.
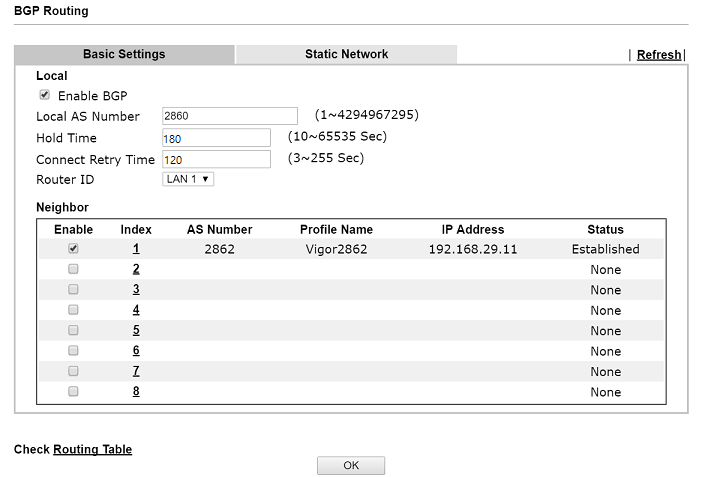
5. You should see "Established" at Neighbor Status after the route announced the routing information to each other.
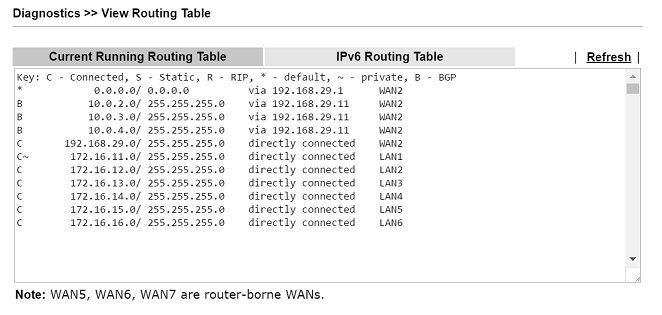
6. At Diagnostics >> Routing Table, we should see the routing information to the IP range on the peer router, and the routes learnt are marked B, which stands for BGP.
Note:
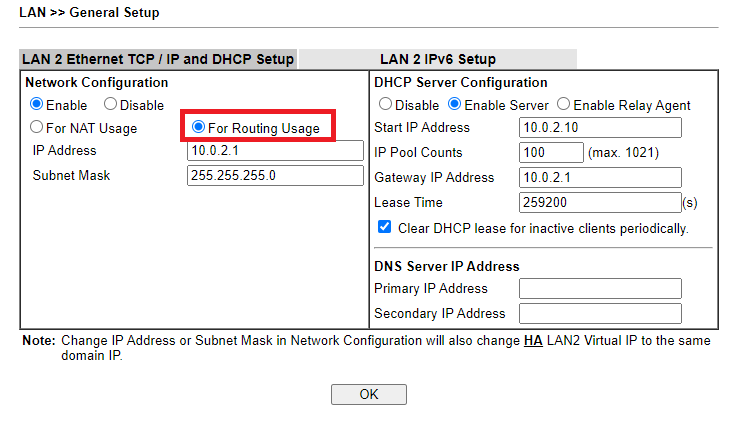
For BGP routing, you need to use routing LAN instead of NAT LAN to make the device from outside network access your network. Because your router won't allow unknown IP to access its local LAN (even thought the device has had router's LAN IP) with NAT LAN. For example, if you want to access the local LAN of Vigor2862 from Vigor2860 via BGP routing, you need to select routing LAN on Vigor2862.
The Configuration of Router A
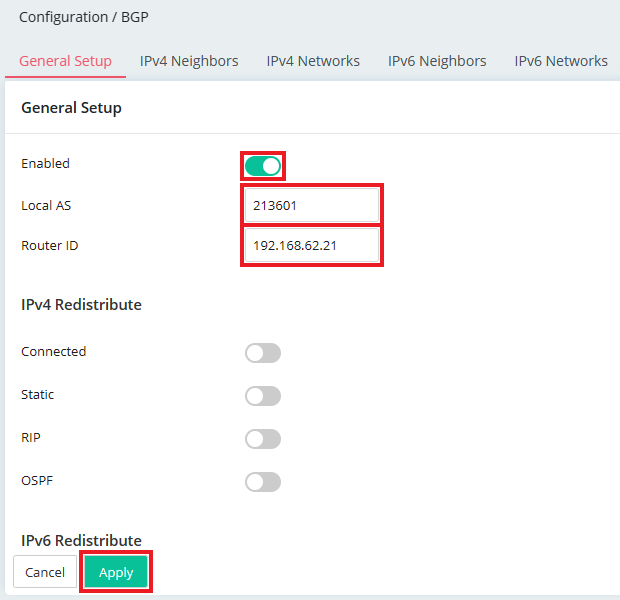
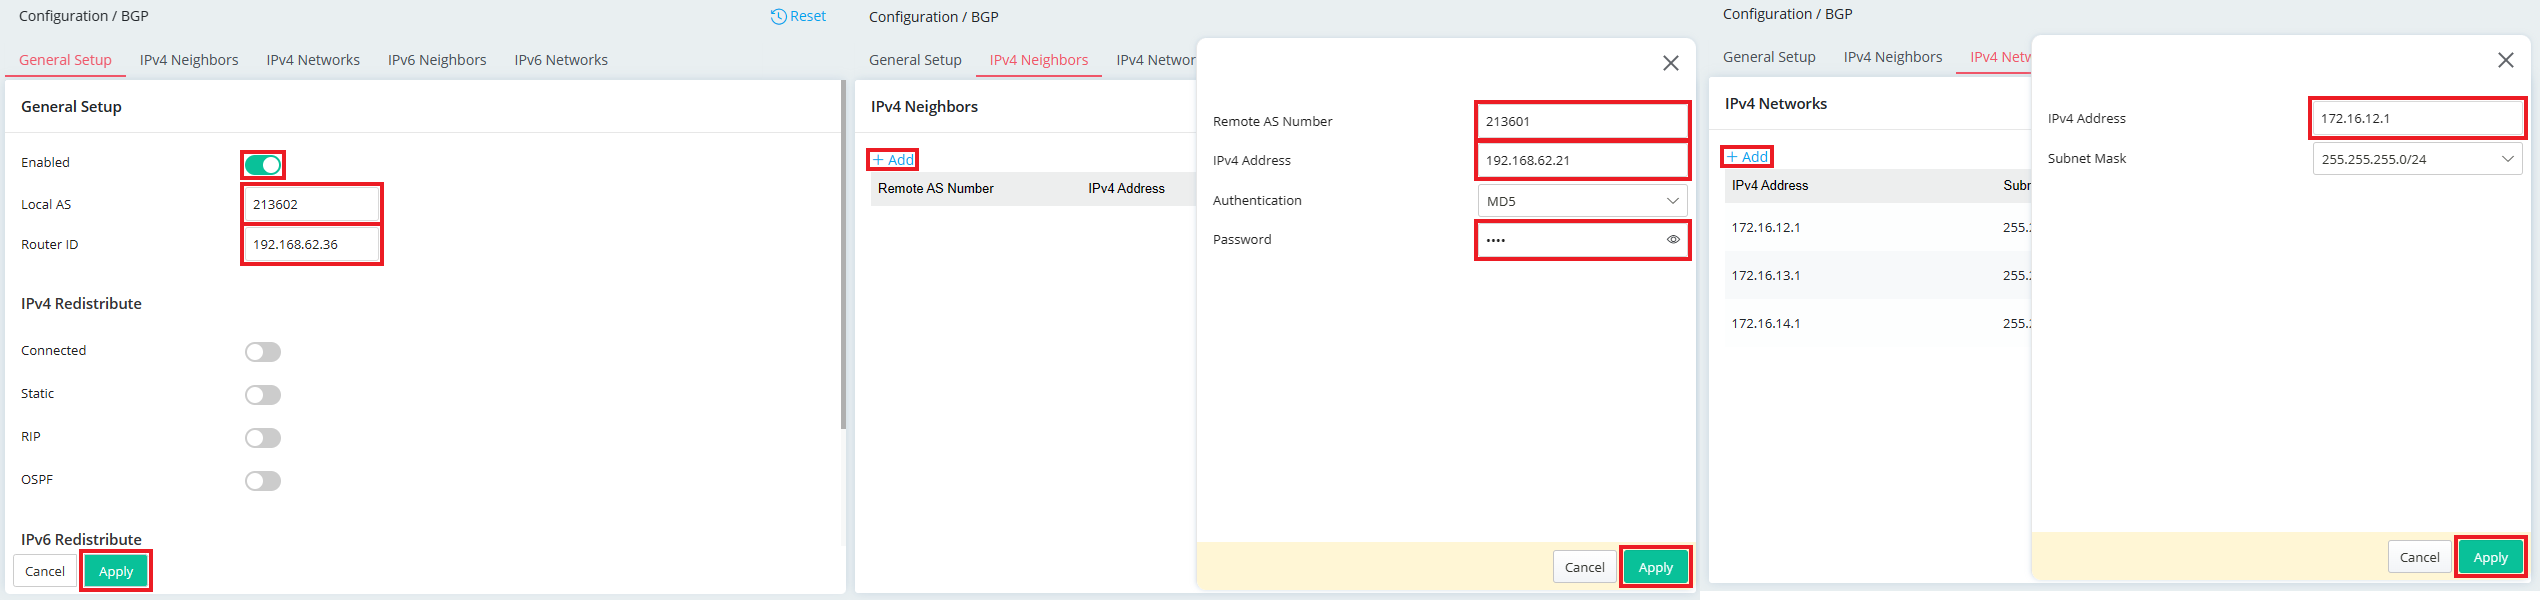
- Go to Configuration / BGP /General Setup page
- Select Enabled.
- Give a unique Local AS
- Enter your WAN IP as Router ID.
-
Click Apply to save.
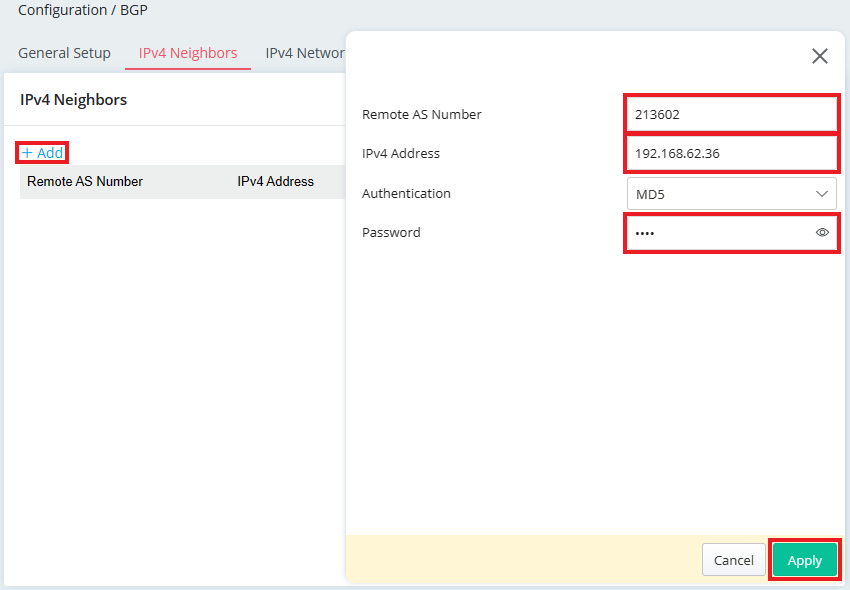
- Go to IPv4 Neighbors tab, click "Add" to create neighbor as follows:
- Enter the Remote AS Number of the peer router.
- Enter the WAN IP address of the peer router as IPv4 Address.
- Give a Password.
-
Click Apply to save the profile.
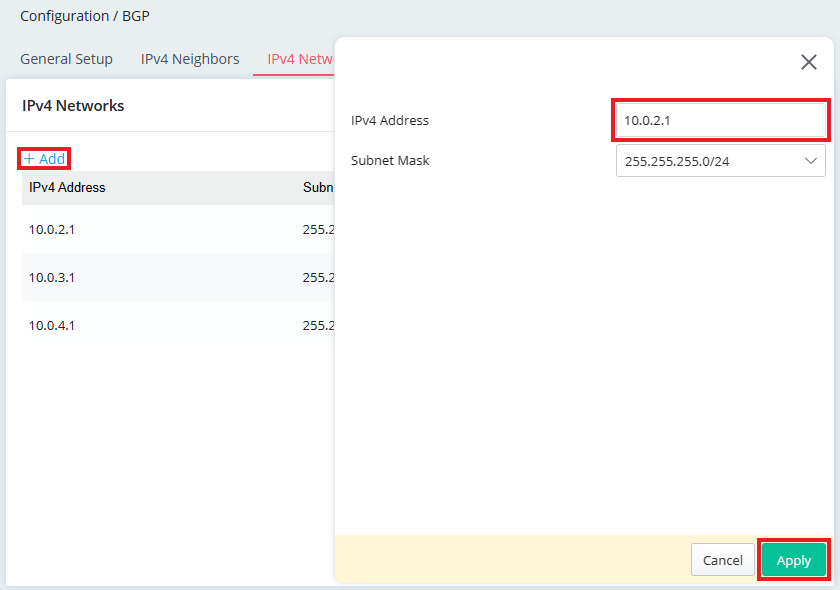
- Go to IPv4 Networks tab, click "Add" to create the LAN network of the local subnets you want to advertise.
- Enter the IPv4 Address of local subnet.
- Select the Subnet Mask of local subnet.
-
Click Apply to save.
The Configuration of Router B
-
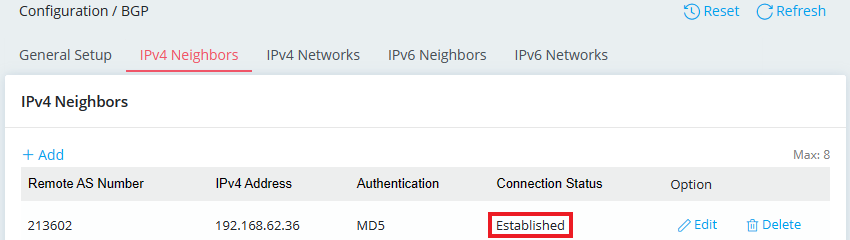
Go to Configuration / BGP on Router B and configure General Setup, IPv4 Neighbors and IPv4 Networks similarly. Here we use different AS number to make the routers External BGP (eBGP) peers.
-
You should see "Established" at Connection Status after the route announced the routing information to each other.
-
Go to Monitor / Route Table, we should see the routing information to the IP range on the peer router.

The Configuration of Router A
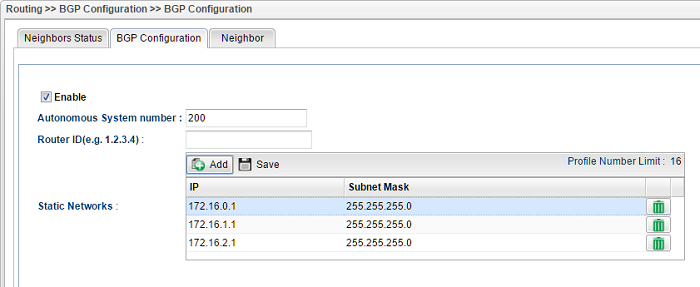
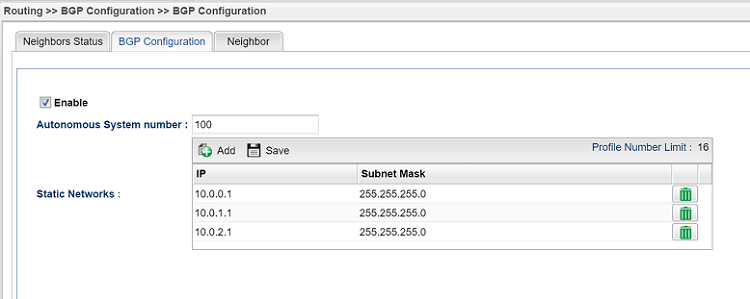
1. Go to Routing >> BGP Configuration >> BGP Configuration tab
- Check Enable
- Give it a unique Autonomous System Number
- Add the LAN network that the router should advertise to the peer router into Static Networks
- Click Apply
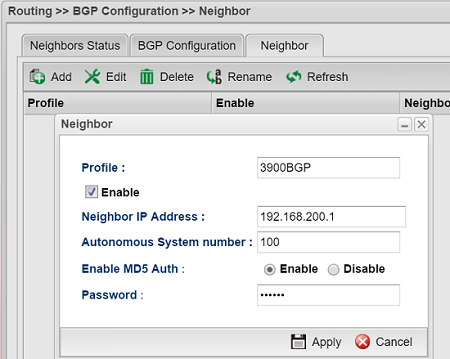
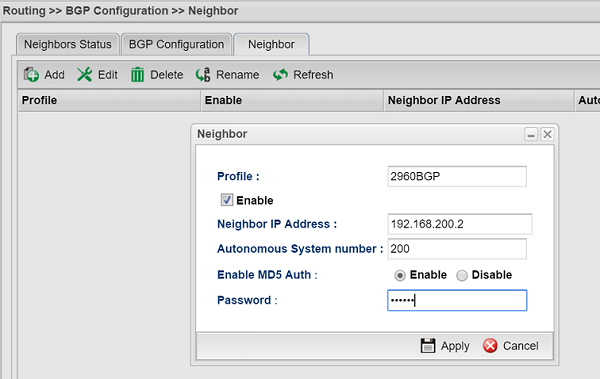
2. Go to the Neighbor tab and add a profile as follows:
- Give a profile name and check Enable
- For Neighbor IP Address, type the WAN IP address of the peer router
- Enter the Autonomous System Number of the peer router
- Enable MD5 Auth for higher security
- Click Apply
The Configuration of Router B
3. Similarly, go to Routing >> BGP Configuration >> BGP Configuration tab and to edit the AS number and Static Network. Don't forget to use a different AS number.
4. Go to Neighbor tab to add a profile of the peer router.
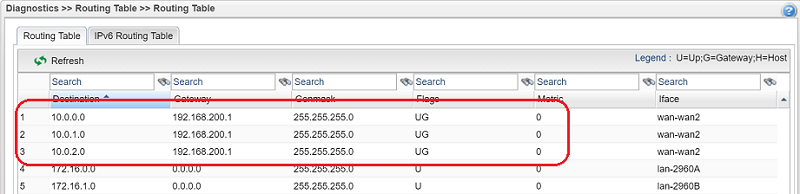
5. With the configuration above, if both the routers are connected, you should see "established" at the Neighbor Status tab.

6. At Diagnostics >> Routing Table, we can check if the router has learned the routing information about the peer's LAN network.
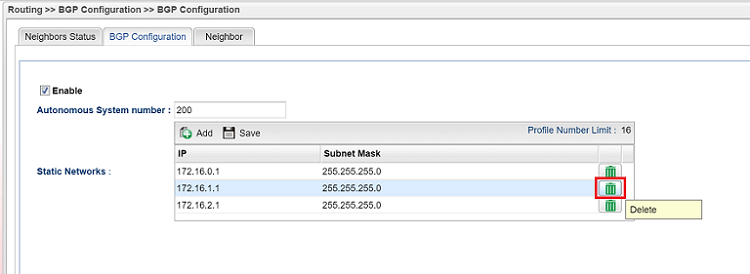
7. And if a subnet was deleted from Static Network, the routing table of the BGP Neighbor should change accordingly.
Published On:2017-08-15
ShareWas this helpful?