
Routing Fundamentals
This article introduces the basic concept of routing and the types of routing supported by Vigor Router. By the end of this article, we hope the readers will be able to read the routing table and get useful information from it, as well as understand how to add routing information and policies on Vigor Router.
Contents:
- What is Routing
- The Routing Table
- Static Routing
- Dynamic Routing
- Policy-Based Routing
- Inter-VLAN Routing
What is Routing
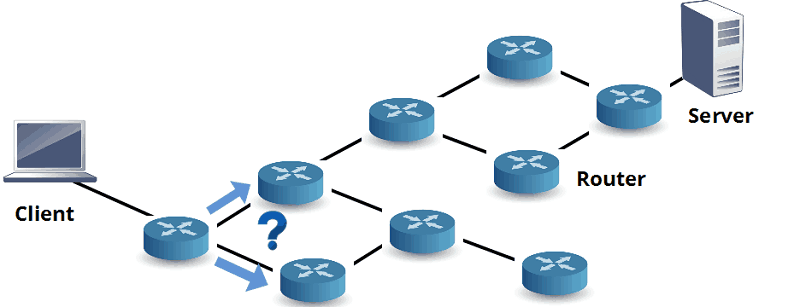
Before a packet reaches its destination on the Internet, it usually needs to traverse across various networks, and routers are the devices which will forward the packet from one network to another so that they can continue on its journey. Before redirecting a packet to its next hop, the router needs to decide which is the best path for the packets, in other words, which interface of the router is more likely to be linked to the destination network.
The Routing Table
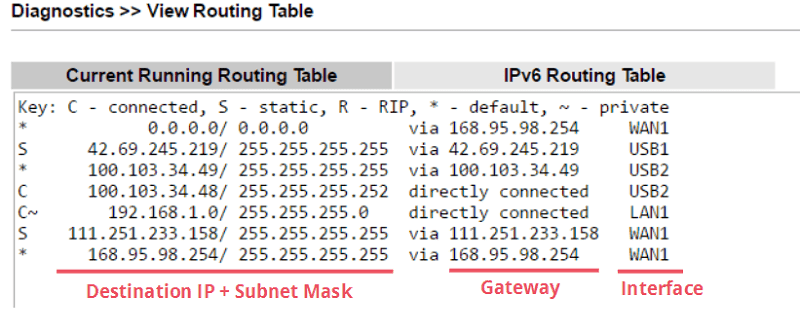
The router makes the routing decision according to the “routing table” maintained by the router, which is a list of the preferred routes to various networks. When receiving a packet, the router looks up the packet's destination IP in the routing table, finds the best match, then sends the packets to the specified interface and gateway IP address. On Vigor Router, the routing table is shown on the Diagnostics > Routing Table page.
In the routing table, if the network IP address duplicates and network overlap each other, the entry with longer subnet mask is preferable since it represents a more specified network. On the other hand, the entry with the subnet mask 0.0.0.0 which covers all the IP addresses is the less preferable route, but it's also the default route for the IP addresses not specified in the routing table. For Vigor Router, the default route is usually WAN 1.
Vigor Router builds up its routing table from the direct connections, such as the active WAN and LAN. When VPN connections established, the information about the peer network will be automatically added to the routing table as well. Network Administrator can add more routing information by static or dynamic routing.
Static Routing
Static routing is the routing information manually added by the network administrator. It can give the router information about the network which it can reach although not directly connected.
To add a static route on Vigor Router, go to LAN >> Static Route, click on an available index to edit the profile. In the profile, enter the destination IP Address and Subnet Mask of the network, and enter the gateway IP address as the IP of the router which connects directly to the destination network. Finally, the Network Interface should be the interface on the Vigor Router which links to the gateway router.

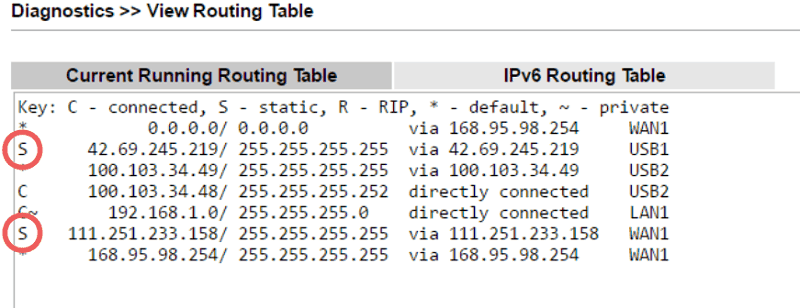
After you click “OK” and save the profile, the route will be added to the Routing Table, and there will be an “S” mark in front of the entry.
Dynamic Routing
Dynamic Routing allows the router to learn the routing information from other routers automatically. It not only can reduce the time network administrator spend on configuring the static routes, (especially when the network grows larger), but also allow the router to be responsive to the changes on the network, such as a link fails, or topology changes.
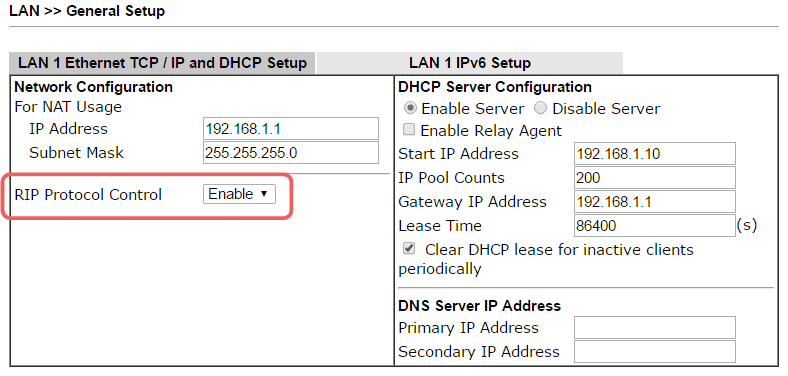
There are several routing protocols to achieve dynamic routing. Currently, Vigor Router supports RIPv2, some high-end models support BGP, and Linux-based models also support OSPF. To allow Vigor Router to share its routing information and receive from other routers, we need to enable “RIP Protocol Control” at LAN >> LAN General Setup >> Details Page. After that, the router will periodically exchange routing information on this LAN interface through multicast packets.
The routing information learned by RIP from the other routers will be listed on the routing table as well, and there will be an “R” mark. The entry learned from RIP will be followed by a number (e.g., 2/120000) represents the metric and timer.
Policy-Based Routing
Policy-based routing is a routing decision according to the policies configured by the network administrator. The main difference between policy-based routing and static/ dynamic routing is that policy-based routing allows the router to make routing decisions not only base on the destination IP address, but also criteria such as protocol, source IP address, and destination port. This primary purpose of policy-based routing no longer is to select the route that is more likely to reach the destination; instead, it is more like setting up a regulation to restrict certain types of traffic to a particular path. For example, we can make the time-sensitive applications (e.g., VoIP) traffic always to take the more reliable internet line; or restrict the higher-cost internet line to critical services only.
To add a policy-based routing on Vigor Router, go to Load-Balance/ Route Policy >> General Setup, click on an available index and edit the profile as follows:
- Enable the profile
- Define Criteria. It specifies the types of packets that should follow this routing rule.
- Specify the Interface and Gateway to which the packet should go if it matches the criteria above.
- Give this policy a priority number (will discuss more in the next paragraph)
- You may select a failover interface in “More Options.”
- Click OK to save the profile.
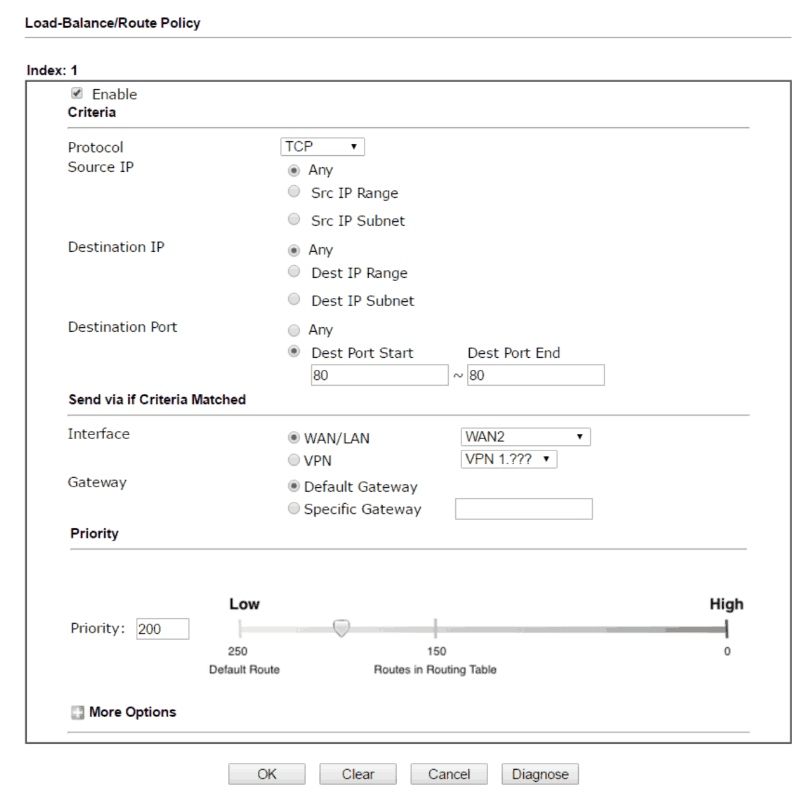
Note that the routing policies are independent of the routing table. Whether the routing policies will override the routing table depends on the “Priority” settings in the rule. A number between 0 to 250 represents priority, 0 is the highest, and 250 is the lowest. The priority of the routing table is defined to 150, and the priority of every routing policy is 200 by default, which means that by default, the routing table overrides the policies. If you'd like the routing policy to have higher priority than the routing table, set the priority number to a number smaller than 150 (90, for example). And of course, if a packet matches the criteria of more than one routing policy, the policy which has the smallest priority number will apply.

Inter-VLAN Routing
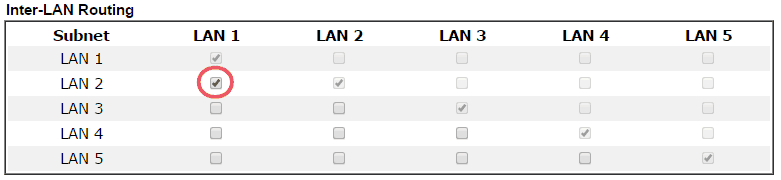
Sometimes the router will not forward a packet even if the destination network is listed explicitly in the routing table, one of the situations is when a LAN host is trying to access another host on a different LAN subnet. Since the idea of implementing VLAN and multiple LAN subnets is to divide the local network into multiple broadcast domains, the packets cannot travel across VLAN.
However, if the network administrator would like the hosts on different LAN subnets to access each other, inter-LAN routing can be enabled on LAN >> General Setup page. All we need to do is checking the box at the intersection of the LAN subnets we would like to allow access, and then the router will forward the packets across those LAN subnets. Below is an example of allowing hosts on LAN1 and LAN2 to access each other.
Verifying the Routing Settings
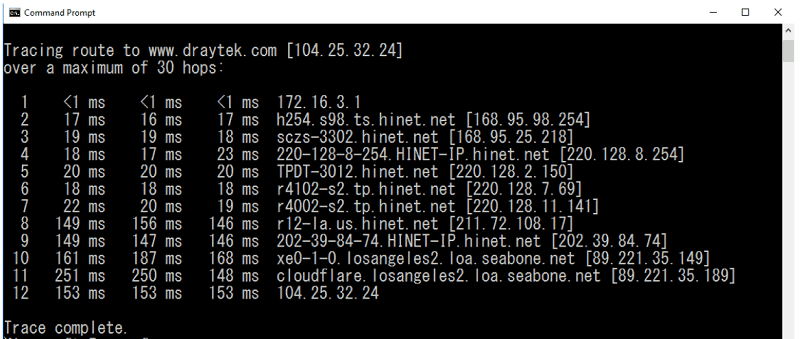
The simplest way to test the routing configuration on the router is to perform “traceroute” in command prompt window. By checking the router's next hop, we can verify to which interface did the router forward the packet. Vigor Router also supports trace route tool at Diagnostics > Trace Route.
Summary
The primary role of a router is to redirect packets to the right interface so that they can continue their journey to their destination, and the router selects a route for a packet based on the routing table, which the router builds and maintains based on the network which it joined. Network administrators may manually add routing information to the routing table by static routing feature, or enable dynamic routing to allow the routers on the network to exchange the routing information automatically. Policy-based routing allows the routing decision to be made not only by the destination IP address, and this allows the network administrator to designate the path of certain types of traffic. And finally, even though it's within the same local network, packets traverse across VLAN should be regarded as crossing interfaces, and thus need to be forwarded by the router, this is when inter-VLAN routing is required.
Published On:2017-06-01
ShareWas this helpful?