
OpenVPN to Vigor Router by using the self-generated certificate
Vigor Router support generating certificates for OpenVPN since firmware version 3.9.4. This article demonstrates how to create OpenVPN from different clients to Vigor Router with the self-generated certificates.
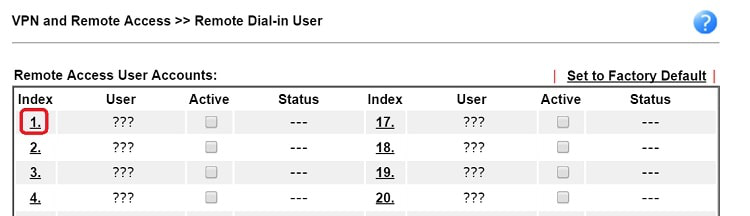
1. Create a remote dial-in user profile: Go to VPN and Remote Access>> Remote Dial-in User, click on an available index to edit the profile.
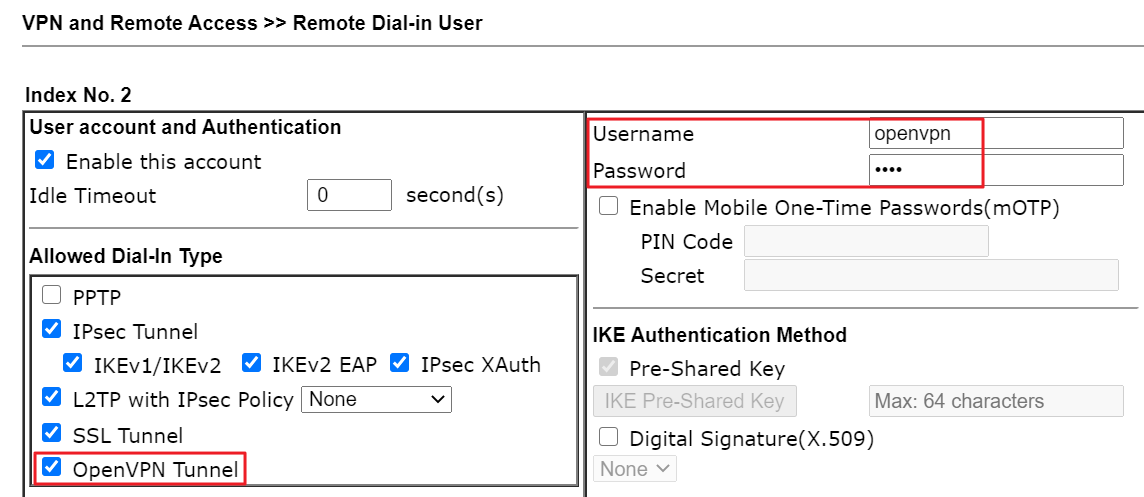
2. Edit the profile as follows:
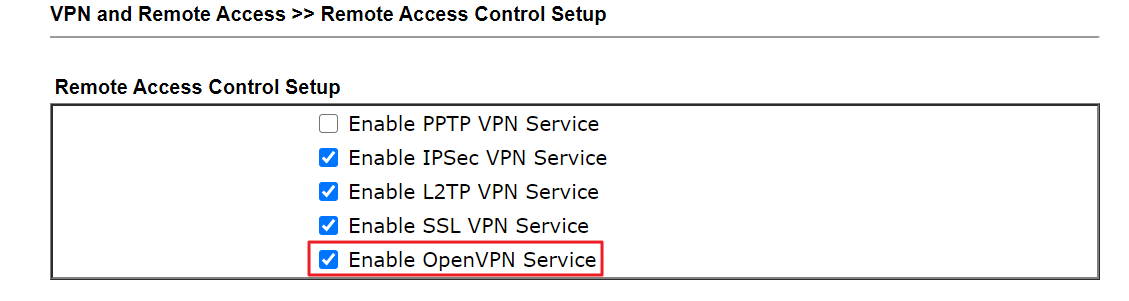
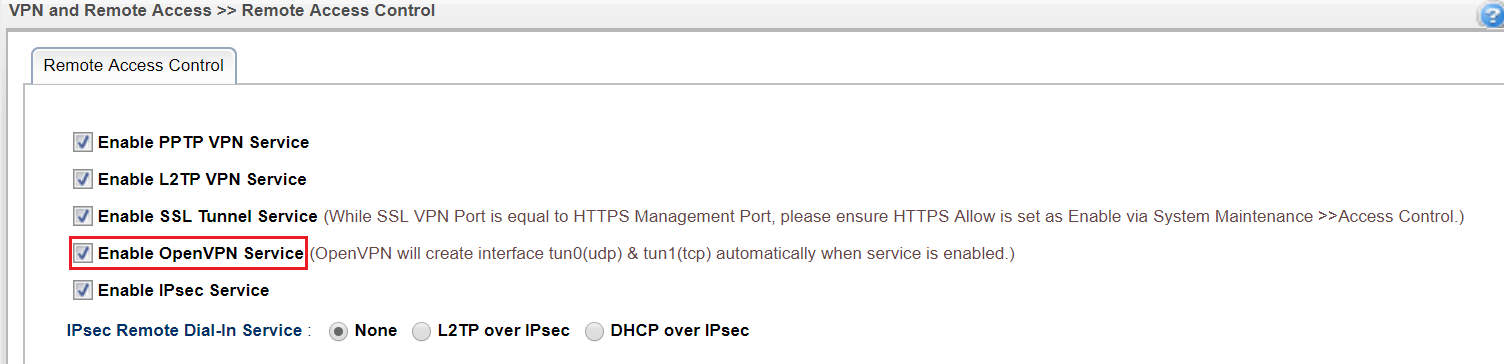
3. Go to VPN and Remote Access >> Remote Access Control and ensure OpenVPN Service is enabled.
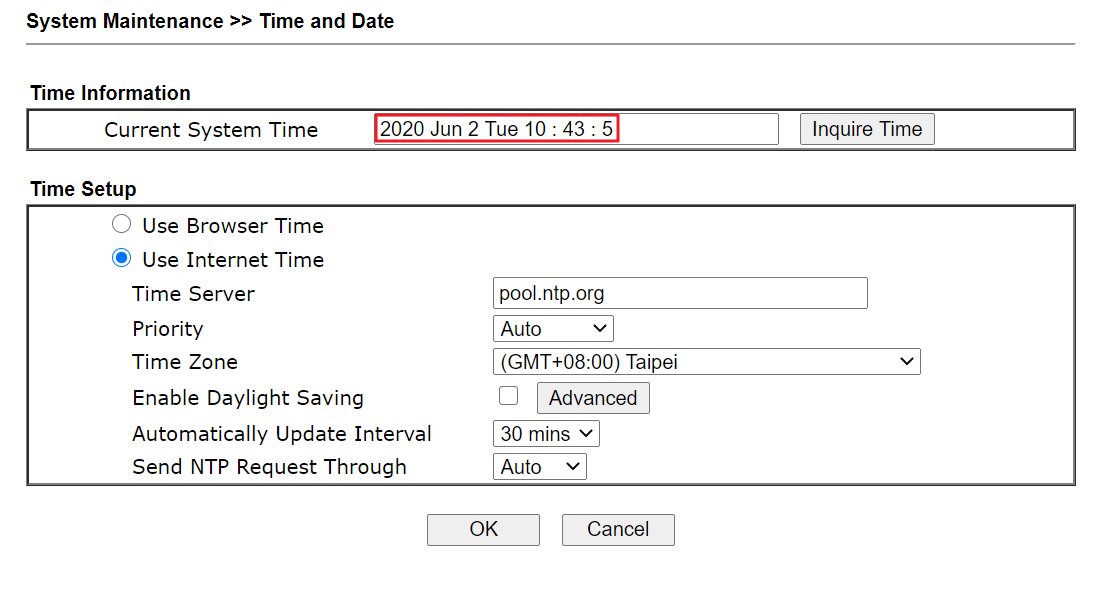
4. Confirm the time is correct on the router via System Maintenance >> Time and Date page.
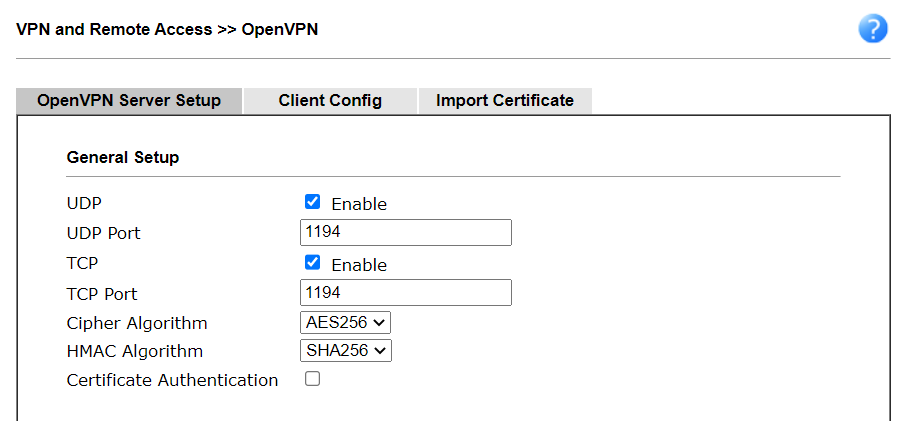
5. Go to VPN and Remote Access >> OpenVPN >> OpenVPN Server Setup,
- Enable TCP Mode or UDP Mode, depends on which transfer protocol you would like to use for OpenVPN connections
- Customize the TCP Port and UDP Port if you want
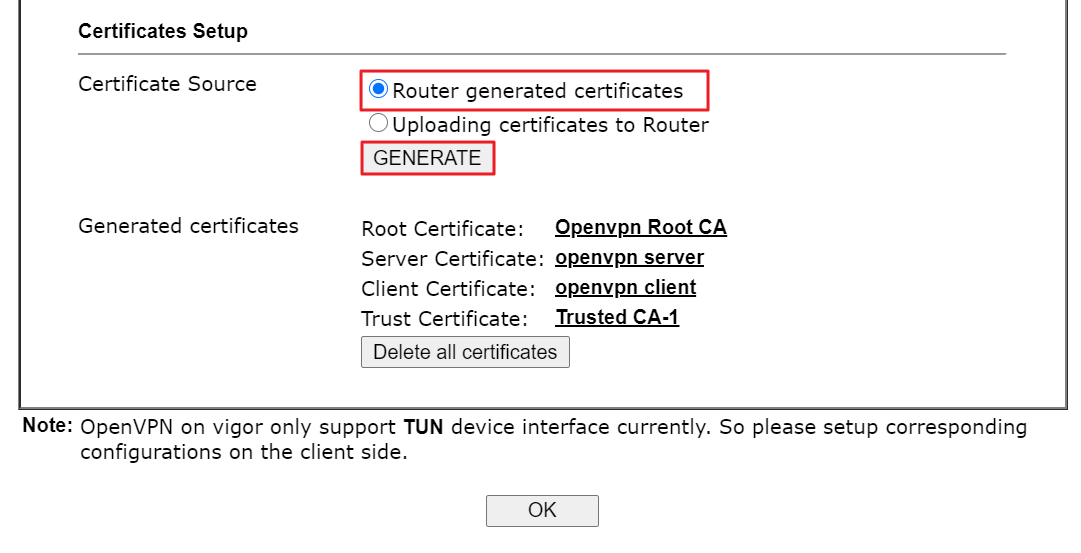
6. Generate certificates
- Choose Router generated certificates
- Click GENERATE
- Click OK
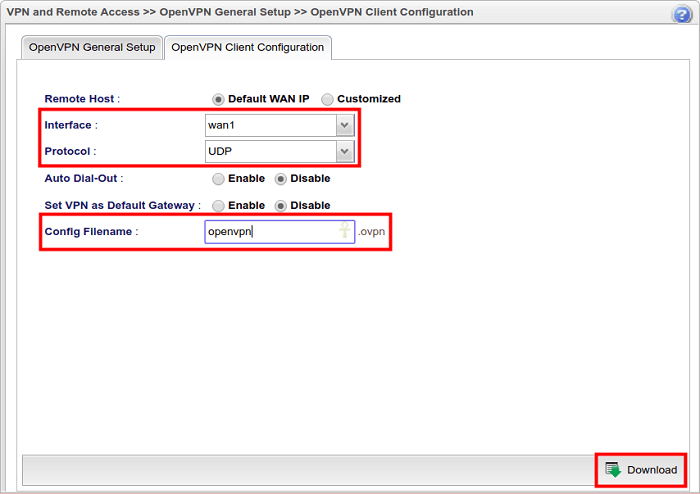
7. Go to OpenVPN Client Configuration page:
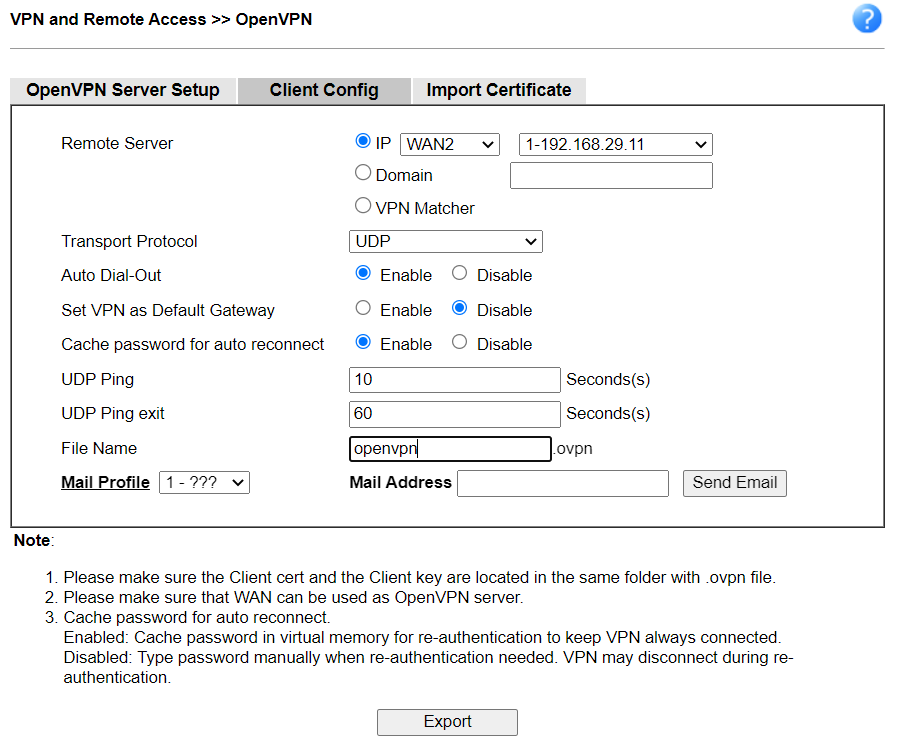
The value of UDP Ping means if no packets have been sent for at least n seconds, the router will ping remote over the TCP/UDP channel. It has two intended uses:
The value of UDP Ping exit means after n seconds pass without reception of a ping or other packet from remote, OpenVPN will exit.
For example, when the UDP Ping exit is set to 60, OpenVPN will exit within 60 seconds if its peer disconnects.
Please remove --pull-filter ignore redirect-gateway and ping-exit 60(UDP) in the ovpn before importing to OpenVPN Connect

You may use any OpenVPN Client App for the connection. All you need to do is import the configuration file exported from the router, and enter the username and password when being asked for credentials.
Connecting from macOS by Tunnelblick
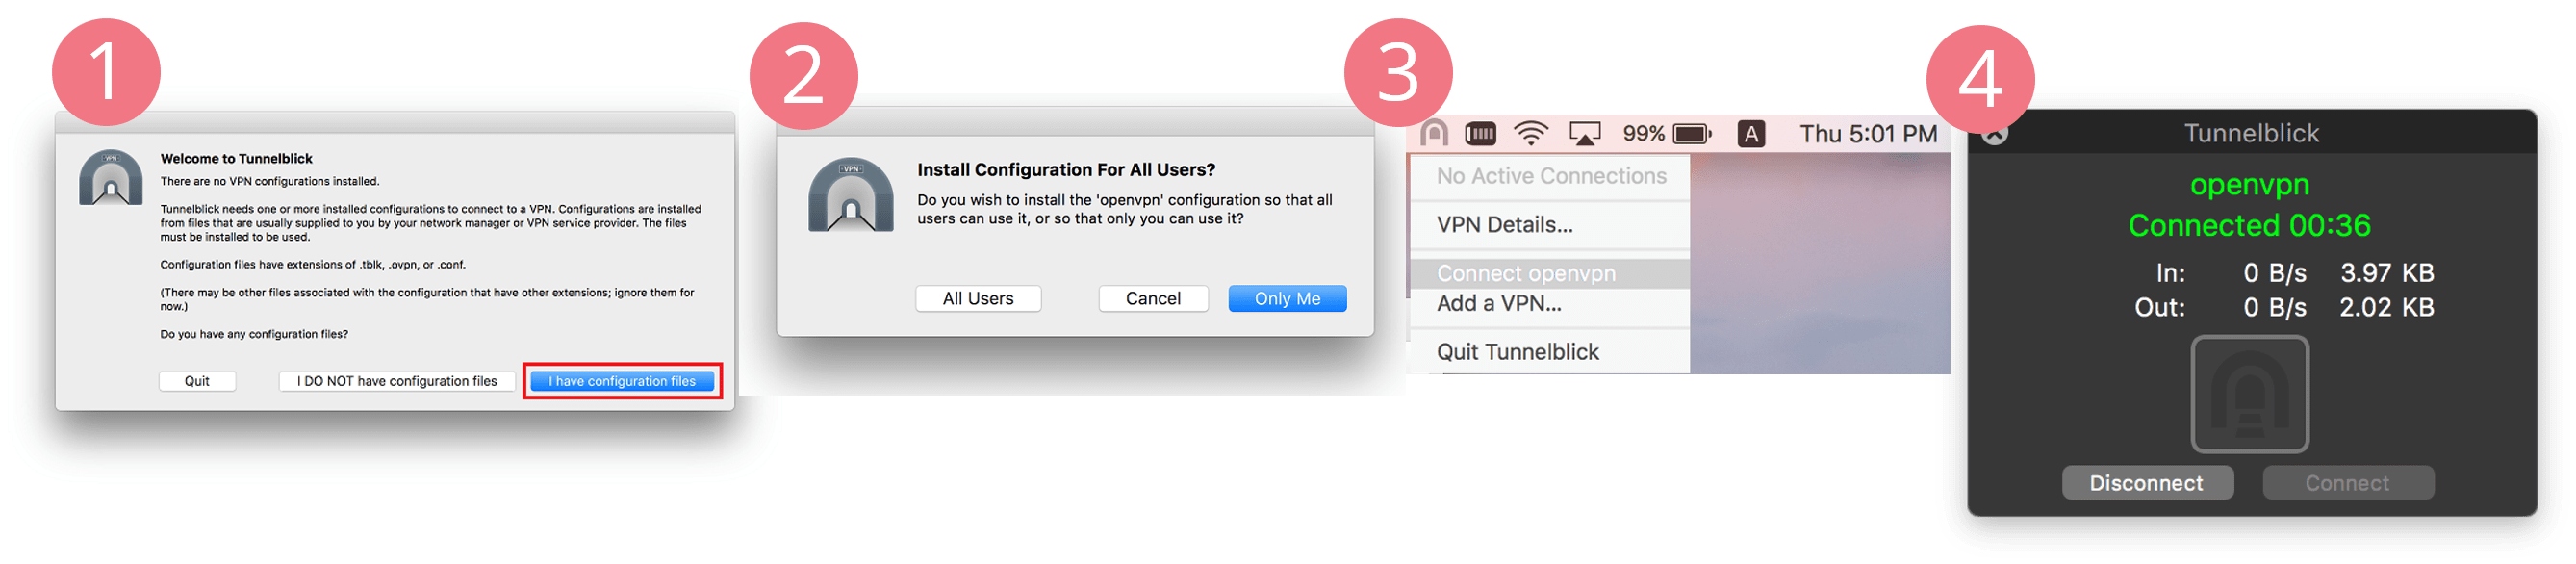
1. Download and install the OpenVPN client software. Start the software and import the client configuration file by clicking I have configuration files.
2. Double-click the client configuration file, then select "All Users" or "Only Me" depends on whether to share this VPN profile to other users. (Note: If you can't import the client configuration by double-clicking it, please try to drag and drop the ovpn file on the Tunnelblick icon on the menu bar or dock.
3. To start the VPN tunnel, right-click the Tunnelblick icon on the menu bar, then click Connect openvpn ("openvpn" is the name of the client configuration file)
4. We can check the VPN status after the connection established.
Connecting from iOS by OpenVPN Connect
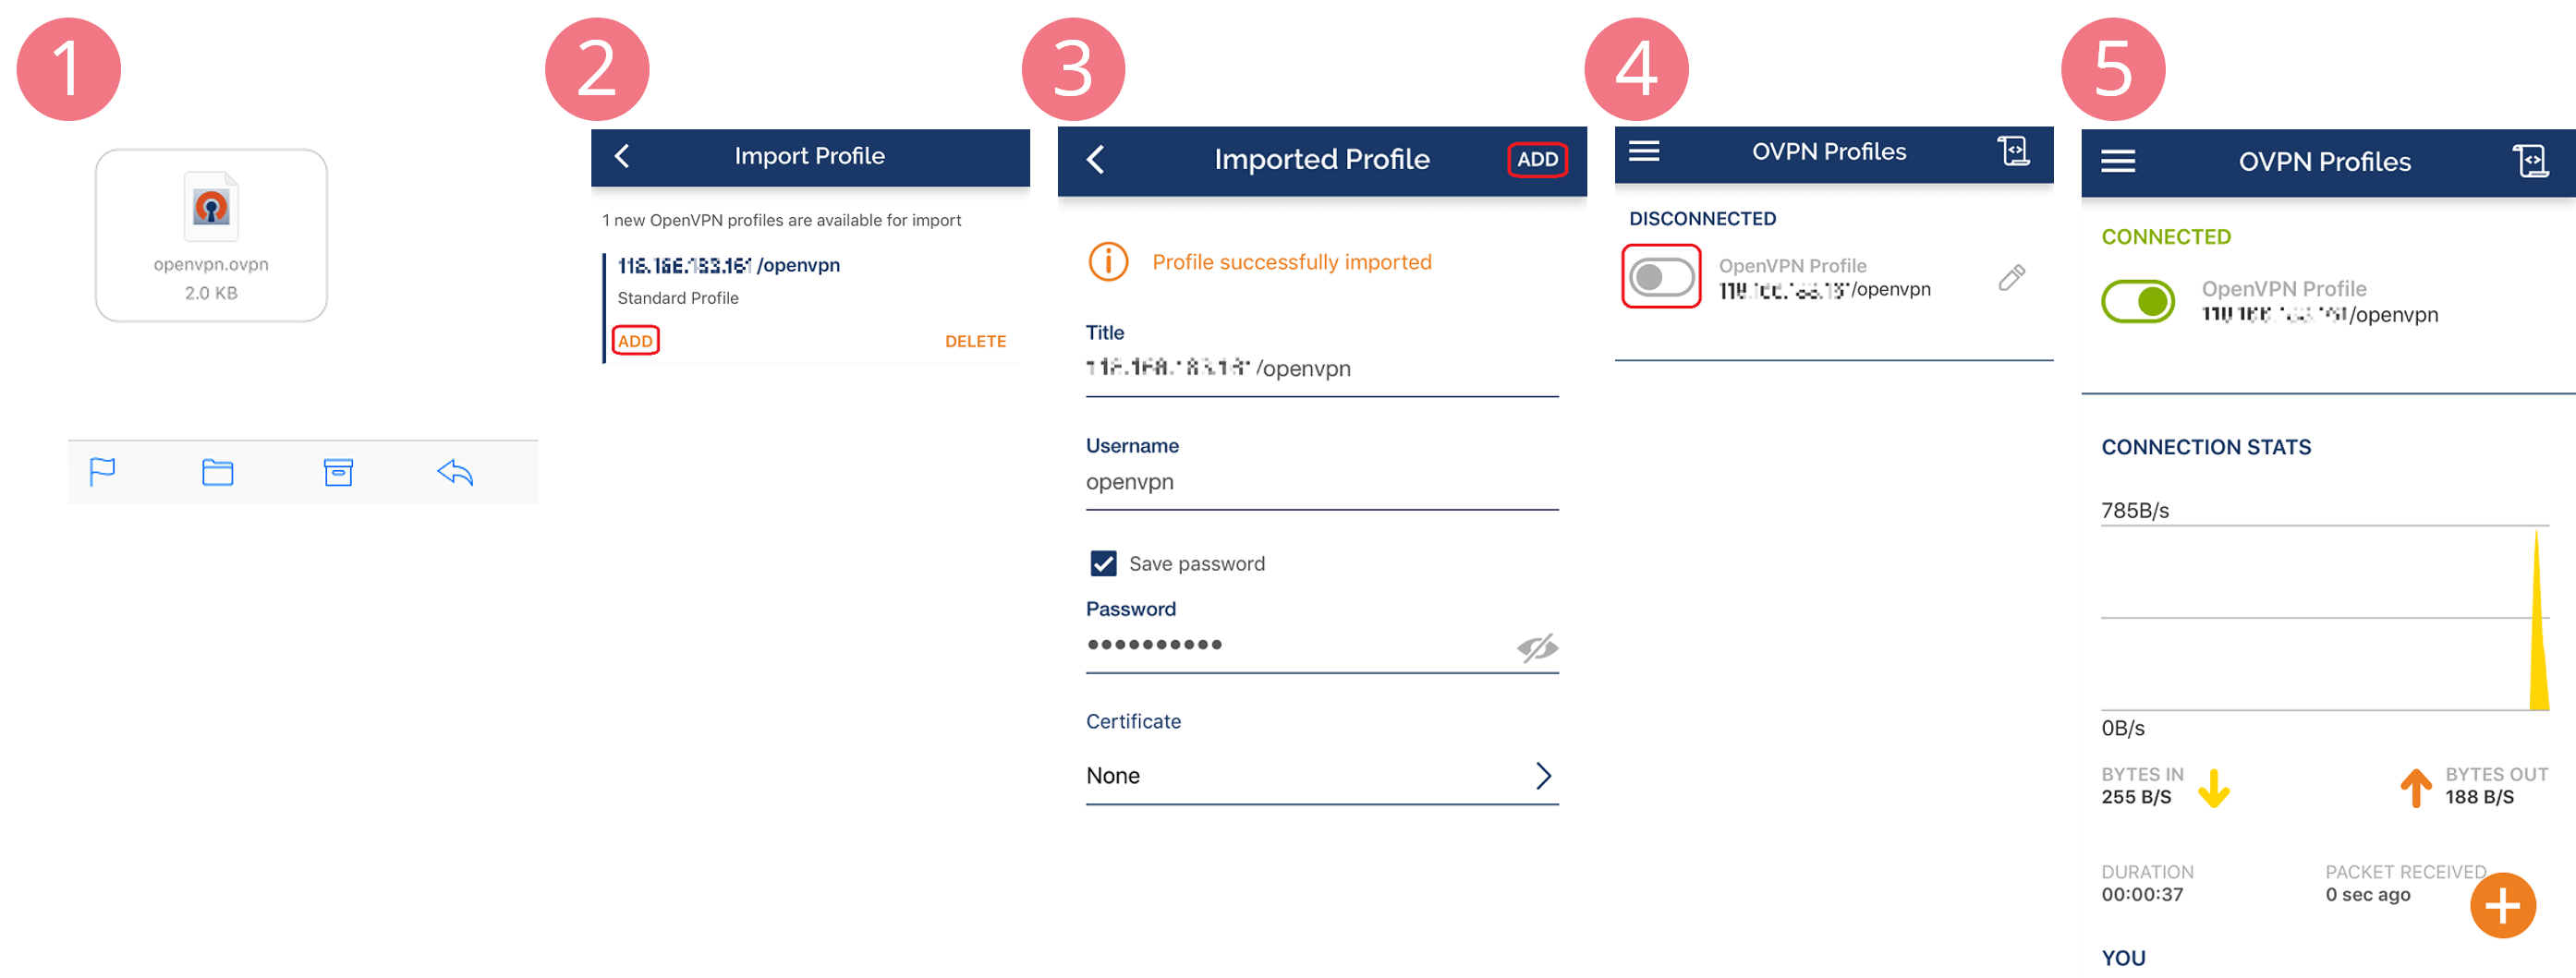
1. Download OpenVPN Connect from the App store. Then, send the config file to the iOS device, here we send it via mail. On the iOS device, tap the file and open it by OpenVPN app.
2. Tap 'ADD' to import the client configuration.
3. Enter Username and Password, then tap ADD.
4. Switch on VPN.
5. We can check the VPN status after the connection established.
Connecting from Windows by OpenVPN
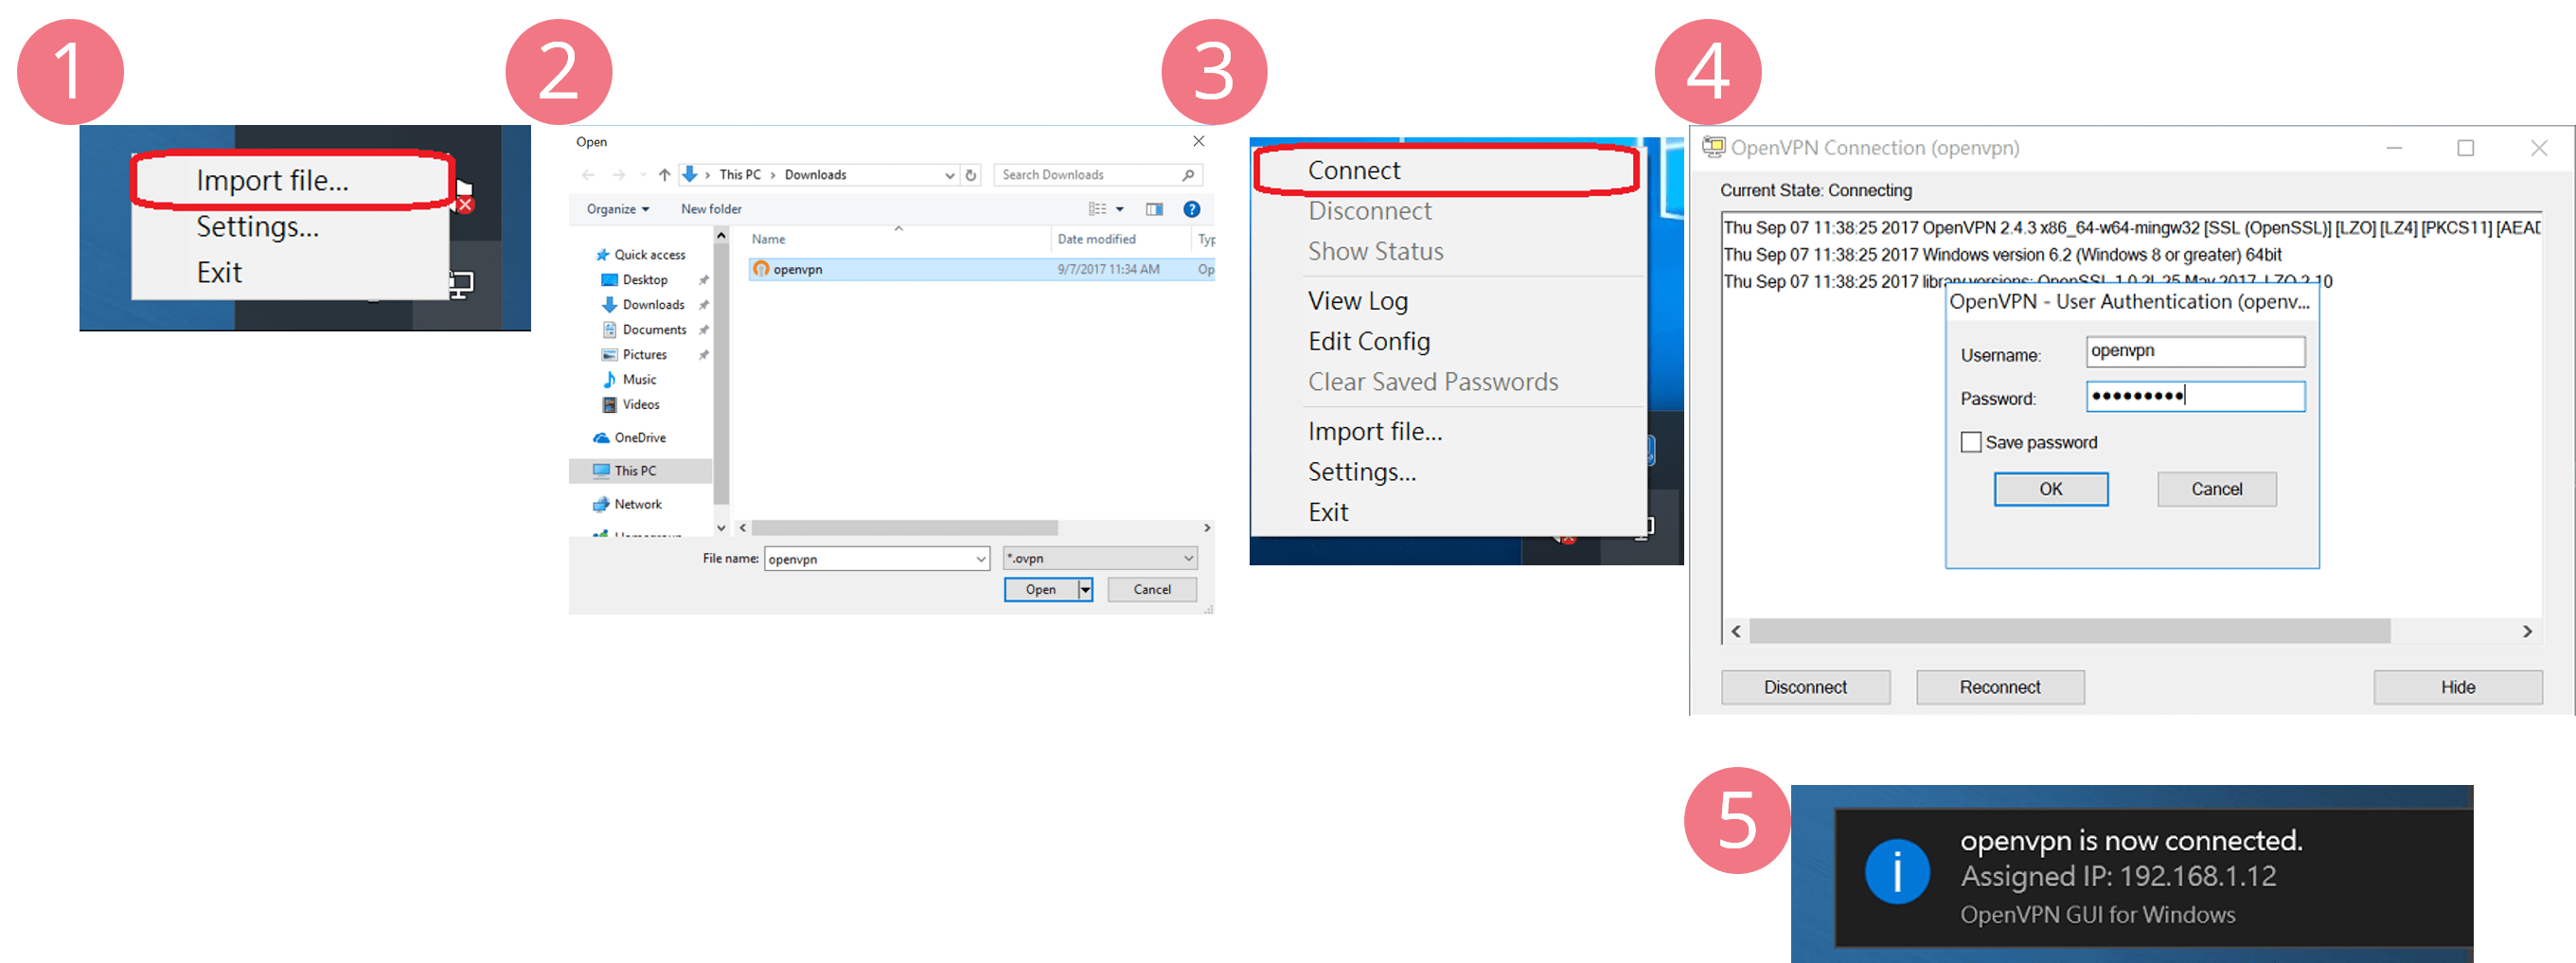
1. Download and install OpenVPN for Windows. Import the client configuration file by right-clicking the OpenVPN icon on the taskbar, then click Import file...
2. Select the configuration file then click Open.
3. Establish VPN connection by right-clicking the OpenVPN icon on the taskbar, then click Connect.
4. Enter Username and Password, then click OK to connect.
5. We can check the VPN status after the connection established.
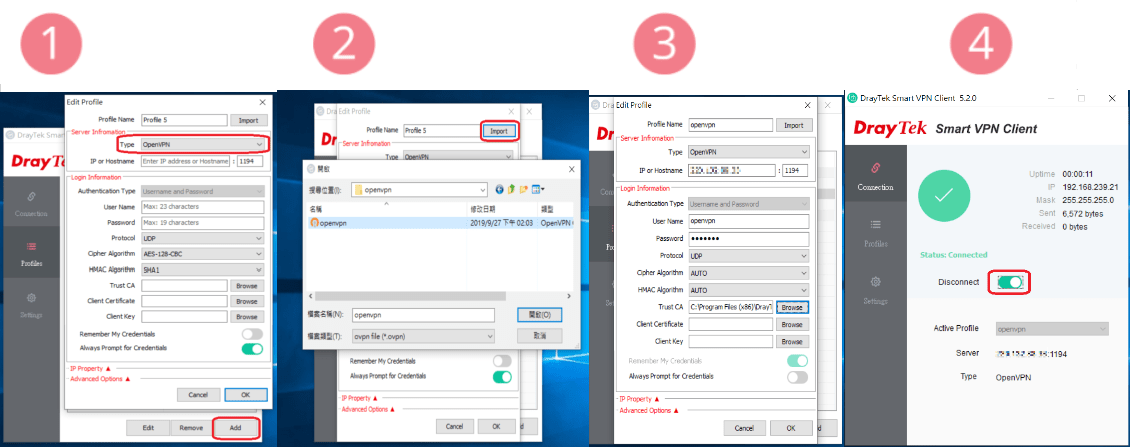
Connecting from Windows by OpenVPN with Smart VPN client
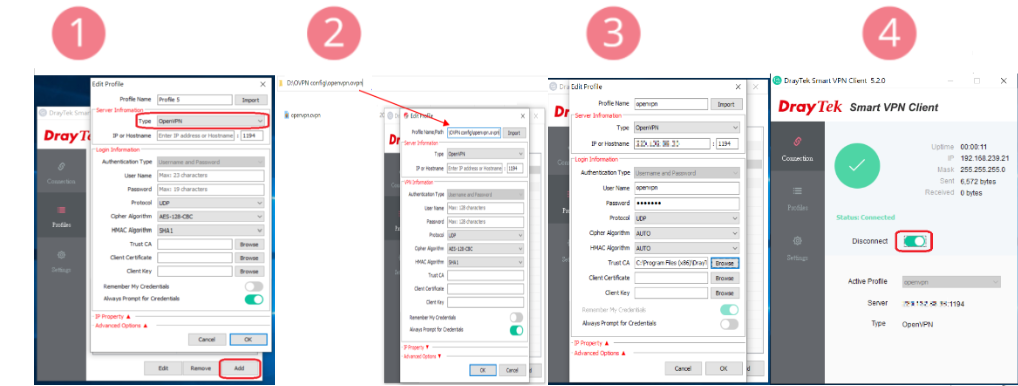
OpenVPN is supported by Smart VPN client since v5.2.0, please install OpenVPN for Windows first.
1. Add new profile and choose VPN type OpenVPN.
2. Import openvpn.ovpn with the full path into Smart VPN client.
3. Enter Username and Password then click OK to save it.
4. Switch Connect button and then we can check the VPN status after the connection established.
Connecting from Android by OpenVPN Connect
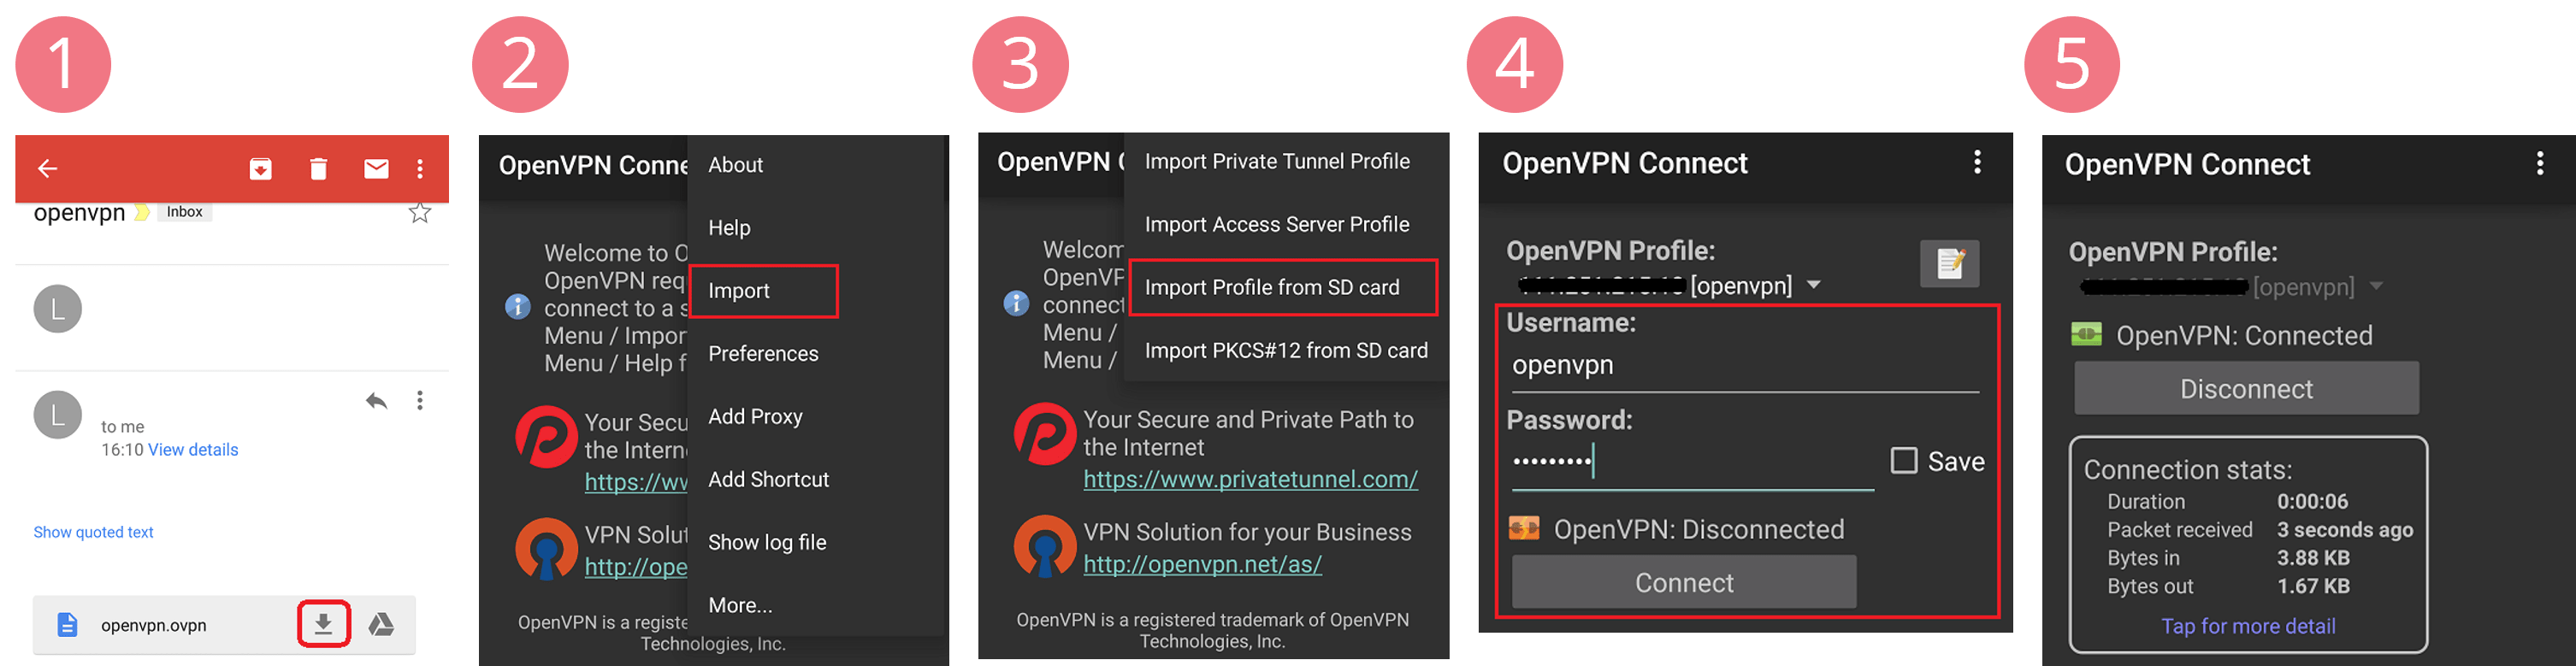
1. Download OpenVPN Connect from Play store. Send the configuration file to Android device, here we send it via mail, then download it to the device.
2. Import the client configuration file: Open OpenVPN Connect, then tap the menu icon on the top right of the app.
3. Choose Import Profile from SD card and select the client configuration file.
4. Establish VPN connection, enter Username and Password, then tap Connect.
5. We can check the VPN status after the connection established.
Connecting from Linux (Ubuntu)
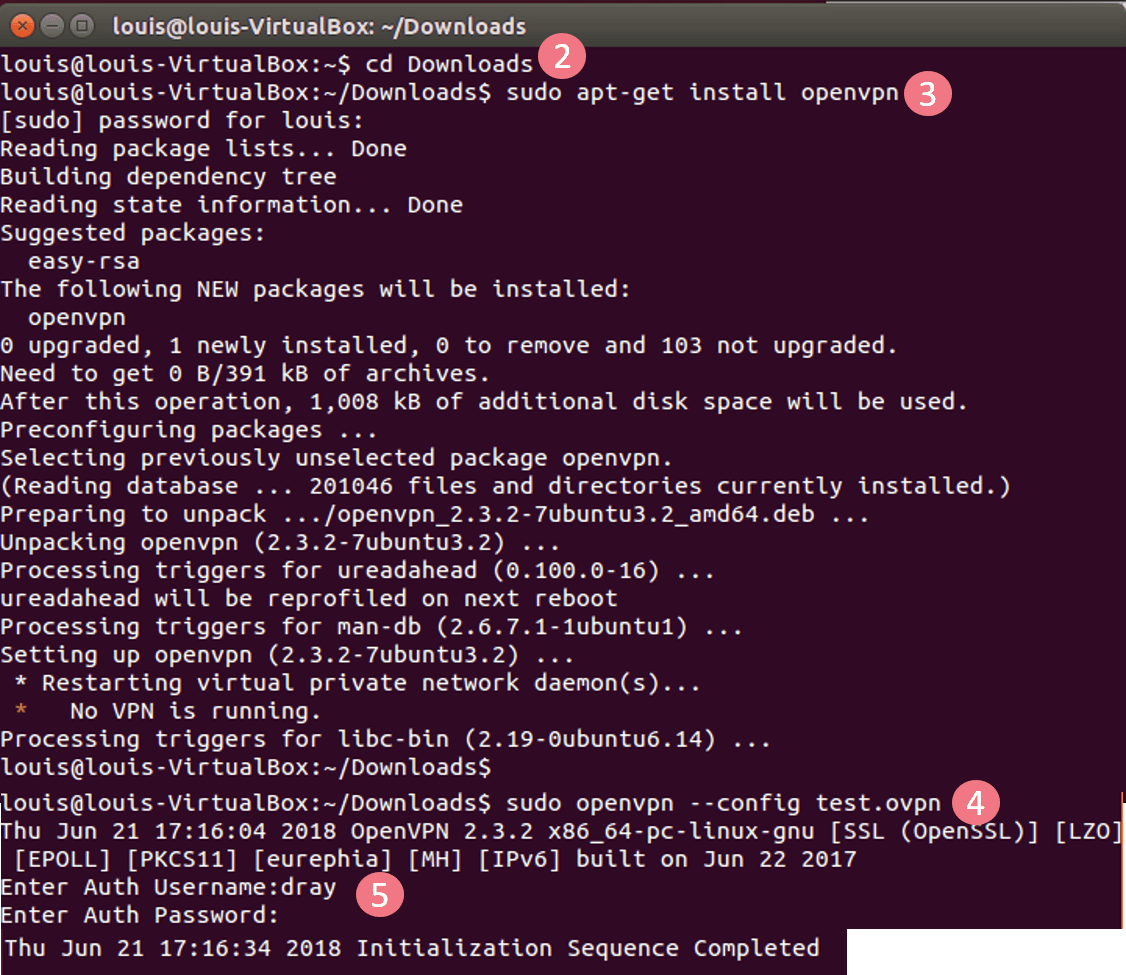
1. Download the config file from router and run CLI.
2. Move to the directory where the configuration file is located
3. Install OpenVPN package by command sudo apt-get install openvpn
4. Connect OpenVPN by command sudo openvpn --config [openvpn config filename]
5. Enter username and password
Troubleshooting
AUTH: Received control message: AUTH_FAILED
The username does not exist on the router's local database, or the password doesn't match. (step 1)
DrayOS5 Routers also support generating certificates for OpenVPN since firmware version 5.3.0. This article demonstrates how to create OpenVPN from different clients to Vigor2136 with the self-generated certificates.
-
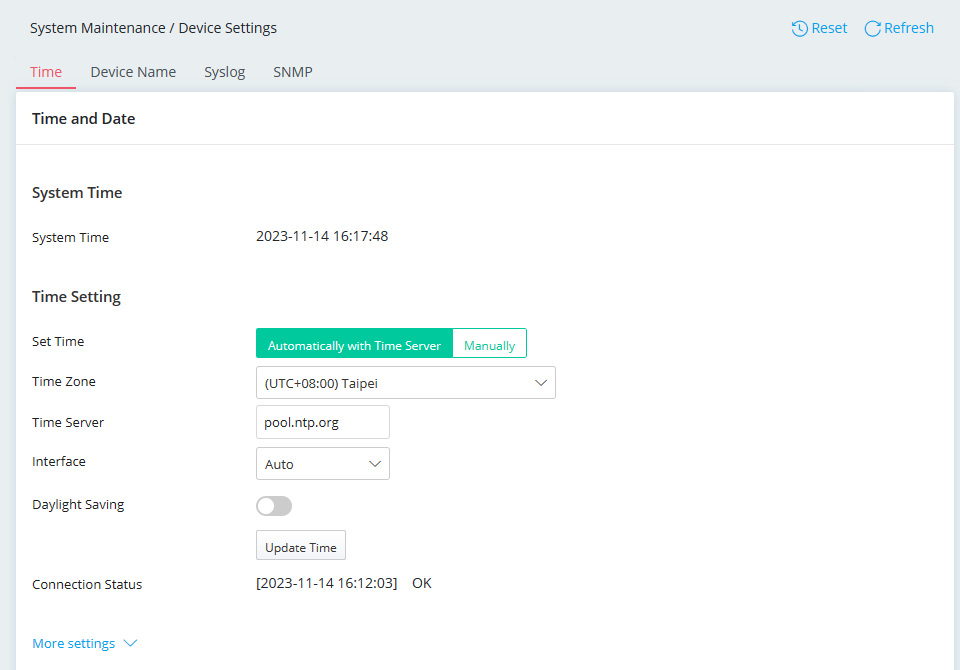
Please confirm the time is correct on the router via System Maintenance / Device Settings / Time page.
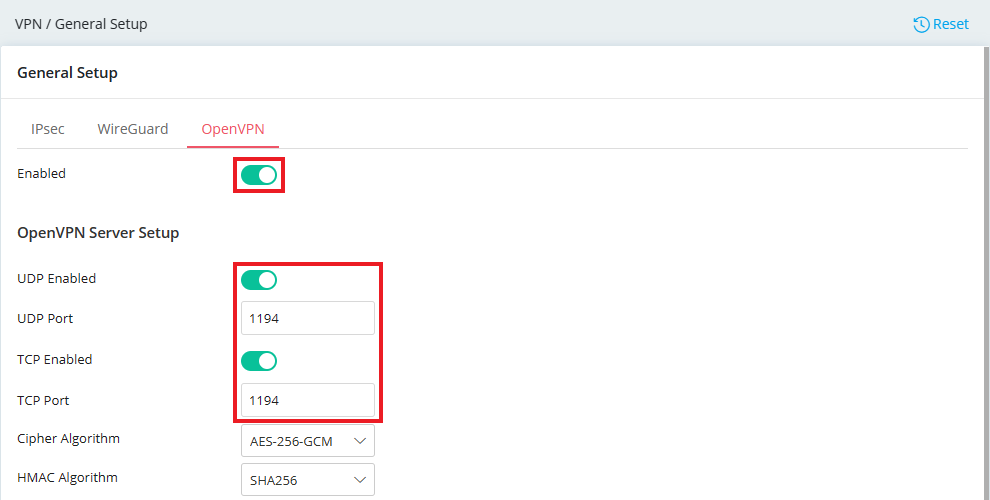
- Go to VPN / General Setup / OpenVPN page to enable OpenVPN service as follows:
- Enable OpenVPN service.
- Enable TCP Mode or UDP Mode, depends on which transfer protocol you would like to use for OpenVPN connections.
- Customize the TCP Port and UDP Port you like.(Optional)
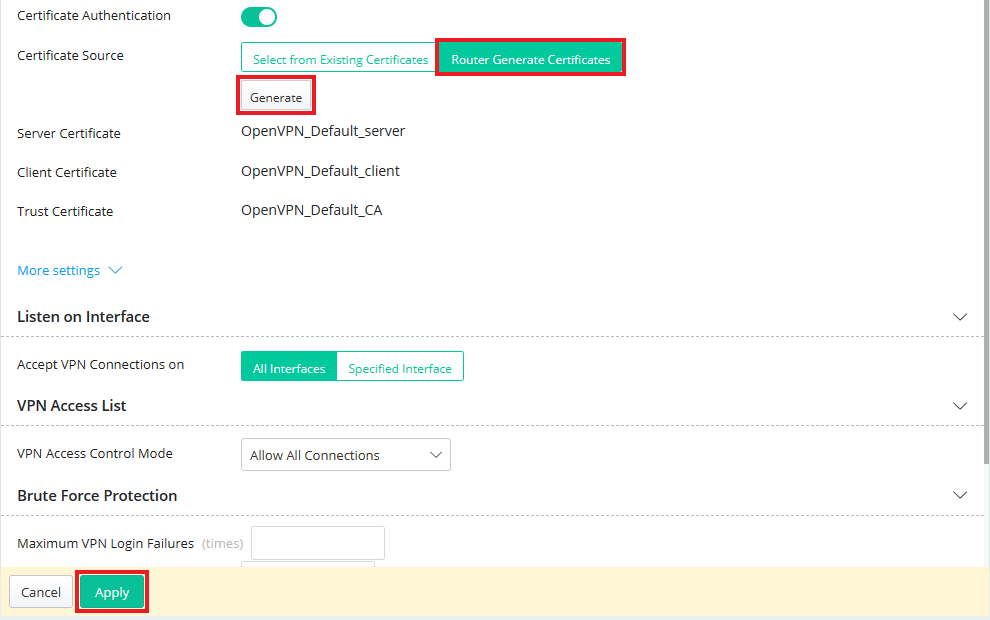
- Generate certificates.
- Choose Router Generate Certificates.
- Click Generate
- Click Apply to save.
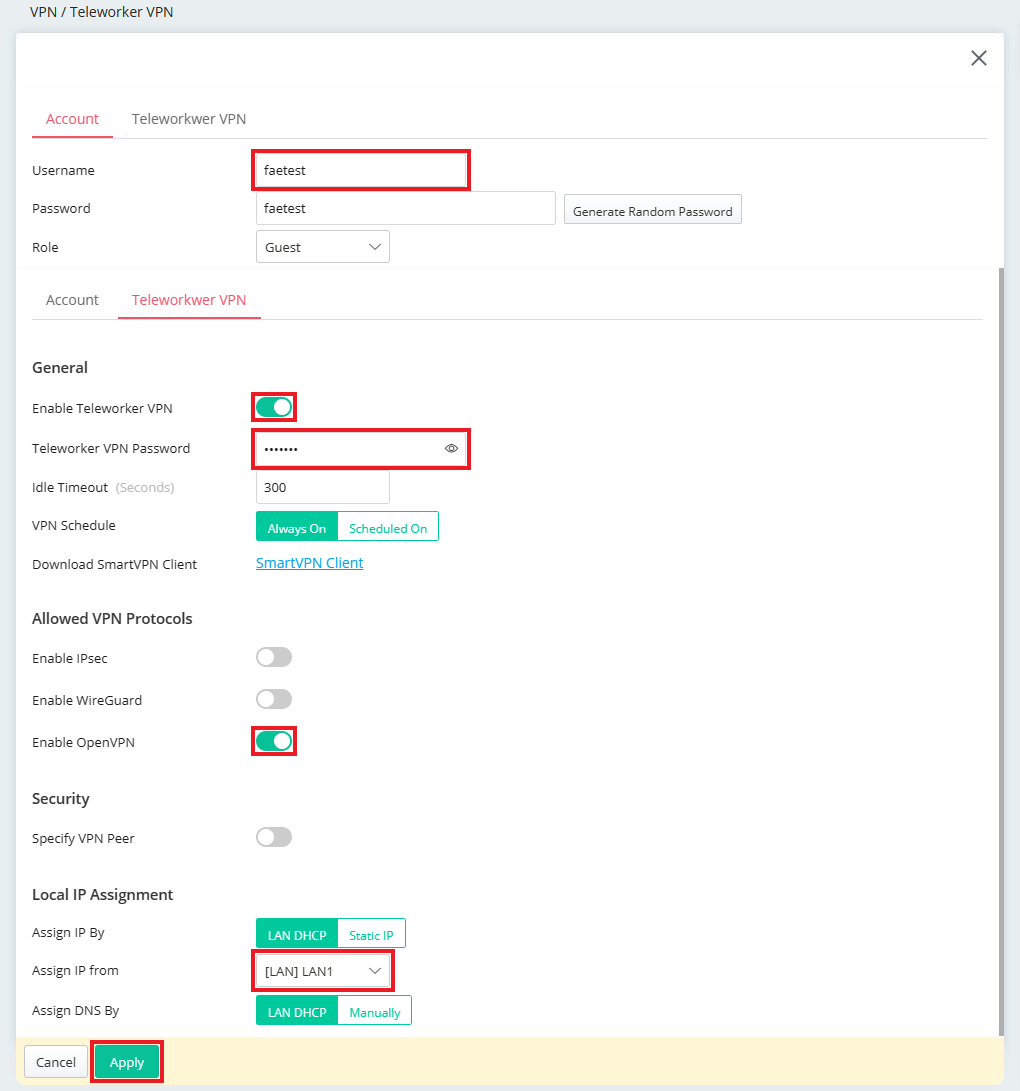
- Go to VPN / Teleworker VPN to create Teleworker VPN profile as follows:
- Enter Username in Account tab.
- Go to Teleworker VPN tab and select Enable.
- Enter Teleworker VPN Password.
- Select Enable OpenVPN in Allowed VPN Protocols.
- Select the LAN subnet assigned to the user
- Click Apply to save the profile.
- Go back to VPN / Teleworker VPN page to export OpenVPN configuration file.
- Click Teleworkers Configuration Generator.
- Choose the WAN interface that allows OpenVPN connection.
- Select the Protocol you would like to use.
- Select Download zip file.
- Click Download Configuration.

Connecting from Windows via OpenVPN
- Download and install OpenVPN tool for Windows. Import the client configuration file by right-clicking the OpenVPN GUI icon on the taskbar, navigate to Import then click Import file...
- Select client.ovpn we just downloaded from router then click Open.
- Establish the VPN connection by right-clicking the OpenVPN GUI icon on the taskbar, navigating to the profile then click Connect.
- Enter Username and Password, then click OK to connect.
-
We can check the VPN status after the connection is established.
Connecting from Windows via OpenVPN with Smart VPN client
OpenVPN is supported by Smart VPN client since v5.2.0, please install OpenVPN tool for Windows first.
- Add a new profile and choose OpenVPN as VPN Type.
- Import client.ovpn we just downloaded from the router with full path into Smart VPN Client.
- Enter Username and Password, then click OK to save the profile.
-
Switch Connect button to dial up VPN and we can check the VPN status after the connection is established.
Connecting from macOS by Tunnelblick
- Download and install the OpenVPN client software. Start the software and import the client configuration file by clicking I have configuration files.
- Double-click the client configuration file, then select "All Users" or "Only Me", depending on whether to share this VPN profile with other users. (Note: If you can't import the client configuration by double-clicking it, please try to drag and drop the ovpn file on the Tunnelblick icon on the menu bar or dock.)
- To start the VPN tunnel, right-click the Tunnelblick icon on the menu bar, then click Connect openvpn ("openvpn" is the name of the client configuration file)
-
We can check the VPN status after the connection is established.
Connecting from iOS by OpenVPN Connect
- Download OpenVPN Connect from the App store. Then, send the config file to the iOS device, here we send it via mail. On the iOS device, tap the file and open it by OpenVPN app.
- Tap "ADD" to import the client configuration.
- Enter Username and Password, then tap ADD.
- Switch on VPN.
-
We can check the VPN status after the connection is established.
Connecting from Android by OpenVPN Connect
- Download OpenVPN Connect from Play store. Send the configuration file to Android device, here we send it via mail, then download it to the device.
- Import the client configuration file: Open OpenVPN Connect, then tap the menu icon on the top right of the app.
- Choose Import Profile from SD card and select the client configuration file.
- Establish VPN connection, enter Username and Password, then tap Connect.
-
We can check the VPN status after the connection is established.
Connecting from Linux (Ubuntu)
- Download the config file from the router and run CLI.
- Move to the directory where the configuration file is located.
- Install OpenVPN package by command
sudo apt-get install openvpn - Connect OpenVPN by command
sudo openvpn --config [openvpn config filename] -
Enter username and password.
Vigor3900 and Vigor2960 support OpenVPN since firmware version 1.4.0. Unlike other VPN protocols, OpenVPN offers Network Administrator the flexibility to choose transmission protocol, port number, and encryptions. It's an open-source application that you can find the client software for every platform. This article demonstrates how to set up Vigor3900 /Vigor2960 as an OpenVPN server and use its local user database for authentication.
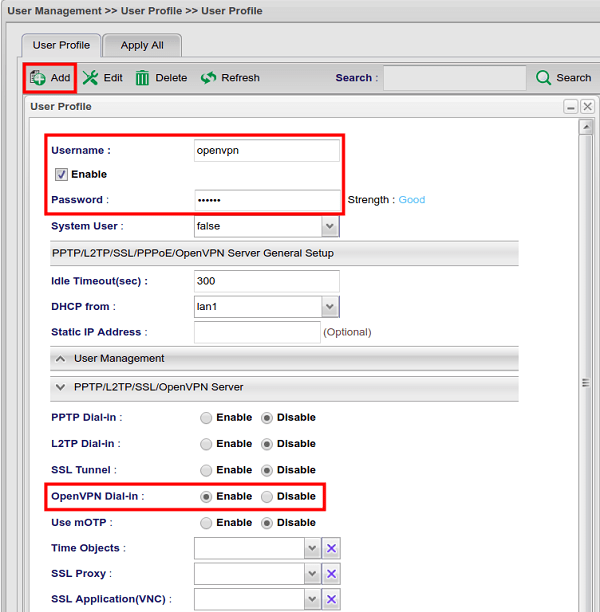
1. Add an OpenVPN User Profile at User Management >> User Profile page:
- Enter Username
- Check Enable
- Enter Password
- Select "Enable" for OpenVPN Dial-In at PPTP/L2TP/SSL/OpenVPN Server
2. Go to VPN and Remote Access >> Remote Access Control and Enable OpenVPN Service
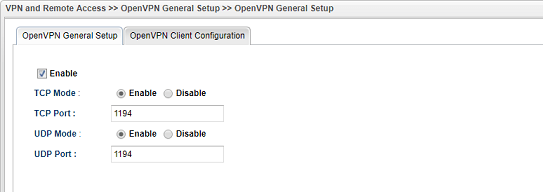
3. Go to VPN and Remote Access >> OpenVPN General Setup >> OpenVPN General Setup:
- Check Enable
- Enable TCP Mode or UDP Mode, depends on which transfer protocol you would like to use for OpenVPN connections
- Customize the TCP Port and UDP Port if you want
- Click Apply to save
4. Confirm the time settings is correct on the router.

5. Go to OpenVPN Client Configuration page:
- Choose the WAN that allows OpenVPN connection for Interface
- Select the Protocol you would like to use
- Give a Config filename
- Click Download to save the VPN configuration file, and send to the OpenVPN client devices.
You may use any OpenVPN Client App for the connection. All you need to do is import the configuration file downloaded from the router, and enter the username and password when being asked for credentials. Here we show some examples.
Connecting from macOS by Tunnelblick
1. Download and install the OpenVPN client software. Start the software and import the client configuration file by clicking I have configuration files.
2. Double-click the client configuration file, then select "All Users" or "Only Me" depends on whether to share this VPN profile to other users. (Note: If you can't import the client configuration by double-clicking it, please try to drag and drop the ovpn file on the Tunnelblick icon on the menu bar or dock.
3. To start the VPN tunnel, right-click the Tunnelblick icon on the menu bar, then click Connect openvpn ("openvpn" is the name of the client configuration file)
4. We can check the VPN status after the connection established.
Connecting from iOS by OpenVPN Connect
1. Download OpenVPN Connect from the App store. Then, send the config file to the iOS device, here we send it via mail. On the iOS device, tap the file and open it by OpenVPN app.
2. Tap 'ADD' to import the client configuration.
3. Enter Username and Password, then tap ADD.
4. Switch on VPN.
5. We can check the VPN status after the connection established.
Connecting from Windows by OpenVPN
1. Download and install OpenVPN for Windows. Import the client configuration file by right-clicking the OpenVPN icon on the taskbar, then click Import file...
2. Select the configuration file then click Open.
3. Establish VPN connection by right-clicking the OpenVPN icon on the taskbar, then click Connect.
4. Enter Username and Password, then click OK to connect.
5. We can check the VPN status after the connection established.
Connecting from Windows by OpenVPN with Smart VPN client
OpenVPN is supported by Smart VPN client since v5.2.0, please install OpenVPN for Windows first.
1. Add new profile and choose VPN type OpenVPN.
2. Import openvpn.ovpn into Smart VPN client.
3. Enter Username and Password then click OK to save it.
4. Switch Connect button and then we can check the VPN status after the connection established.
Connecting from Android by OpenVPN Connect
1. Download OpenVPN Connect from Play store. Send the configuration file to Android device, here we send it via mail, then download it to the device.
2. Import the client configuration file: Open OpenVPN Connect, then tap the menu icon on the top right of the app.
3. Choose Import Profile from SD card and select the client configuration file.
4. Establish VPN connection, enter Username and Password, then tap Connect.
5. We can check the VPN status after the connection established.
Connecting from Linux (Ubuntu)
1. Download the config file from router and run CLI.
2. Move to the directory where the configuration file is located
3. Install OpenVPN package by command sudo apt-get install openvpn
4. Connect OpenVPN by command sudo openvpn --config [openvpn config filename]
5. Enter username and password
Troubleshooting
AUTH: Received control message: AUTH_FAILED
The username does not exist on the router's local database, or the password doesn't match. (step 1)
Published On:2020-07-14
ShareWas this helpful?