
Use High Availability in Hot-Standby Mode
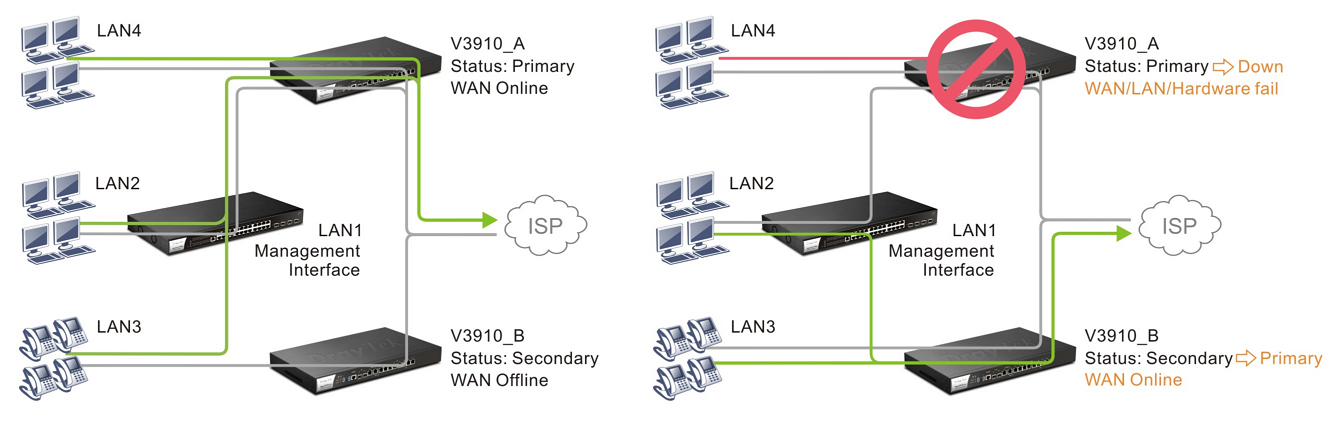
High Availability (HA) is a feature that allows the network administrator to use another router to the network for hardware redundancy. In Hot-Standby Mode, The primary and secondary router share the same WAN source; however, only the primary is usually online. When the primary router goes down, the secondary comes up, dial-up the same WAN line, and continues to provide Internet service to LAN clients.
For DrayOS models, the two Vigor Router working in HA hot-standby mode can share the same WCF or DrayDDNS license key, and the configuration made on the primary will automatically sync to the secondary one. This article is going to demonstrate how to set up two routers in HA Hot-Standby Mode and create a group on MyVigor to share the WCF or DrayDDNS license key.
Note: HA works between the same series(i.e. 2927Lac+2927), and the firmware and country code of both routers must be the same.
Register both Vigor Router to MyVigor Server
Before setting up High Availability on Vigor Router, please register both routers to the MyVigor server. Both routers need an Internet connection to access the MyVigor server for registration. After both routers are registered, create an HA group, specify the HA Group ID, and add both routers to the HA group.

Then activate the needed service (e.g., WCF or DrayDDNS) on the primary router. With this High Availability Group configured, if a high availability failover occurs, the backup router will be able to use the licenses available on the primary router.
Disconnect the WAN of the Secondary Router
It is recommended to disconnect the WAN connections of the secondary router before finishing the High Availability configurations and the Config synchronization.
Configuration of the Primary Router
1. On the primary router, go to LAN IP Configuration at LAN >> General Setup,
IP Address: It has to be different from the HA Virtual IP. If the HA peers have the same Priority ID, the one has the smaller number for LAN IP will be the primary one, so we suggest using an IP with a lower number on the Primary one. For example, x.x.x.1.
Gateway IP: should is the same as LAN IP, and the note indicates that the actual gateway IP provided to DHCP clients will be the Virtual IP.
2.On the primary router, go to Application >> High Availability,
Group ID: The routers with the same number will be in the same HA group. The default value is 1, we may leave it as default here.
Priority ID: In a HA group, the router with the largest number will be the primary one. if two router's Priority ID are the same, the smaller IP number will be the primary router.
Authentication Key: All the HA members should have the same key.
Management Interface: the packets for communication between members will send over the selected interface. To have the best communication and for security purpose, we recommend to choose an interface that has less interruption. In our scenario, we reserve LAN 1 for High Availability only and put all other LAN clients in LAN2~LAN5.
Update DDNS: for dynamic WAN IP users, enable this function so once the secondary router becomes primary and dials up the WAN, it will also update its new WAN IP address to the same DDNS profile, so your network will be accessible with the same DDNS domain.
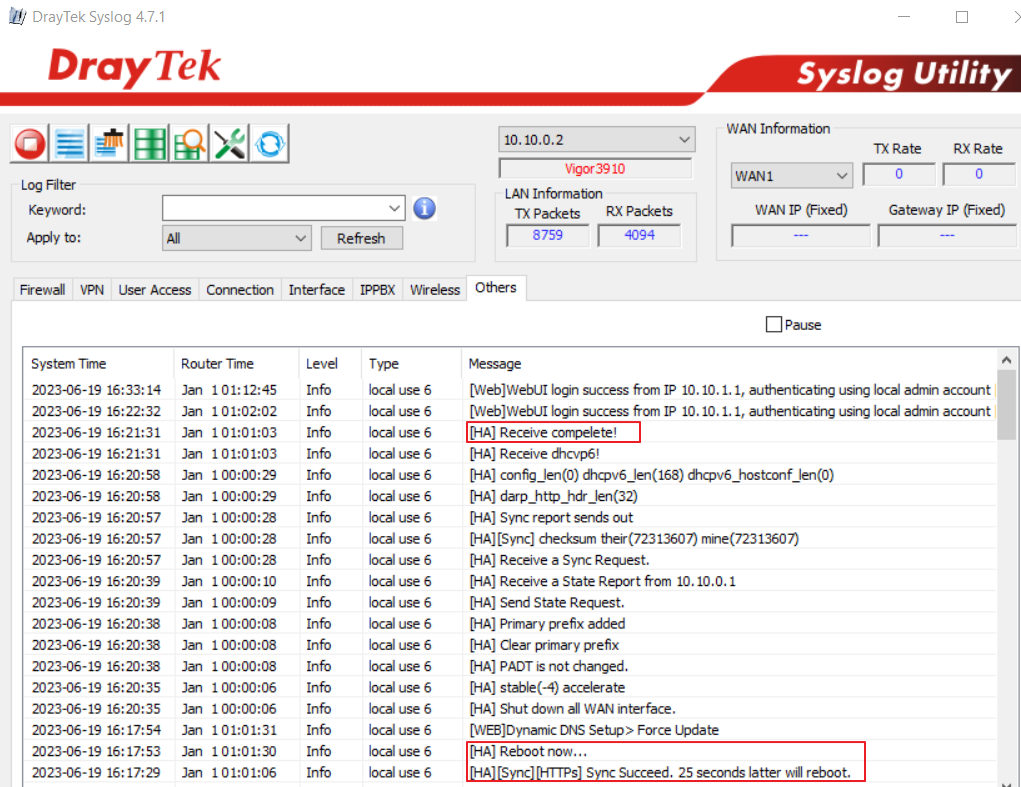
Syslog: enable to show all the High Availability relative logs in syslog.
Enable the LAN Subnet to join High Availability. Hardware redundancy will only apply to the selected LAN subnets. Virtual IP is the IP which will be used as LAN client's gateway IP.
IPv6: Select the High Availability LAN interface and deselect the other LANs when IPv6 is not in use.
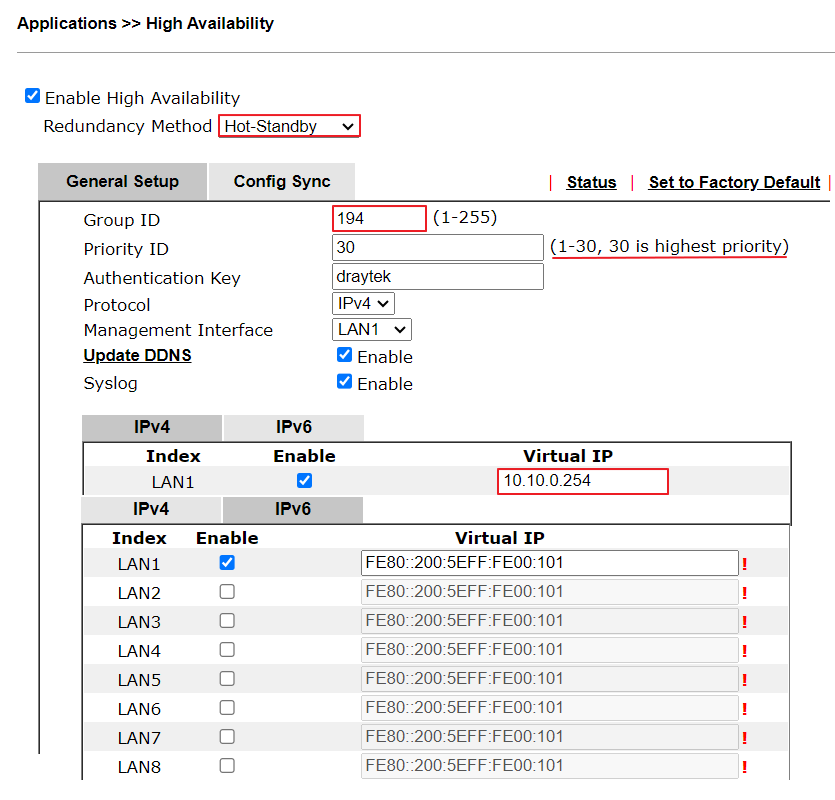
Note: Both IPv4 and IPv6 need to have at least one Virtual IP when HA enabled. Otherwise, the Router will be marked with ! Status.
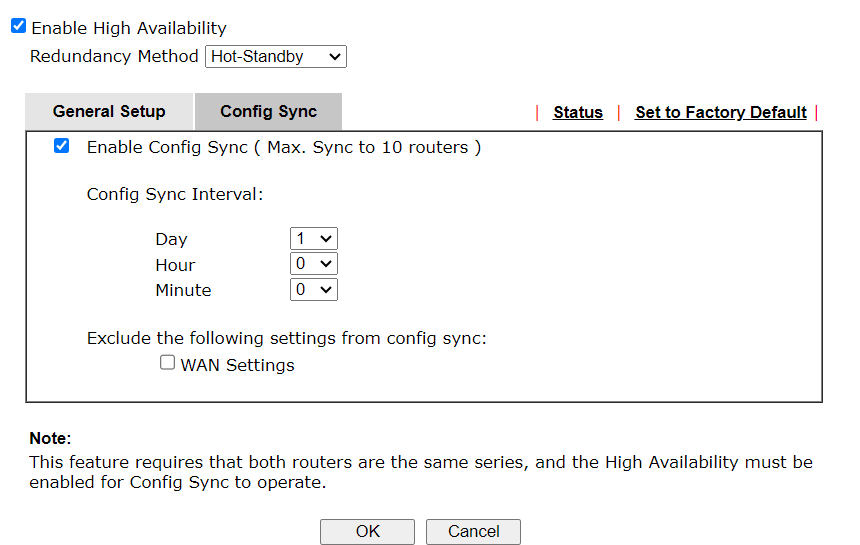
3. Go to Config Sync tab, check Enable Config Sync to update the configuration to the secondary router periodically. We suggest set a longer Config Sync interval such as 1 day due to the router will reboot after every config sync event. Please note even the config sync interval is configured to 1 day, Vigor Router will still sync the configuration automatically after a configuration change.
Configuration of the Secondary Router
4. Go to LAN >> General Setup for LAN IP Configuration. Mind that the IP should be different from (better larger) than that of the primary router. If you have more than one LAN, every LAN should have a different IP Configuration on primary and secondary routers to avoid IP conflict.
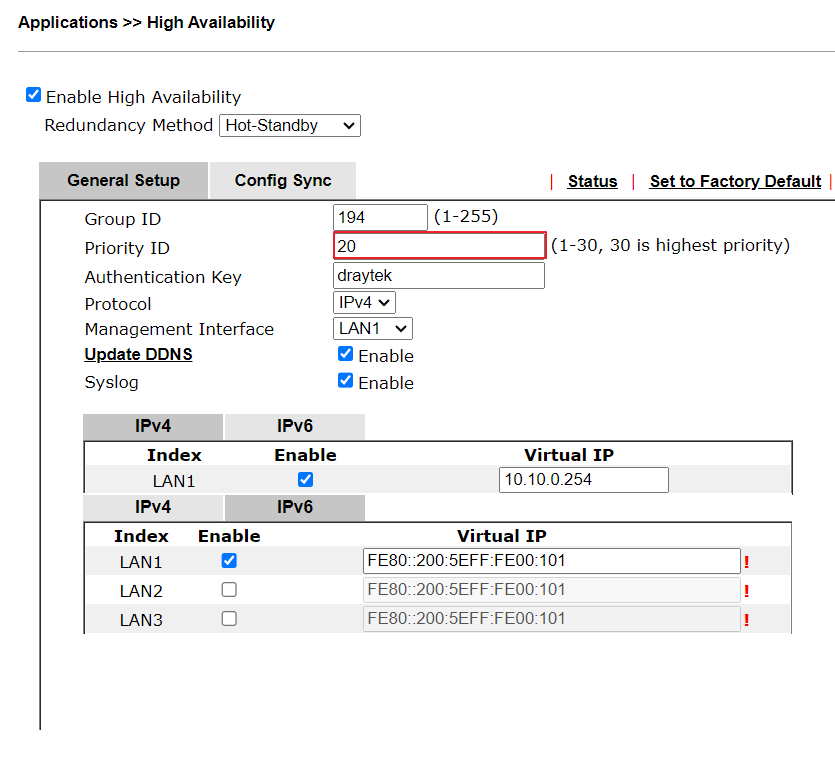
5.Go to Application >> High Availability, and have a similar HA configuration except for Priority ID. Priority ID should be lower than the primary router. Config Sync should be enabled in the Config Sync tab also.
6. After all the configurations are set up, please link up the management interface LAN between the routers, and both routers can start communicating with each other, deciding which one should be the primary and syncing the configurations. Note: Be sure to link the routers on a port that is a port member of the management LAN subnet.
Checking HA Status
7. The secondary router will reboot after syncing the configuration from the primary router. We can check Syslog to see if the configuration sync stops.
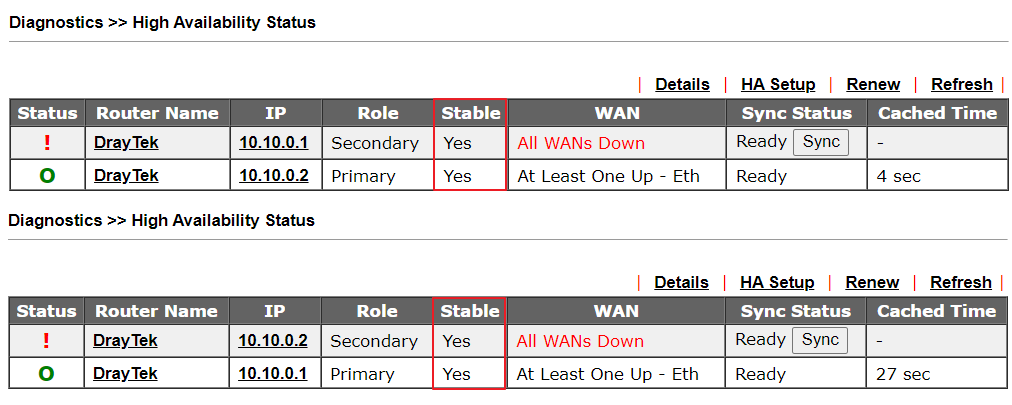
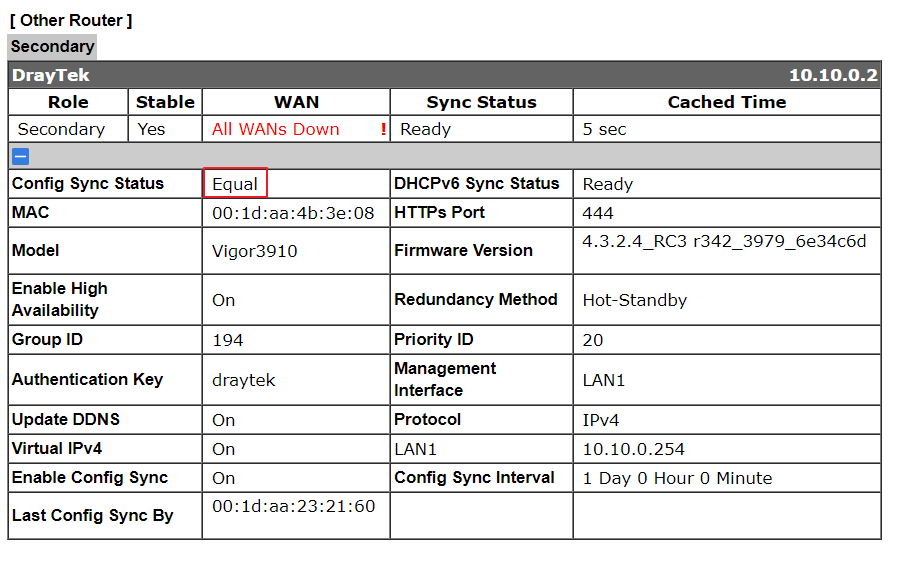
8. When the config sync finishes, please go to Applications >> High Availability >> Status to check both Routers’ statuses. When the Stable field on both routers is Yes, the routers have finished the communication and can run HA correctly. The primary router shows the Status with the green circle. The secondary router will show the Status with !. The All WANs down error event exist because the secondary router will not bring up the WAN when the Primary router is alive. It is the normal Status for the secondary router in Hot-Standby mode.
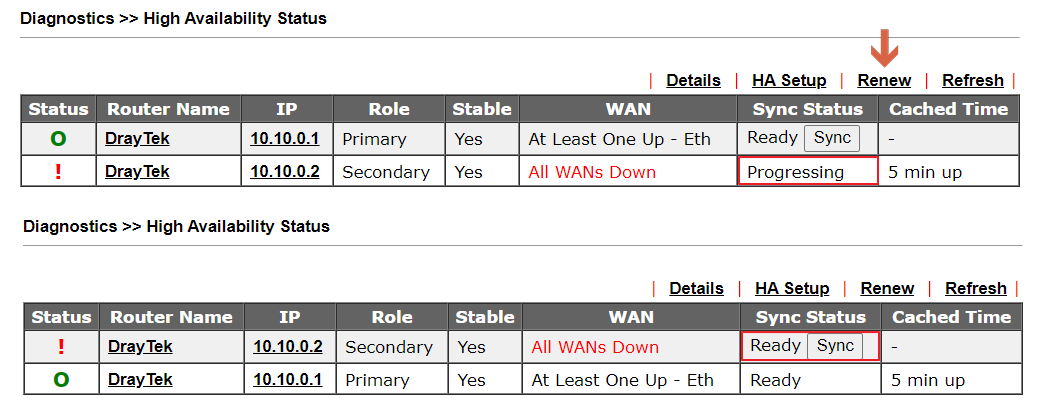
9.Sometimes we may see the Sync Status or the Stable Status of both routers is not the same, for example, one router displays in Ready state but the other router is in Progressing state, we can click the Renew button and the Refresh button on the router. It can force the router to send the status update report, then the status will be updated.
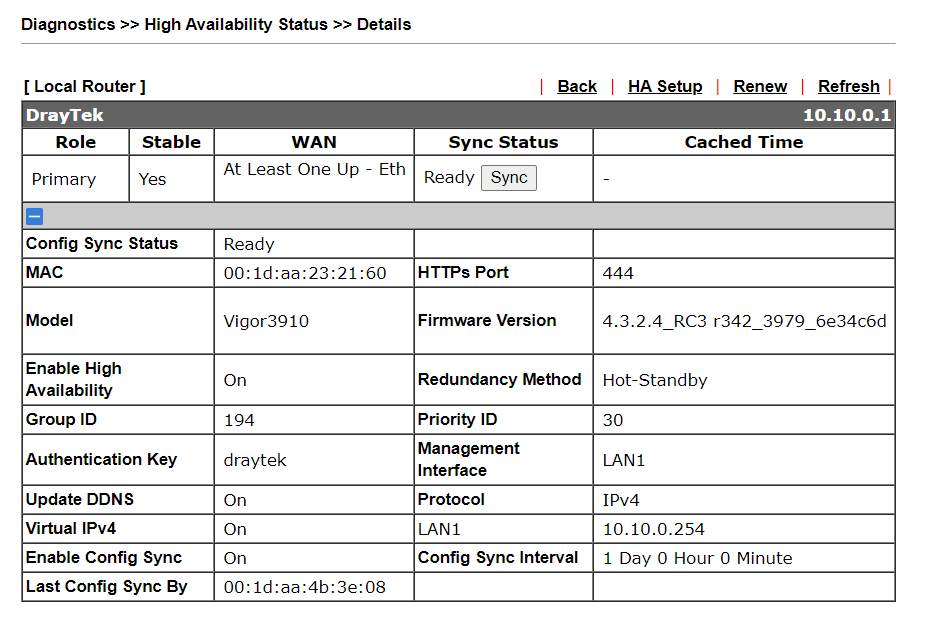
10. The Details page shows more information.
DHCPv6 Sync always runs in the background. It has Ready and Progressing state.
Config Sync Status Equal will only been seen on the secondary router because it does the config sync with the Primary router.
Note: 1. HA works between the same series router (i.e., 2927Lac+2927), and both routers' firmware and country code must be the same. 2. It is recommended to link up the WAN on the secondary router after the config sync finishes. Similarly, disconnect the WAN on the secondary router when changing the configurations on the primary router. 3. When upgrading the firmware, please disconnect the WAN on the secondary router.
Before configuring High Availability, we need to set up LAN profiles and the VLAN ID configurations on each router by the following rules:
1. The LAN profile name and VLAN ID of the corresponding LAN between different routers must be the SAME.
2. Routers MUST own the DIFFERENT IP addresses on the HA Management LAN.
3. Router MUST own the SAME IP address on the non-HA Management LAN.
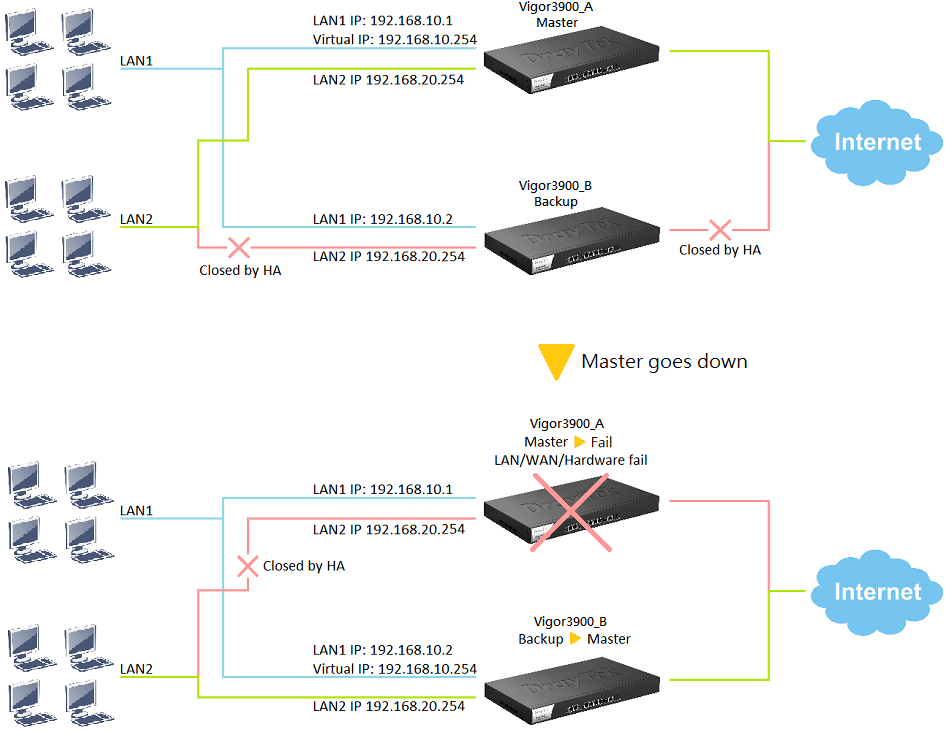
In this scenario, we use LAN1 as the HA Management LAN, so the IP addresses of each router on LAN1 should be different. And the IP addresses on other non-HA Management LAN should be the same. So, the IP addresses settings will be:
- Vigor3900_Master: LAN1 (HA-LAN) - 192.168.10.1, LAN2 - 192.168.20.254
- Vigor3900_Slave: LAN1 (HA-LAN) - 192.168.10.2, LAN2 - 192.168.20.254
Master Router Setup
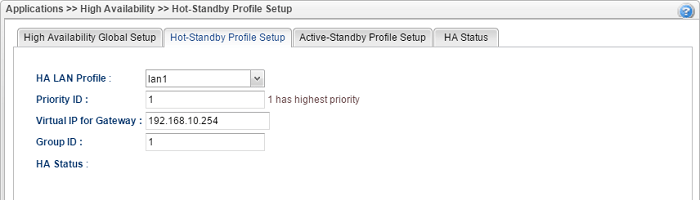
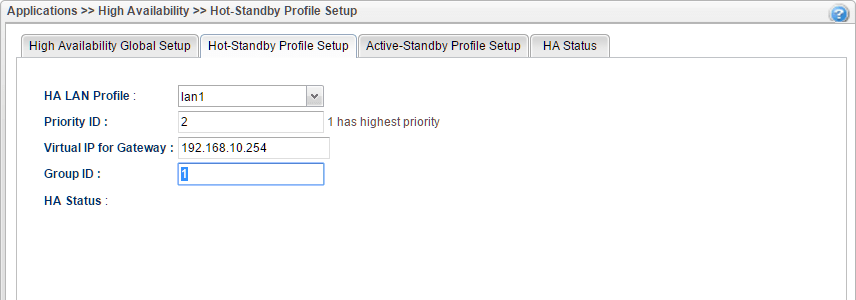
1. Go to Applications >> High Availability >> Hot-Standby Profile Setup,
- Select "lan1" for HA LAN Profile.
- Input Priority ID as 1, which is the highest priority.
- Input Virtual IP 192.168.10.254 for Gateway. Virtual IP should be an IP in the lan1 network
- Input Group ID 1 (The other router should have same Group ID)
- Click Apply.
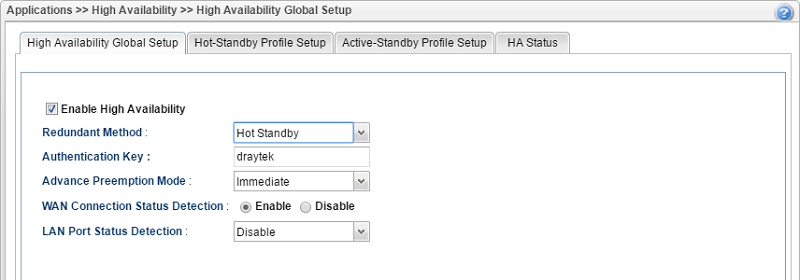
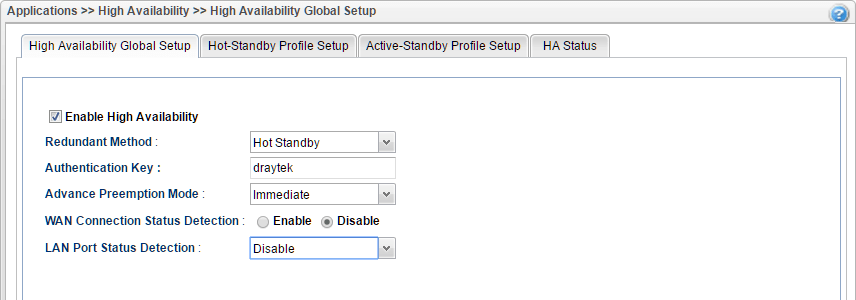
- Check Enable High Availability
- Select "Hot-Standby" for Redundant Method
- Input Authentication Key (The other router should have same Authentication Key; otherwise, the config synchronization will fail.)
- Select "Immediate" for Advance Preemption Mode
- Select "Enable" for WAN Connection Status Detection
- Select "At Least One Up" for LAN Port Status Detection
- Select lan1 for HA LAN Profile
- Input Priority ID as 2, since we already have the other Vigor3900 configuring with Priority ID 1
- Input Virtual IP 192.168.10.254 for Gateway (Virtual IP should be the same as the Virtual IP set up on the other router)
- Input Group ID 1 (should be same as the Group ID on the other router)
- Click Apply.
- Check Enable High Availability
- Select Hot-Standby for Redundant Method
- Input Authentication Key (The Authentication Key should be the same as the other router.)
- Select "Immediate" for Advance Preemption Mode
- Select "Disable" for WAN Connection Status Detection (Because in Hot-Standby mode, Master and Slave router share the same Internet connection, so this is to ensure Slave device will keep Inter-LAN working when WAN connection is failed.)
- Select "Disable" for LAN Port Status Detection
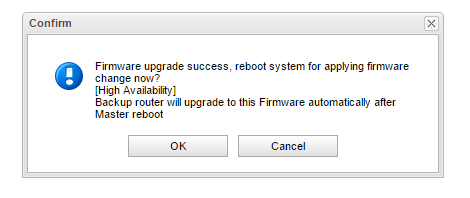
- Master reboots for applying new firmware.
- Master is up and exchanges HA information with the backup router.
- Slave router finds the firmware version is different.
- Slave router will download the firmware from the Master router, and then upgrade itself automatically
2. Go to Applications >> High Availability >> High Availability Global Setup:
Slave Router Setup
3. Go to LAN >> General Setup >> lan1 profile (the HA-LAN profile) to change the IP Address first, the LAN IP should be different from the master router.
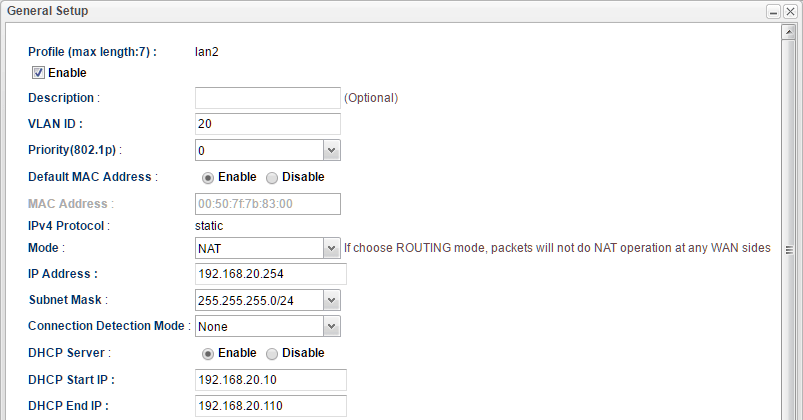
NOTE: Only set the Master and Slave routers to different IP addresses on the management interface, the IP addresses of the rest of the LANs should be the same on both routers. Here is the example, which takes LAN1 as management interface:
| Subnet | Master Router | Slave Router | |
| LAN1 Management Interface |
192.168.1.0 | 192.168.1.1 | 192.168.1.2 |
| LAN2 | 192.168.2.0 | 192.168.2.254 | 192.168.2.254 |
| LAN3 | 192.168.3.0 | 192.168.3.254 | 192.168.3.254 |
| . . . |
. . . |
. . . |
. . . |
LANx |
192.168.x.0 |
192.168.x.254 |
192.168.x.254 |
4. Go to Applications >> High Availability >> Hot-Standby Profile Setup, and
5. Go to Applications >> High Availability >> High Availability Global Setup,
6. After completing the configurations above, we can connect the LAN of both router, then configuration synchronization will start. The Slave router will backup and restore the whole Master configurations except for the LAN IP, HA configurations, Administrator Password, and Router Name. Please do not connect the WAN on the Slave router at this moment.
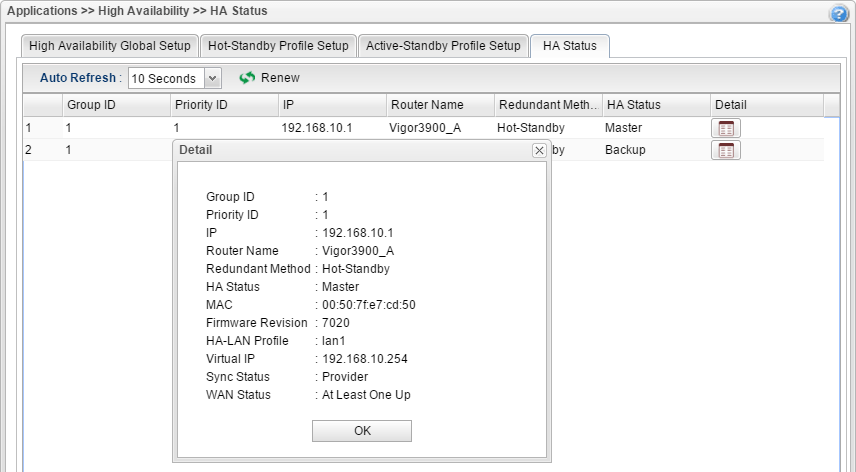
7. After config synchronized, Slave router will restart. We can check HA Status from Applications >> High Availability >> HA Status.
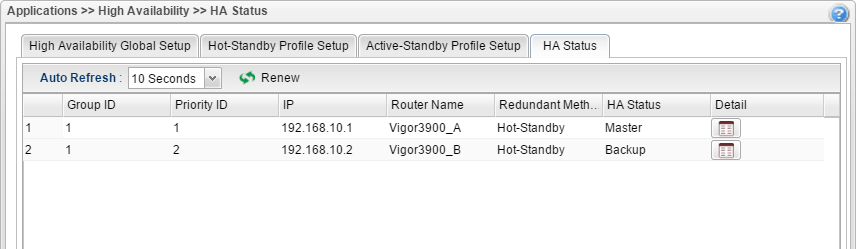
By clicking Detail, we can see more device information.
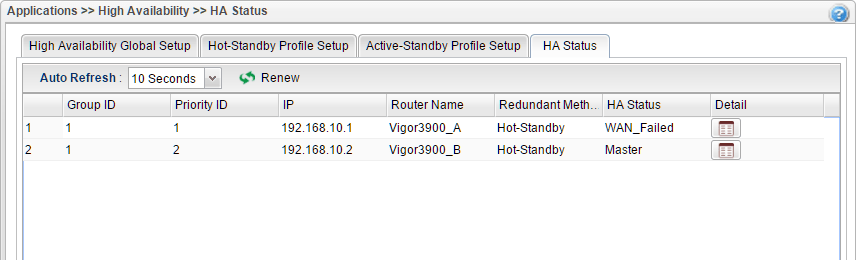
8. When Master meets WAN or LAN Fail Event, or be powered off, the router with Priority ID 2 will become the new Master.
9. When upgrading the firmware of the Master router, the Slave router will upgrade to the same firmware version automatically. The process is:
Published On:2017-10-24
ShareWas this helpful?