
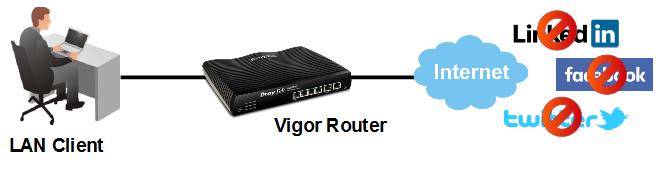
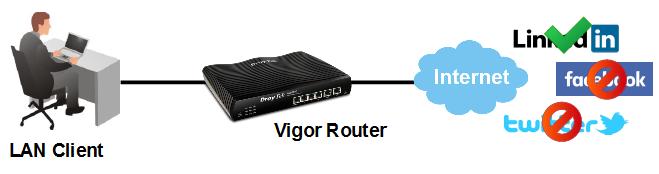
Block Social Networking Websites by Web Content Filter
Web Content Filter is a license-required feature that filters websites using a URL categorization service. This service helps the router learn about the website the client is attempting to access. It enables the network administrator to manage access to all the URLs in the corresponding category without specifying each URL. This article will demonstrate how to block all social networking websites using the Web Content Filter of Content Security Management.
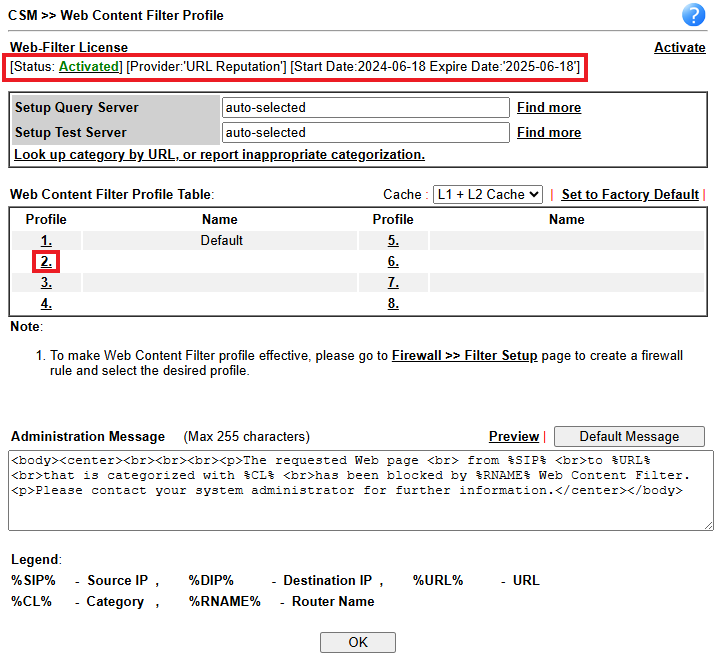
1. Add a new WCF profile: Go to CSM >> Web Content Filter Profile,
- Make sure the Web Content Filter license is activated.
- Click on an available index to add a new profile.
2. Configure the WCF profile as follows:
- Enter a profile name, here we use Social Network
- Set Action to “Block”
- Select the DNS over HTTPS (DoH) category for efficient blocking, and the category of websites you would like to block. The category of a website can be checked from https://brightcloud.com/tools/url-ip-lookup.php.
Here we choose “Social Networking”.

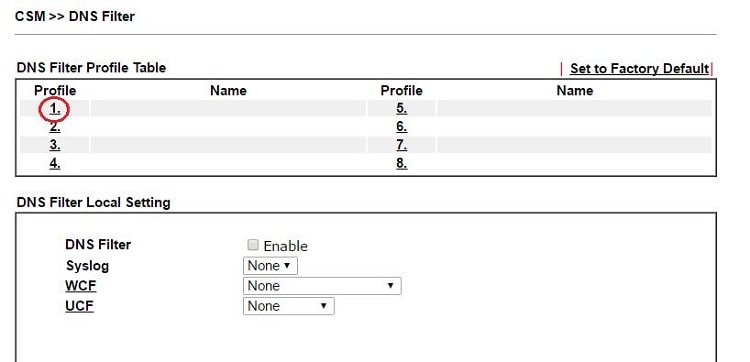
3. To filter the HTTPS websites as well, adding a DNS Filter is required. DNS Filter is an extension of URL Content Filter and Web Content Filter to make sure the HTTPS (encrypted) websites will also be filtered. DNS Filter allows Network Administrator to block or pass the DNS queries that contain specific keywords, thus to control the access to HTTPS websites. Go to CSM >> DNS Filter, and click on a profile index.
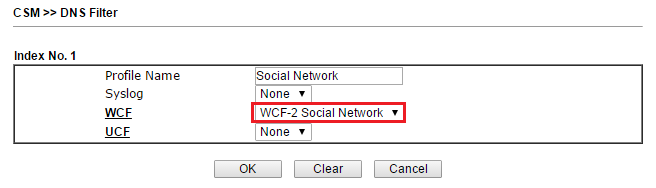
4. Edit the DNS profile as follows,
- Enter Profile Name
- Select WCF as the Web Content Filter Profile created in Step 2
- Click OK to save
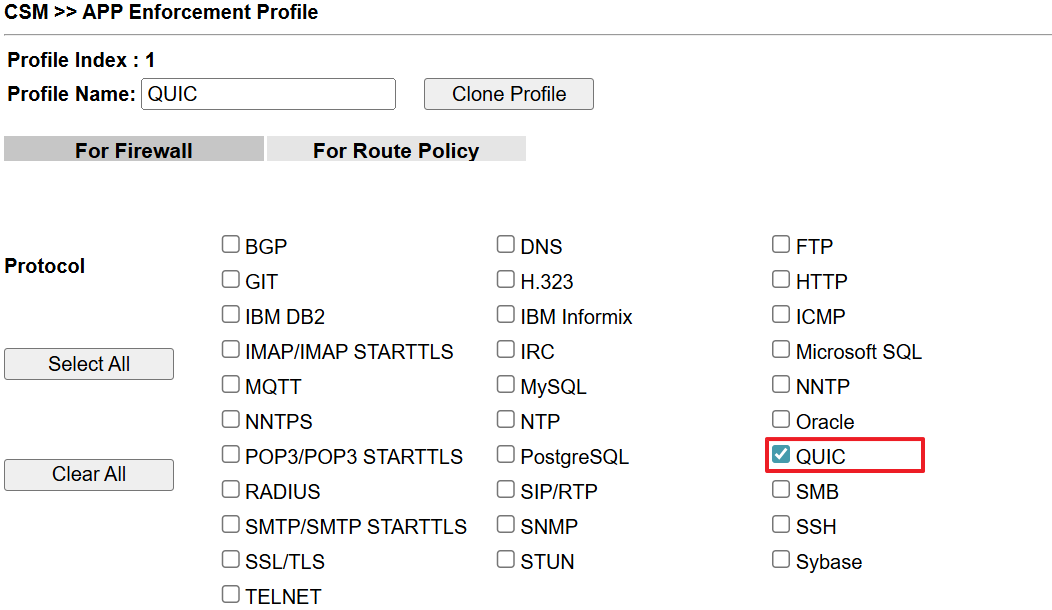
5. Add an APP Enforcement Profile to block QUIC. Go to CSM >> APP Enforcement, select a profile index, and choose QUIC. Many websites (such as Google, YouTube, and Facebook) already support HTTP/3, which is based on the QUIC protocol. If you only filter TCP/443 (HTTPS) without blocking QUIC (UDP/443), user browsers (such as Chrome, Edge, and Firefox) may connect via QUIC directly, making the filtering rules ineffective.
Please note that the QUIC protocol can also be blocked by creating an IP Filter for service ports UDP 853, UDP 80, and UDP 443.
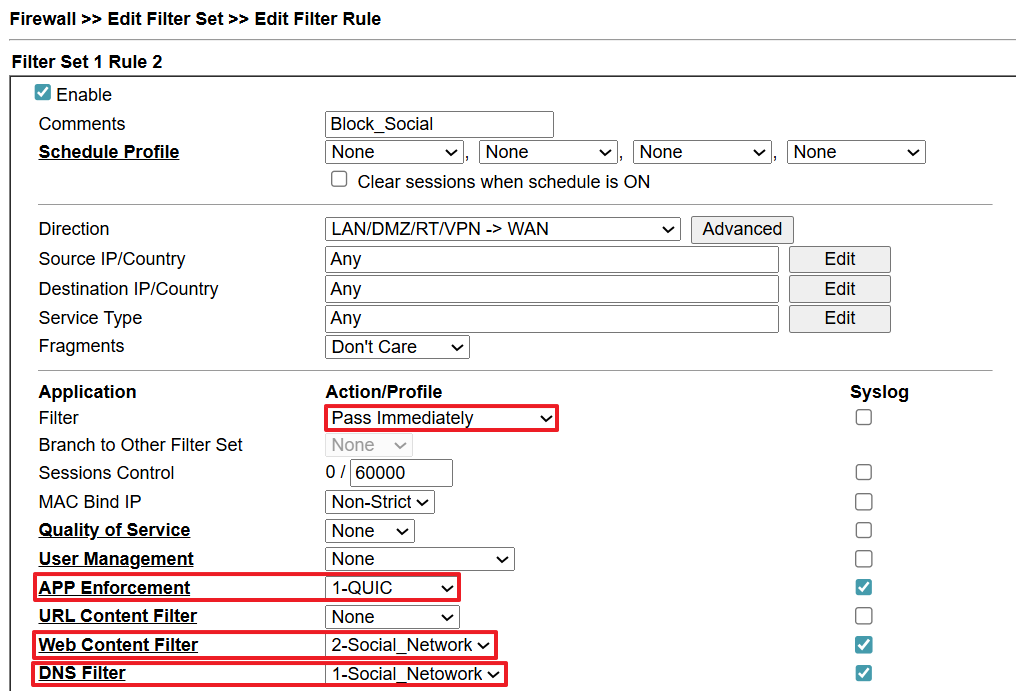
6. To apply the Web Content Filter and DNS Filter, go to Firewall >> Filter Setup >> Set 1, and click on a Filter Rule number
- Enable the Filter Rule
- (Optional) Edit Source IP if you would like to apply this policy to some of the LAN hosts, or you may just leave it as "Any" if you would like to apply the filter rule to all theLAN host.
- Select Filter as "Pass Immediately"
- Select APP Enforcement as the profile created in Step 5
- Select Web Content Filter as the profile created in Step 2
- Select DNS Filter as the profile created in Step 3
- Click OK to save
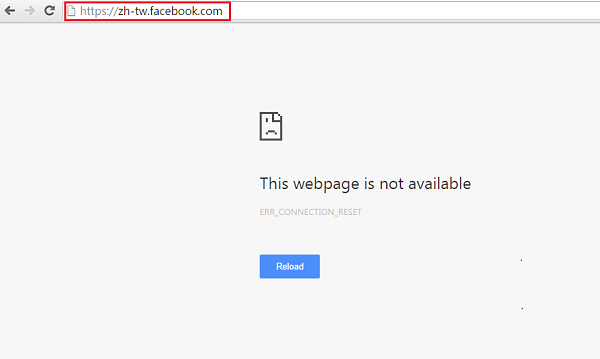
7. After finishing the above settings, all the social networking websites will be blocked by Web Content Filter and DNS Filter with Vigor Router, even if the website uses HTTPS.
How to make a social networking website to bypass the rule?
If there's a website you would like to allow access but it belongs to the social networking category, you may add its URL into the White List of Web Content Filter profile. Below we take "www.linkedin.com" for example.
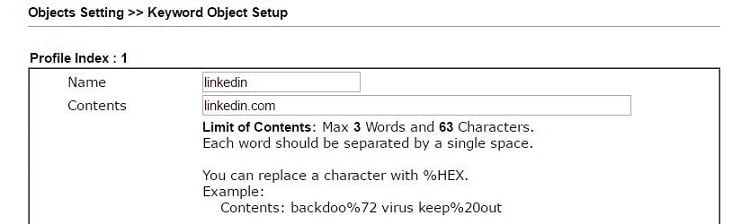
1. Go to Objects Setting >> Keyword Object, create an object and enter the keyword of that website's URL in Contents.
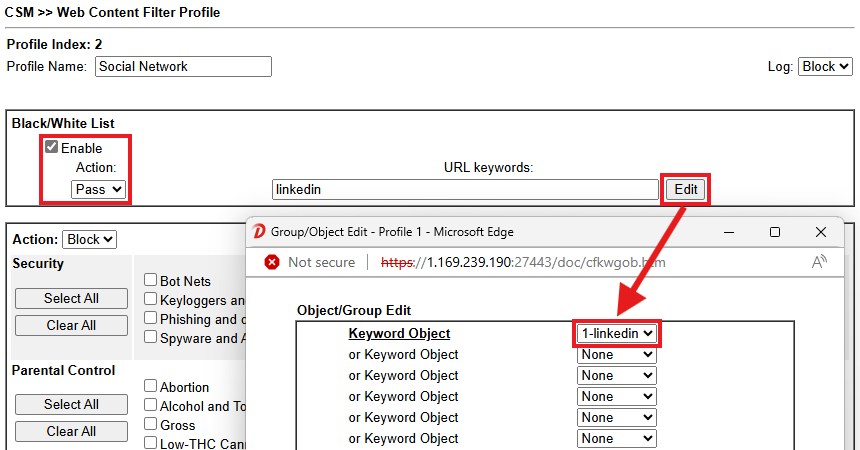
2. Edit the Web Content Filter profile as follows,
- Enable White/Black List
- Set Action to "Pass"
- Click Edit and select the Keyword Object created in the previous step.
- Click OK to save the profile.
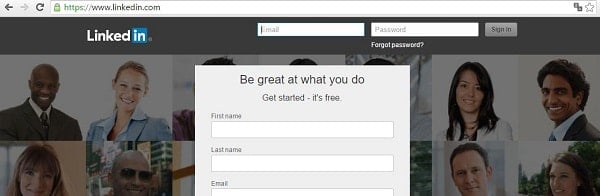
3. Now, the LAN clients will be able to visit www.linkedin.com even if it's categorized as a Social Networking website.
Troubleshooting
If Web Content Filter does not work as expected, please check the following items:
- Clear browser's cookie and history.
- Clear the DNS cache on the computer.
- Make sure the computer's default gateway is Vigor Router.
- Check the DNS server of the computer: If the server is an internal DNS server, please make sure the internal DNS server's gateway is set to Vigor Router. If the server is your Vigor Router, please enable DNS Filter Local Setting in CSM >> DNS Filter instead of a Firewall Rule, and please note that DNS Filter Local Setting will apply to all LAN clients who use the router as DNS server.
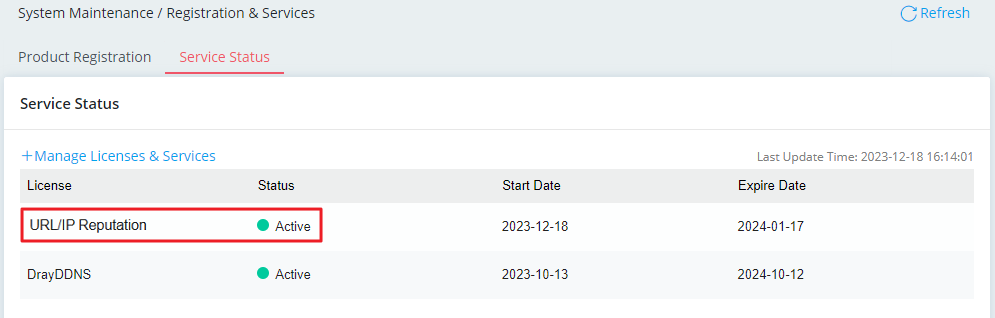
Step 1: Ensure the WCF license is activated
Go to the System Maintenance / Registration & Services / Service Status menu page. Webfilter status should be Active.
Step 2: Firewall Configuration
In this example, we assume that all LAN clients are not allowed to access all social networking websites. There are two ways we can apply the WCF Profile.
Create a Content Filter Rule and apply the categories we want to block:
Go to the Security / Firewall Filters / Content Filters menu page. Click + Add to create a profile and configure it as follows.
- Enter the profile name.
- Check Enabled.
- Edit the source IP and interface if you want to apply this firewall rule only to a specific IP range. Here, we leave it as Any so that the router can block all LAN clients from accessing social networking websites.
- Drag down the menu and select [WCF]Social Networking. You can type the keyword on the search bar for the related category.
- Choose Block for Action.
- Check Enable Syslog for monitoring and troubleshooting.
- Click Apply to save the setting.

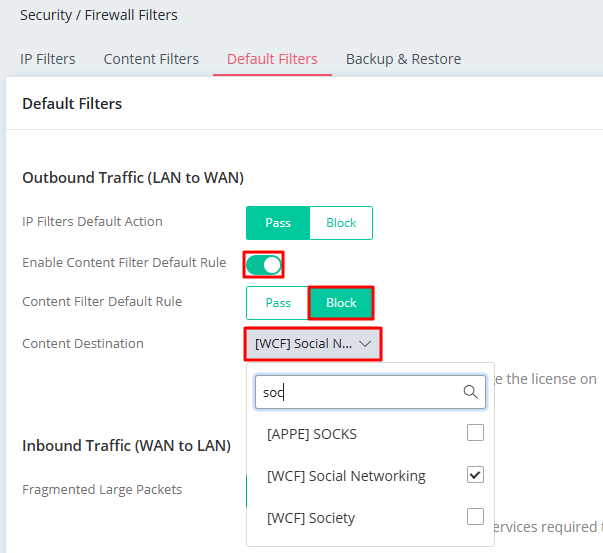
Enable Default Content Filter and apply the categories we want to block:
Go to the Security / Firewall Filters / Default Filters menu page.
- Enable Content Filter Default Rule
- Choose Block.
- Drag down the menu and select [WCF]Social Networking. You can type the keyword on the search bar for the related category.
- Click Apply to save the setting.
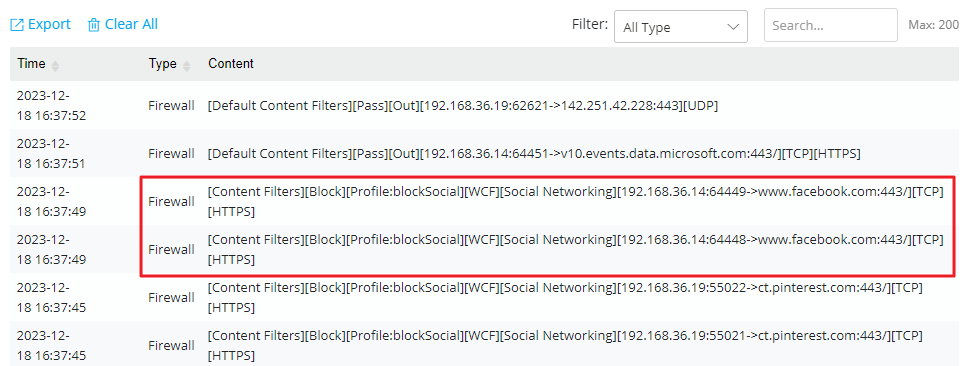
Step 3: Testing
After completing the settings, the Content Filter will block all social networking websites.

We can see the block message in the syslog.
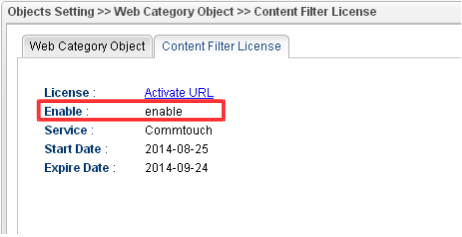
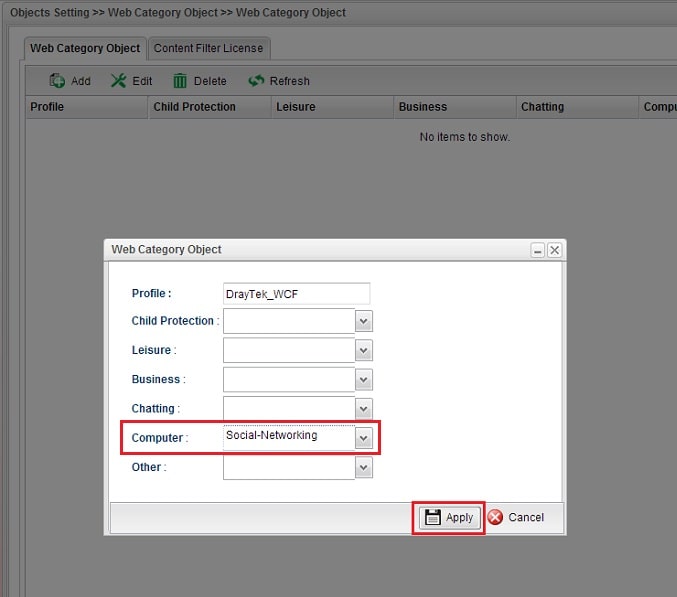
1. Make sure your Content Filter License is activated. Go to Objects Setting >> Web Category Object >> Content Filter License, and check if the status of license is enabled.
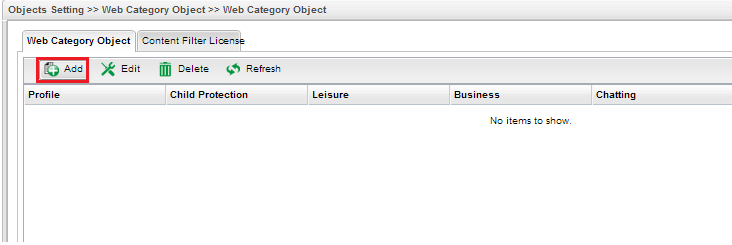
2. Go to Object Setting >> Web Category Object >> Web Category Object. After activating the Web Content Filter service via “Content Filter License”, click Add in the “Web Category Object” to start.
3. Enter a profile name, and choose the categories you want to filter. Here we choose Social Networking. Then, click Apply to save the profile. (Note: We can check out which category a website belongs to by visiting http://www.cyren.com/url-category-check.html)
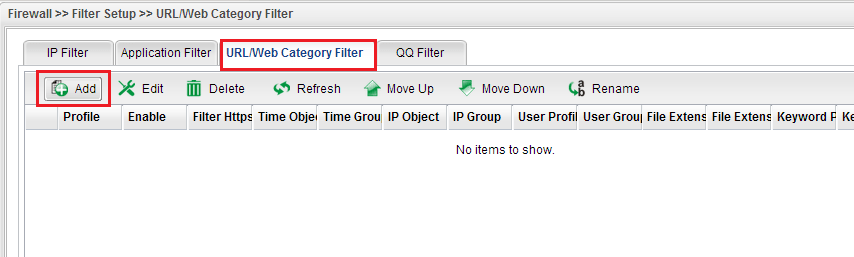
4. Go to Firewall >> Filter Setup >> URL/Web Category Filter, and click Add.
5. Type a Profile name, check Enable, and select "Enable" for Filter https. Check the profile created in the previous step in policy > Web Category Block. Then, click Apply to save the settings.
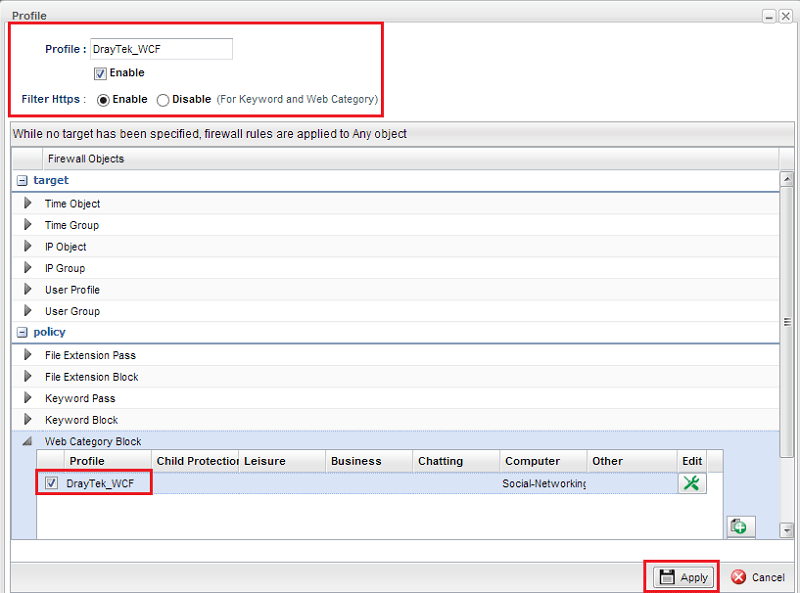
6. (Optional) To apply this firewall only at a specific time (e.g., working hours), at Time Schedule, create a Time Object specifying the time you'd like to apply this rule and select the object.

7. (Optional) To apply this firewall only to specific IP range (e.g., the employee's IP), at Source IP, create a Source IP Object specifying the IP range need to follow this rule and enable it.

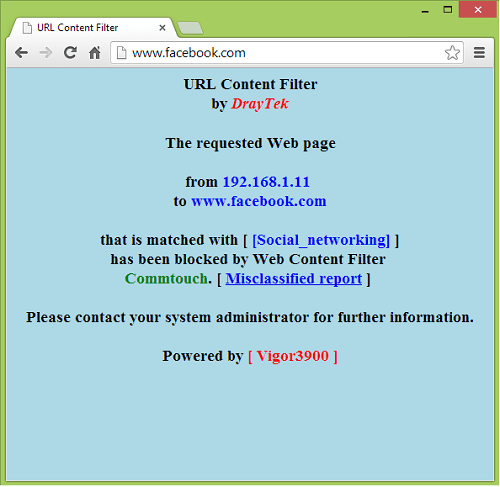
8. Now, LAN clients should see the message below when they try to access a networking website, such as Facebook.
Published On:2018-01-25
ShareWas this helpful?