
Use Let's Encrypt Certificate for your DDNS Domain
Vigor Router supports importing a Let's Encrypt certificate from its web user interface. It makes the process of generating, signing and importing the certificate very easy. This document will show how to apply a Let's Encrypt for the router's domain.
DrayOS models support this feature since firmware version 3.9.0. However, it's only available for the DrayDDNS domain - the free Dynamic DNS service provided by DrayTek.
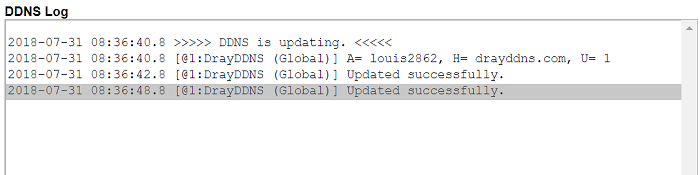
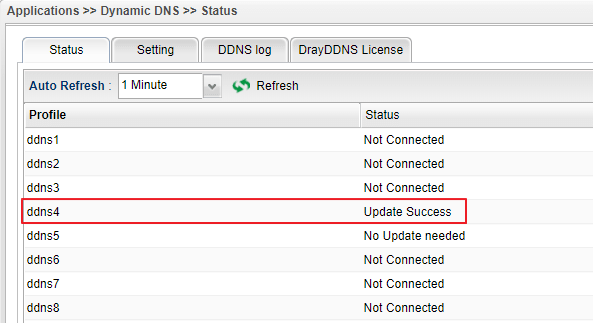
1. Register a DrayDDNS account for the router and use it at Applications >> Dynamic DNS Setup. (visit the article Activate DrayDDNS Service for a Free Hostname for detailed instruction) Click View Log button at Applications >> Dynamic DNS Setup page for ensuring your DrayDDNS domain has updated successfully.
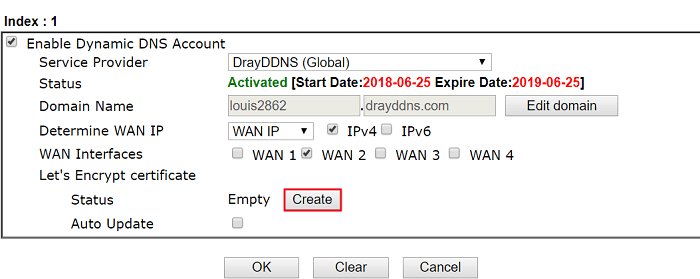
2. Go to Applications >> Dynamic DNS Setup, enter the DrayDDNS profile, and click Create at Let's Encrypt certificate.
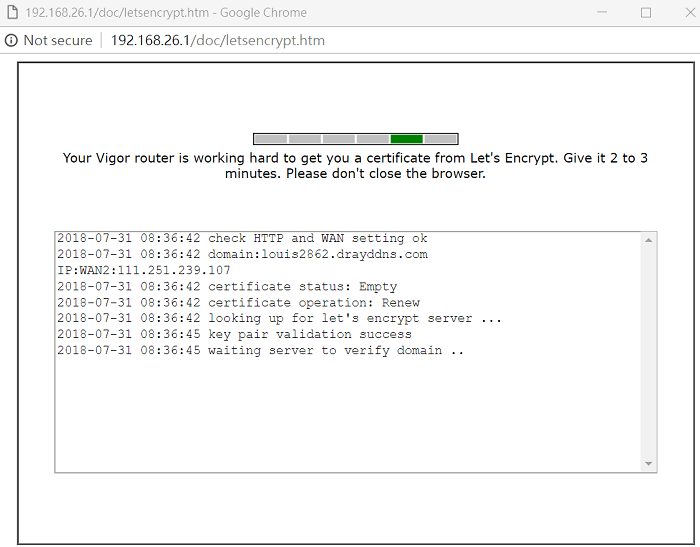
3. It may take 2 to 3 minutes for the router to generate the certificate.
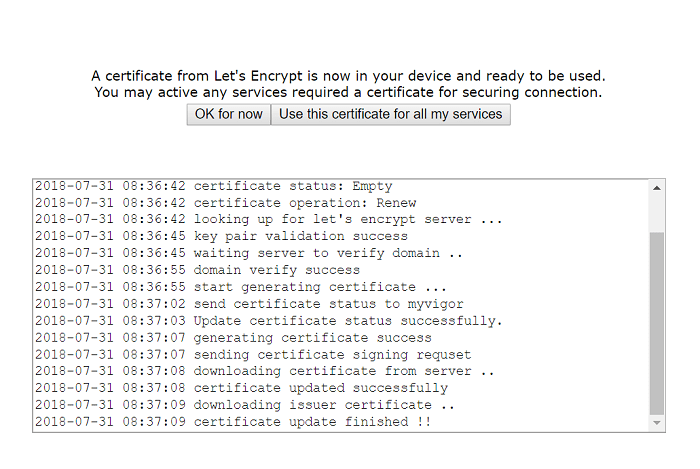
4. When the process is finished, Vigor Router will pop up a message to ask if you would like to apply Let's Encrypt certificate for the SSL VPN/ HTTPS Server.
- Click OK for now if you'd like to apply it to HTTPS server manually later.
- Click Use this certificate for all my services if you'd like to apply it to HTTPS server now.
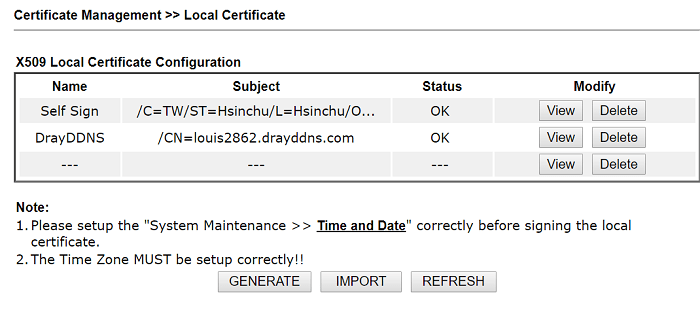
5. We can view the Let's Encrypt certificate via Certificate Management >> Local Certificate page. The certificate will be valid for 3 months.
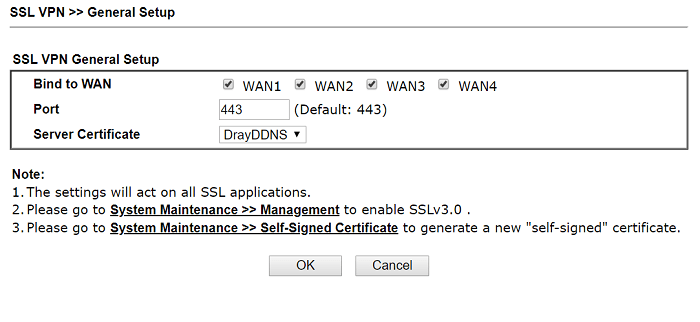
6. You will see at SSL VPN >> General Setup page the Server certificate has changed to DrayDDNS – the Let's Encrypt certificate automatically.
7. When we access Vigor Router by its DrayDDNS domain name, we will see the HTTPS connection is marked Secure in the browser.

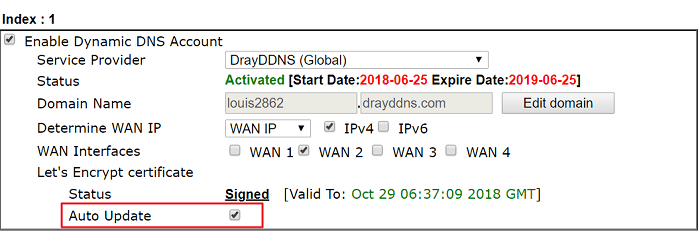
8. By enabling the Auto Update option in the DrayDDNS profile, the router will renew the certificate automatically when the certificate is almost expired.
Apply for a Let's Encrypt certificate for your DDNS domain on Vigor2136
1. Configure a Registered Dynamic Domain Name
In this example, we use DrayDDNS.
For details on activating DrayDDNS, please refer to Activate DrayDDNS on your Vigor Router

2. Enable the ACME Client Option
Vigor2136 will use the domain name to request a Let's Encrypt certificate. The certificate request, challenge, and download process may take a few seconds.

3. Verify Certificate Generation
Check if the Let’s Encrypt certificate is generated successfully via Configuration/ Certificate.

4. The Let’s Encrypt Certificate can be used for Vigor Router’s Local Service, including HTTPS Web Server, TR069 Server, IPsec VPN Server, and more.
Note that when using other DDNS provider’s domain to apply for a Let’s Encrypt certificate, please enable Enable HTTP Management from WAN during the certificate generation process, as the Let’s Encrypt server will need access to the Vigor Router’s HTTP port to verify authorization. Additionally, if the Vigor router is behind another NAT device, ensure that HTTP Port 80 is open to the Vigor2136 for this process to succeed.

Please disable HTTP Management from the WAN once the certificate is installed.

This feature is available on Vigor3900 and Vigor2960 since firmware version 1.4.0.
1. Register a DDNS account for the router and use it at Applications >> Dynamic DNS Setup. Make sure DDNS updated successfully from Applications >> Dynamic DNS >> Status page.
2. Go to Certificate Management >> Local Certificate, and click Let's Encrypt.

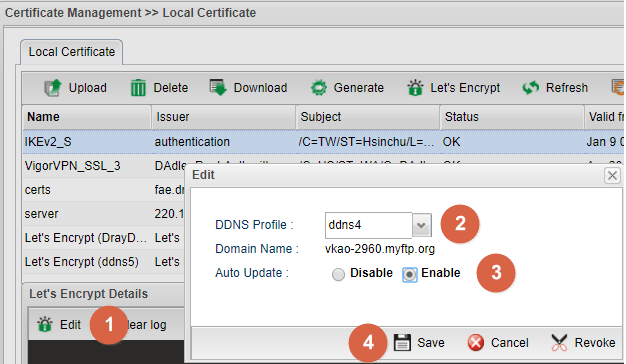
3. Let's Encrypt Details window will show at the bottom of the page. Click Edit, then:
- Select the DDNS Profile you want to use the certificate
- Select "Enable" for Auto Update (so that the router will renew the certificate when the valid time is less than 30 days.)
- Click Save for applying the settings.
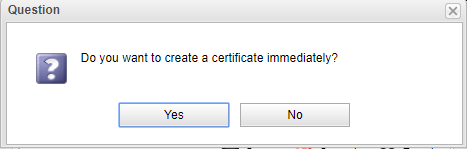
4. Click Yes on the pop-up window if you want to create Let's Encrypt certificate right now.
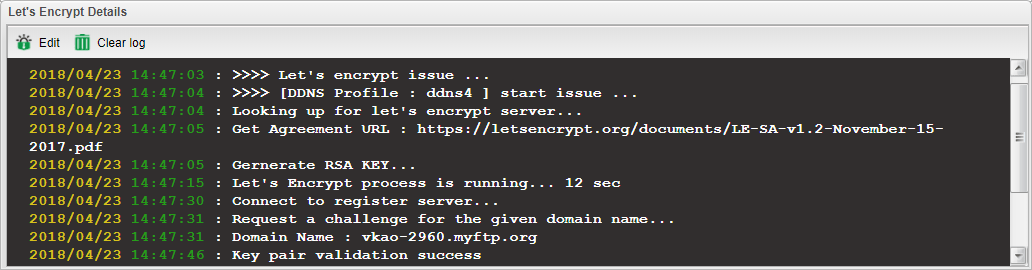
5. The router will start negotiating with Let's Encrypt server. It will take a few minutes to generate and import the certificate
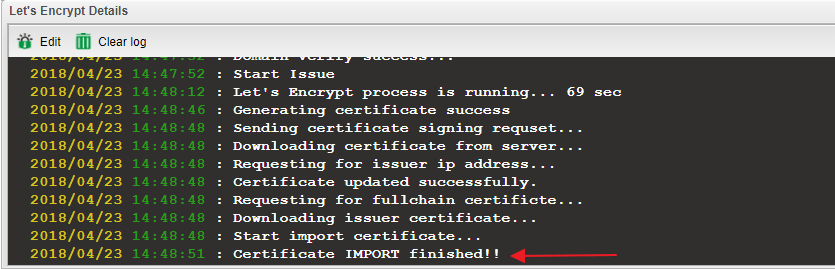
6. Seeing the log Certificate IMPORT finished!! means the router has imported the Let's Encrypt certificate successfully.
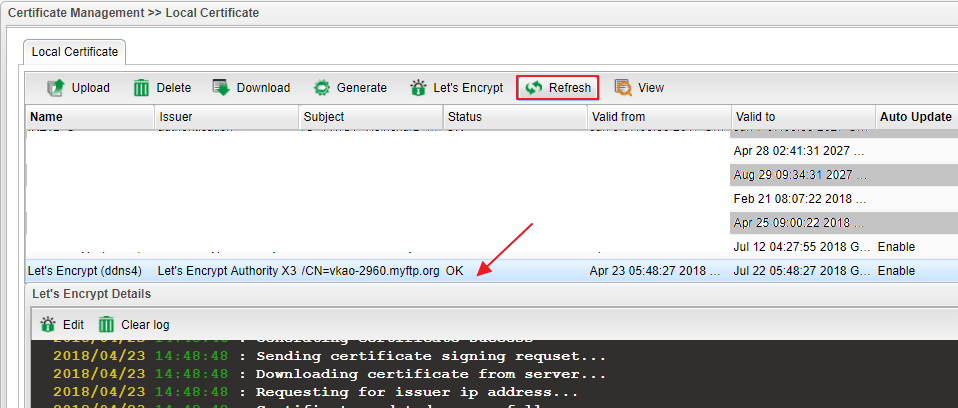
7. Click Refresh on the Local Certificate page, and we will see the Let's Encrypt Status shows OK.
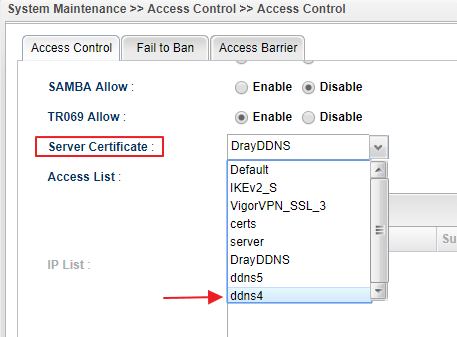
8. Go to System Maintenance >>Access Control >> Server Certificate, select the Let's Encrypt certificate we just created and click Apply to save the settings.
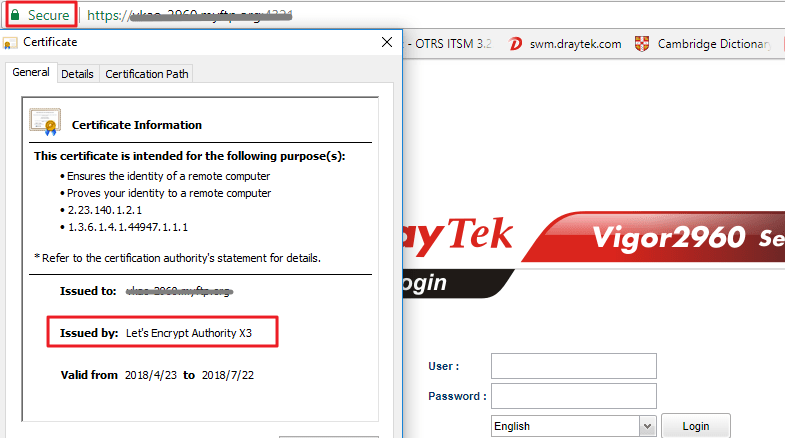
9. Access the router's DDNS Domain by HTTPS, and we can see the HTTPS connection is recognized as Secure by the browser now.
Troubleshooting:
Below are some common error message and the solutions:
1. Domain verify failed
It means Let's Encrypt server cannot resolve the domain name that the router is applying. When seeing this message, please check if the DDNS has updated successfully.
2. Domain verify timeout
It means Let's Encrypt server cannot connect to Vigor Router's TCP port 80, which the server will connect when generating or revoking the certificate. Some ISP will block connection on TCP port 80 from other countries' IP, when seeing this message, please check the access on TCP port 80.
3. Failed to get acme server directory
It means Let's Encrypt server blocks the action because the IP connects too many times (The current limit is 10 times in 3 hours) When seeing this message, stop issuing the certificate from Vigor Router for some time.
4. Download certificate failed
It means Let's Encrypt server blocks the action because the domain name has issued the certificate too many times. (The current limit is 5 times a week) When seeing this message, please stop issuing the certificate from Vigor Router for some time.
If you cannot apply Let's Encrypt certificate successfully, please provide the following information to [email protected] for our analysis:
- Logs in Let's Encrypt Details window
- WAN packets captured by Packet Monitor with Interface ALL WANs when generating the Let's Encrypt certificate
- Remote Access to your Vigor Router
Published On:2018-09-06
ShareWas this helpful?