
Introduction to Route Policy
This document introduces the Route Policy (a.k.a., routing policy, or policy-based routing).
This feature allows the network administrator to manage the outbound route base on the IP address, port number, country or domain name in the packet.
The Route Policy always has higher priority than Default Route and Auto Load Balance set in WAN >> General Setup, and always has lower priority than Firewall Rules.
The administrator may also define a priority to the rules.
Note: Route Policy function is used to route traffic originating from LAN clients and remote dial-in (VPN) clients. To set up routing for traffic originating from the router itself (such as LAN-to-LAN VPN and TR-069 connections), and non-directly connected networks (such as networks behind other routers, and remote VPN networks), you will need to use the Static Route function instead.
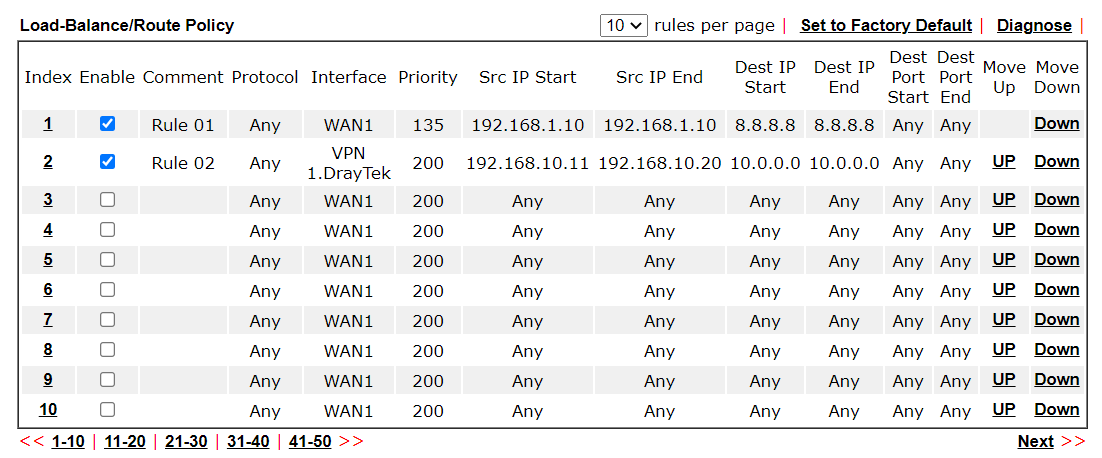
To configure Route Policy, go to Routing >> Load Balance/Route Policy. The following image is a screen-shot of Route policy list.
It shows whether the policy is enabled, the criteria to match, and through which the interface should the traffic go if the criteria matched, and also its priority.
To set up a Route Policy, click on an Index number. At the bottom of the page, there are two configuration modes: Wizard Mode provides a simple and basic configuration, while Advance Mode allows more options.
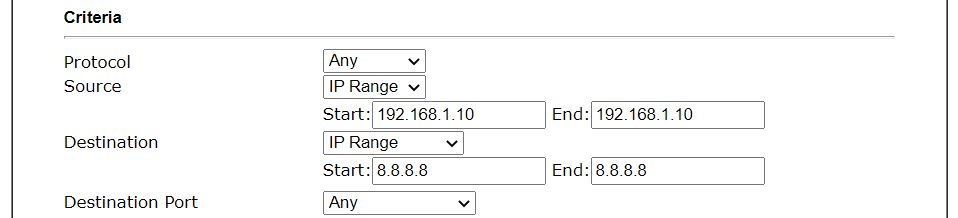
- First, set the criteria of the packets to apply this policy.
- Select a Protocol.
- Enter the Source IP address.
- Enter the Destination IP address.
- Select the Destination Port.
- ▲The configuration above is an example that if a packet is sent from192.168.1.10~192.168.1.100 to 8.8.8.8,
no matter what the protocol or destination port is, it will follow this route policy. - Next, we select an interface and gateway through which should the packet go if it matches the criteria.
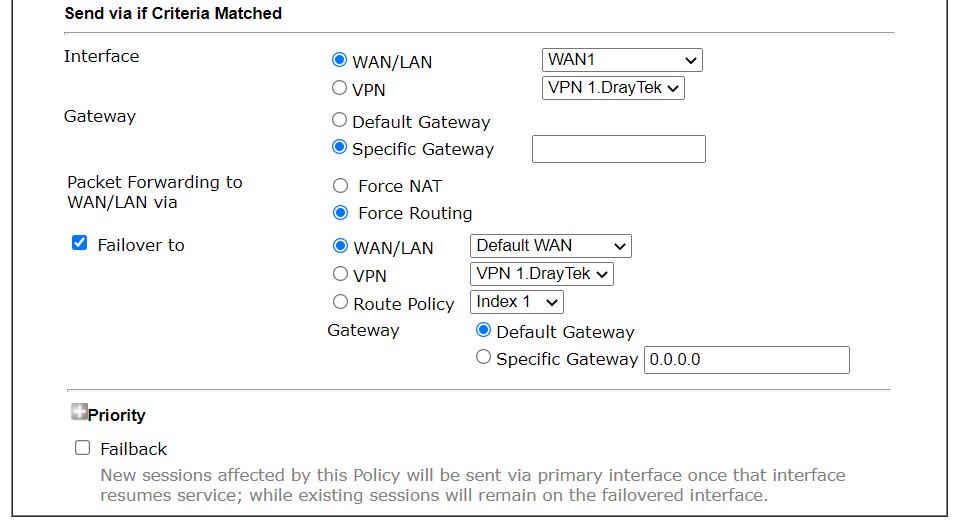
- Select an Interface. Different from Static Route, in Route Policy, we can also choose a VPN as the interface.
- If you want to use multi-WAN:
- Choose WAN as Interface Type
- Click “Add” to add a new WAN Interface
- Select a WAN Interface from combobox
- Click “Delete” to delete the wan interface
- Select an Interface mode: IP-Based Load Balance / Session-Based Load Balance.
- For more details in two Load Balance mode, please refer to FAQ article: Aggregate WAN's Bandwidth
- Select a Gateway IP. Note that if the interface is a LAN, it is necessary to designate a specific gateway.
- In Advance Mode, if the interface is WAN or VPN, there are some more options:
- Force NAT or Force Routing: If the packets are forwarded to WAN, Administrator could choose to do NAT to replace the source IP, or Routing to keep the source IP.
- Failover to: Allows packet to be sent through other interface or follow another Policy when detects a path failure in the original interface. The above configuration indicates that the packets will be sent through WAN2 when the original route is disconnected.
- Failback: This option is available when "Failover to" is enabled. While failover happens, then the primary interface resumes its service, enable "Failback" will clear the existing session on Failover interface and return to the original interface immediately. It might disrupt the active connection. When Failback is not enabled, the router will only stop sending packets via the Failover interface when the existing sessions are cleared. It might take a while if the application keeps sending packet once a while.
- In summary, choose Failback if you want to use the primary interface as much as possible and don't choose it to keep the connection stable.
- ▲The configuration above is an example that if a packet matches the criteria of this Route Policy,
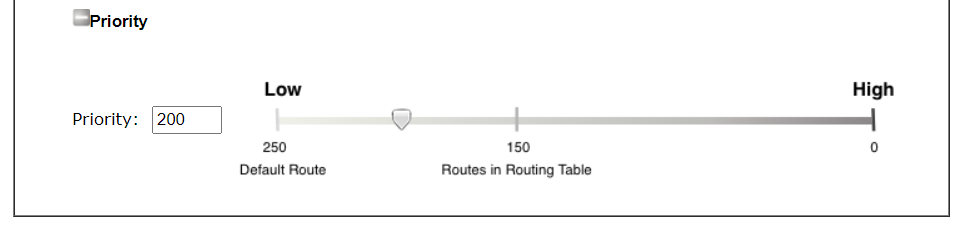
it will be sent to the default gateway then the destination through VPN1. - Priority:
- Administrator may set priority between 1 and 249 for this Route policy, where the smaller number indicates higher priority. When two policies have the same priority value, the traffic will follow the first (according to the policy index order) matched policy.
| Note: | The Source IP supports 4 options to define IP properties. |
| IP subnet can define a custom subnet. | |
| IP range can input single or plural IP address. | |
| IP object can apply to object profile defined in Objects Setting >> IP Object in advance. | |
| IP group can apply to group object profile defined in Objects Setting >> IP Group in advance. |
| Note: | The Destination IP also supports 4 options mentioned above and 2 additional options. |
| Domain Name can input a certain domain of the website. | |
| Country Object can apply to group object profile defined in Objects Setting >> Country Object in advance. (DrayTek Routers includes GeoLite2 data created by MaxMind, available from https://www.maxmind.com.) |

Published On:2016-05-12
ShareWas this helpful?