WireGuard is a modern VPN protocol that is fast and secure and uses public key exchange. When compared to OpenVPN, WireGuard provides much better performance.
This article explains creating a WireGuard Site-to-Site VPN tunnel between Vigor Routers.
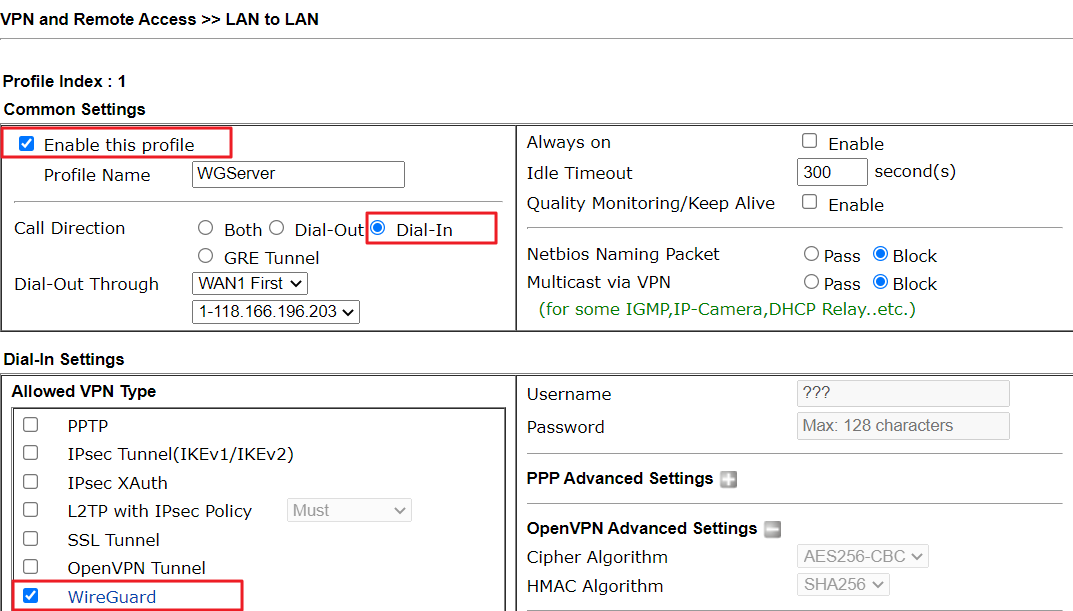
1. On the VPN server, create a WireGuard VPN LAN to LAN profile: Go to VPN and Remote Access >> LAN to LAN, click on an available index to edit the profile.
2. Edit the profile as follows:
Check Enable this profile
Give it a Profile Name
Select Dial-In for Call Direction
Leave the Idle Timeout as 300 seconds (optional)
Select WireGuard as the Allowed VPN Type
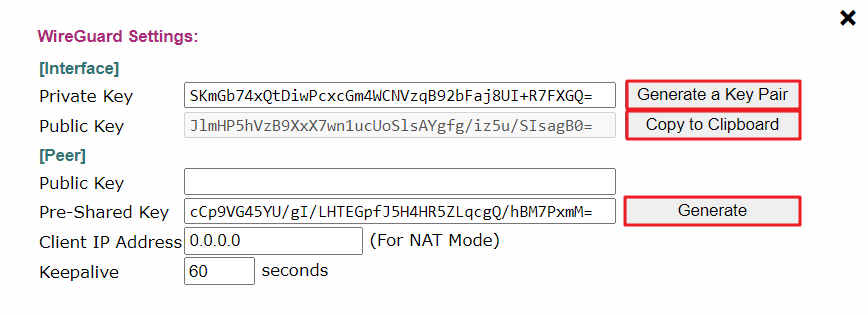
The WireGuard Settings window will pop up after selecting WireGuard.
Click Generate a Key Pair for [Interface]. It will generate the keys for the VPN server.
Copy the Public Key to a text file. (The Public Key is required to be configured in the WireGuard VPN Client router.)
Leave Public Key for [Peer] as empty. (It should be configured after the WireGuard VPN Client router generates the keys on its WireGuard VPN profile.)
Click Generate the Pre-Shared Key then copy the Pre-Shared Key to a text file. The Pre-Shared Key cannot be any string, so please use the Generate button to produce the key.
Configure the Keepalive setting as 60 seconds. The Keepalive setting is to suggest the WireGuard VPN client send a keepalive packet with a regular interval to avoid the UDP session being closed by the NAT router in front of it. The setting can be modified according to the UDP session timeout of the NAT router.
Click X to exit the WireGuard Settings window.
 Enter the Local Network IP/ Mask settings.
Enter the Remote Network IP/ Mask settings.
Select Routing for the Mode and go to the VPN client to create WireGuard Key Pair first. Do not click OK to save the VPN profile because the VPN profile can save when the Peer public key exists.
Enter the Local Network IP/ Mask settings.
Enter the Remote Network IP/ Mask settings.
Select Routing for the Mode and go to the VPN client to create WireGuard Key Pair first. Do not click OK to save the VPN profile because the VPN profile can save when the Peer public key exists.

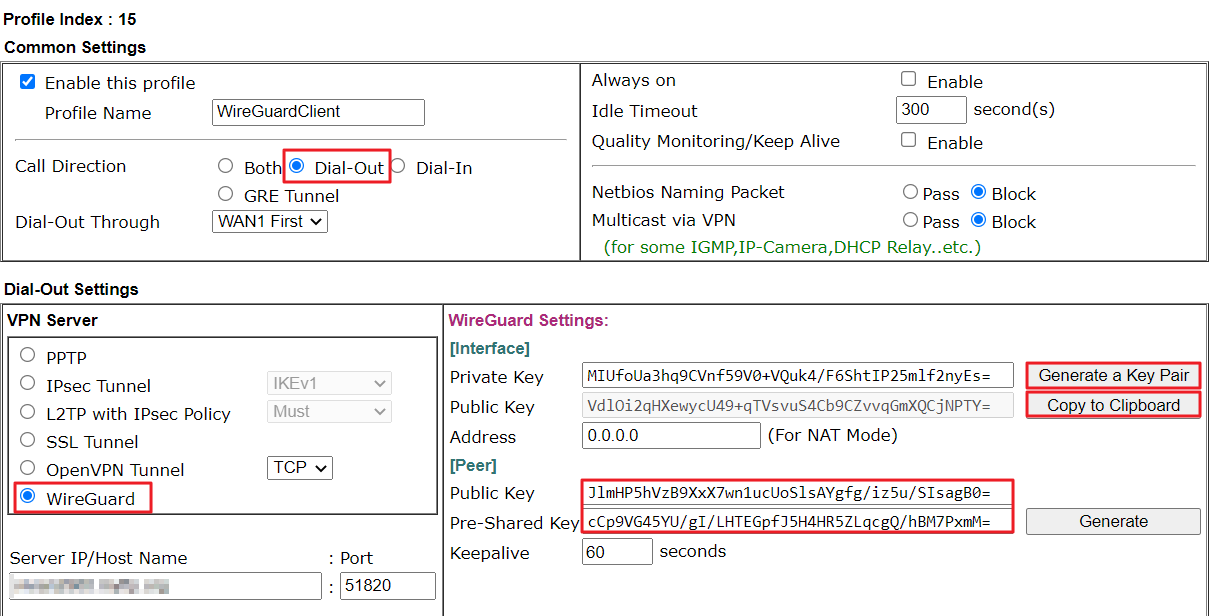
3. On the VPN client, create a WireGuard VPN LAN to LAN profile: Go to VPN and Remote Access >> LAN to LAN, click on an available index to edit the profile.
Check Enable this Profile
Give it a Profile Name
Select Dial-Out for Call Direction
Select WireGuard as the VPN protocol and enter the VPN server’s IP or Domain Name.
Click Generate a Key Pair for [Interface]. It will generate the keys for the VPN client.
Copy the Public Key to a text file. (The Public Key will be configured in the WireGuard VPN Server router later.)
Enter the WireGuard VPN Server’s Public Key (copied in step2) in the Public Key for [Peer] field. Enter the Pre-Shared Key that the WireGuard VPN Server generated in step2.
Configure the Keepalive setting as 60 seconds. The Keepalive setting is to make the WireGuard VPN client send a keepalive packet with a regular interval to avoid the UDP session being closed by the NAT router in front of it. The setting can be modified according to the UDP session timeout of the NAT router.
 Enter the Local Network IP/ Mask settings.
Enter the Remote Network IP/ Mask settings.
Select Routing for the Mode and click OK to save this VPN profile.
Enter the Local Network IP/ Mask settings.
Enter the Remote Network IP/ Mask settings.
Select Routing for the Mode and click OK to save this VPN profile.

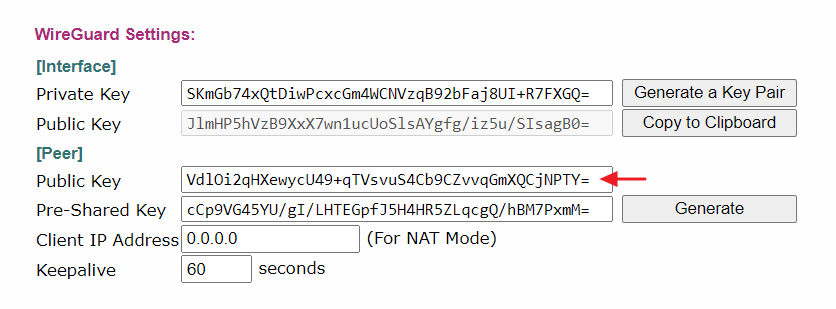
4. Go to the VPN Server’s WireGuard VPN Settings page again and paste the VPN Client’s Public Key. Click X or OK to exit the window then click OK to save the setting.
5. On the VPN client router, go to VPN and Remote Access >> Connection Management, select the WireGuard VPN profile and click Dial to activate the tunnel.
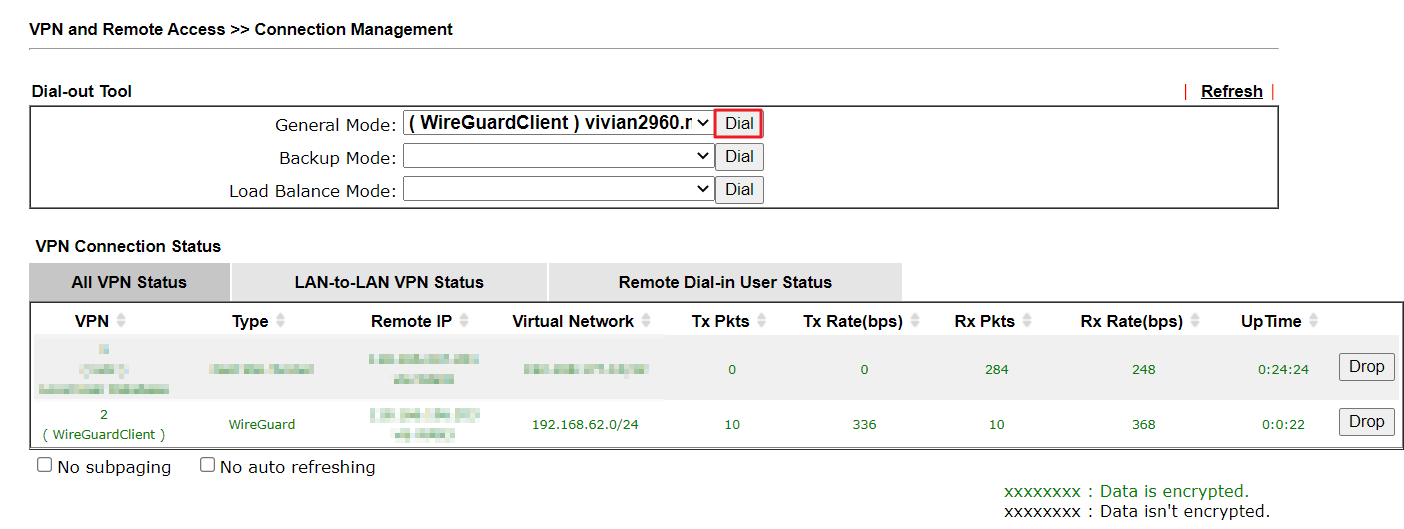
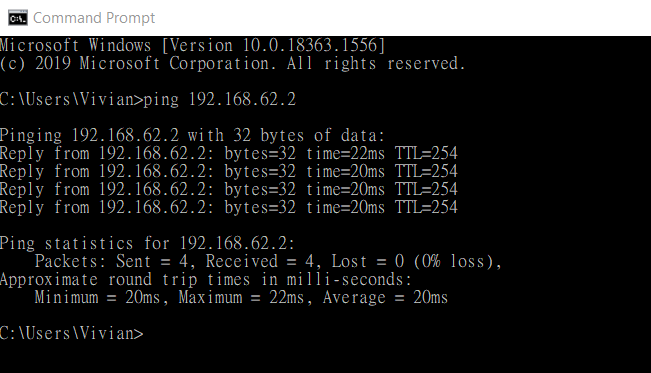
We may ping a remote IP to check if the traffic over WireGuard VPN works.
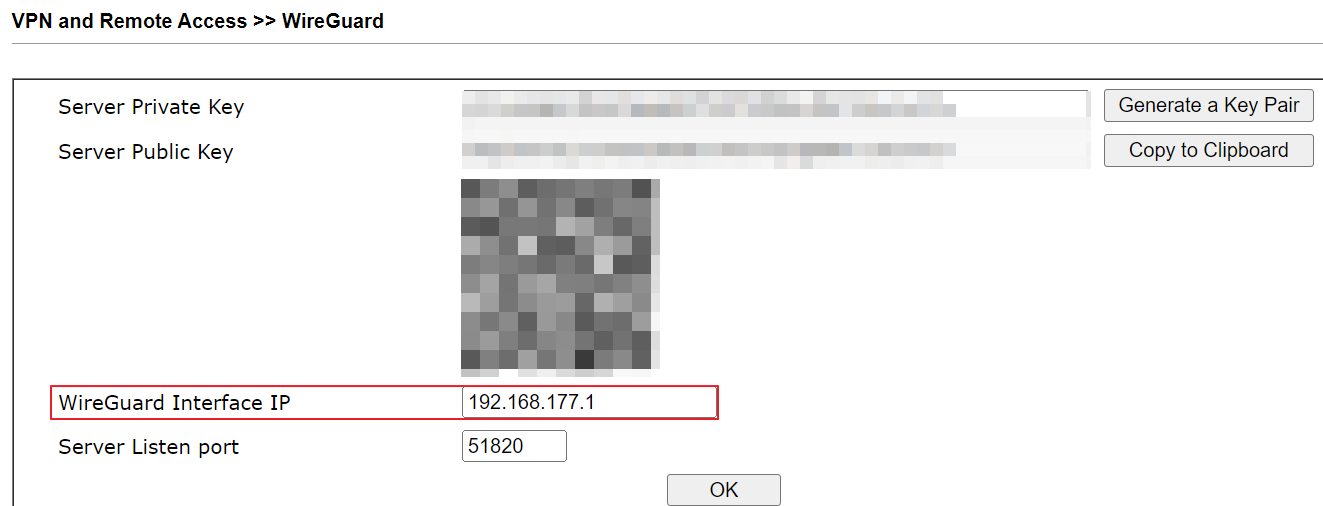
Note: If the Wireguard LAN to LAN VPN is up, but the ping to remote network doesn't work, we can check if the Interface IP is conflicted with the remote VPN network via VPN and Remote Access >> WireGuard. The interface IP is an IP for the Wireguard interface, and it can be any IP as long as it is not conflicted with a network IP. We recommend using the router's LAN IP as the Interface IP. Click Generate a Key Pair, change the Interface IP, and click OK to save it.
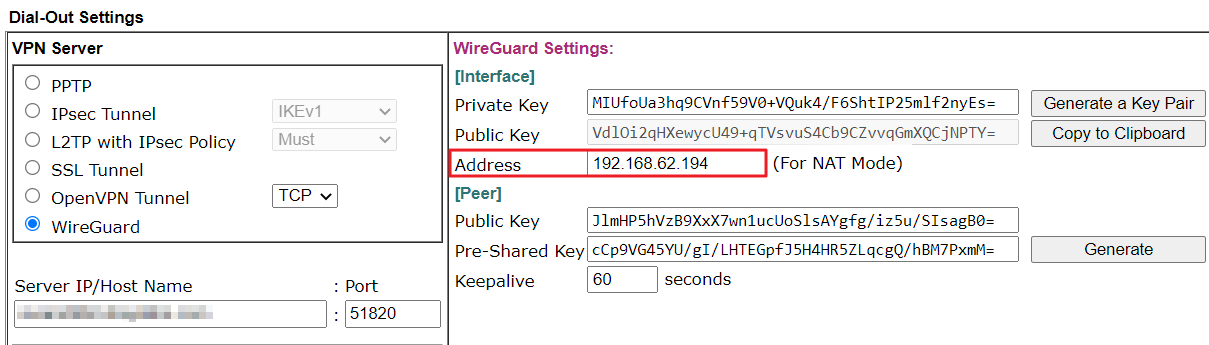
When using WireGuard VPN in NAT mode
We only need to add the settings below for creating the WireGuard VPN in NAT mode.
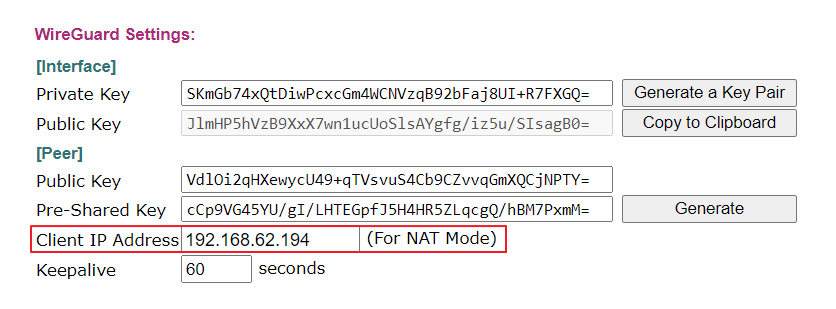
1. On the VPN server, enter the IP that will assign to the VPN client in the Client IP Address field.
2. On the VPN client, enter the IP that the server gives in the IP Address field.
3. On the VPN client, select NAT for the Mode in the TCP/IP Network settings.

WireGuard VPN between Vigor2136s
To configure the WireGuard VPN between two Vigor2136s easily, please open both routers’ Web pages simultaneously.
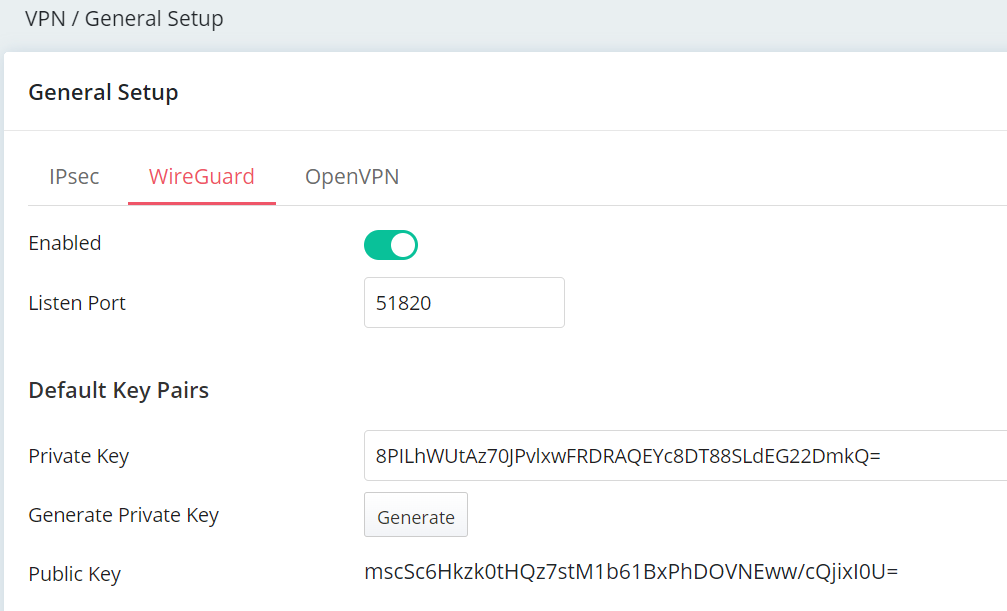
1. Set up the General Key on the WireGuard VPN Server
Activate WireGuard VPN service via VPN/ General Setup/ WireGuard
Switch on the Enabled tab.
Click Generate to generate the Private Key.
The Key Pairs in the General Setup are for the Vigor Router.
The peer WireGuard VPN clients need the Vigor Router’s Public Key to create the WireGuard VPN profile. Copy the Public Key of the WireGuard VPN server.
2. Set up the WireGuard VPN Site to Site Profile on the VPN Client Router
Go to VPN / Site to Site VPN, click Add + to create a VPN Site to Site Profile.
2.1 In General Settings:
Give a name to this Profile
Switch on Enabled
Select Dial-Out for Direction
Select WireGuard as VPN Protocol
Enter Remote VPN server’s IP or Domain Name
Select On Demand for Dial-Out mode

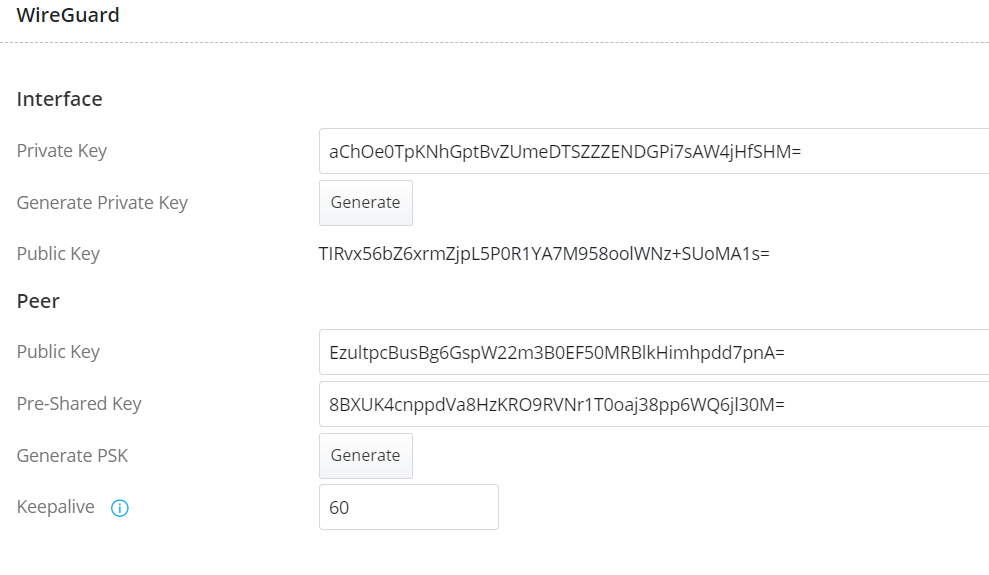
2.2 In WireGuard Settings
Interface
Click Generate to generate the Public Key and the Private Key for this VPN profile.
Copy the Public Key setting of the VPN Client. The VPN server will need the Client’s Public Key to create the WireGuard VPN profile.
Peer
Paste the WireGuard VPN Server’s Public Key (copied in step 1) here.
Click Generate to generate the Pre-Shared Key settings.
Copy the Pre-Shared Key setting of this VPN profile. The VPN server will need the same Pre-Shared Key setting to create the WireGuard VPN profile.
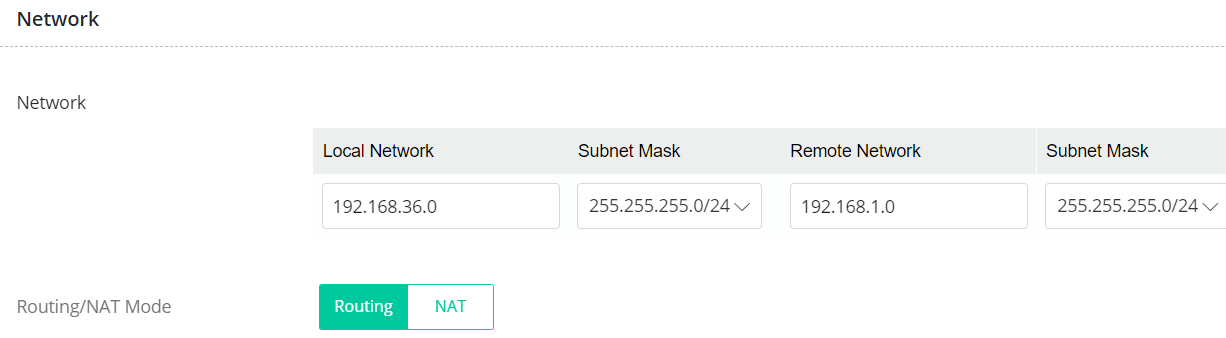
2.3 In Network Settings
Enter the Local Network and Subnet Mask
Enter the Remote Network and Subnet Mask
Select Routing mode
Do Not Apply the settings; Go to create the VPN profile on the VPN Server then.
3. Set up the WireGuard VPN Site to Site Profile on the VPN Server
Go to VPN / Site to Site VPN, click Add + to create a VPN Site to Site Profile.
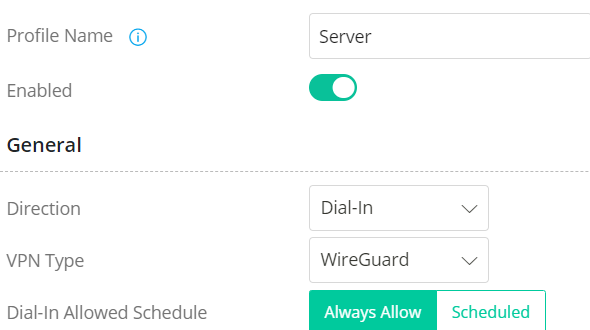
3.1 In General Settings:
Give a name to this Profile
Select Dial-In for Direction
Select WireGuard as VPN Protocol
Select Always Allow as the Dial-In Allowed Schedule
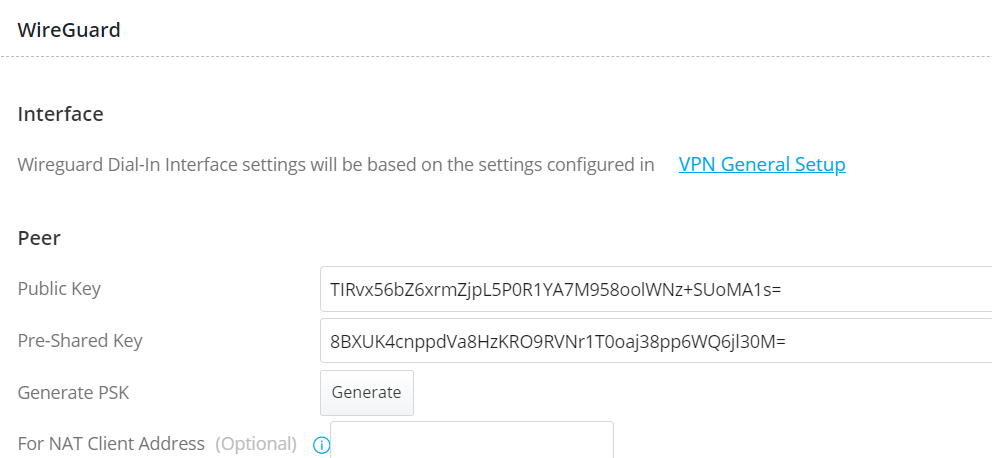
3.2 In WireGuard Settings
Peer
Paste the WireGuard VPN Client’s Public Key (copied in step 2.2).
Paste the Pre-Shared Key setting (copied in step 2.2)
3.3 In Network Settings
Enter the Local Network and Subnet Mask
Enter the Remote Network and Subnet Mask
Click Apply to Save the settings.

4.Go back to the Client Router’s VPN Site to Site Profile Setup page and Apply the settings.
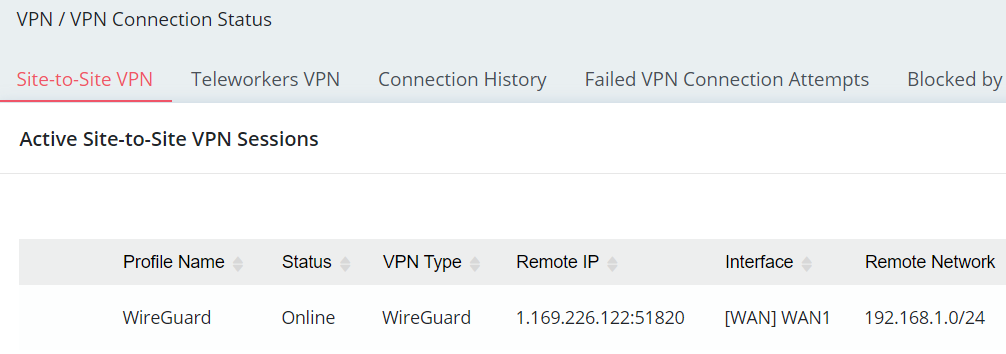
5. Go to VPN / VPN Connection Status to check if the WireGuard Site-to-Site VPN connection is established.
And use ping to ensure if the connection to a remote Server through the VPN works.
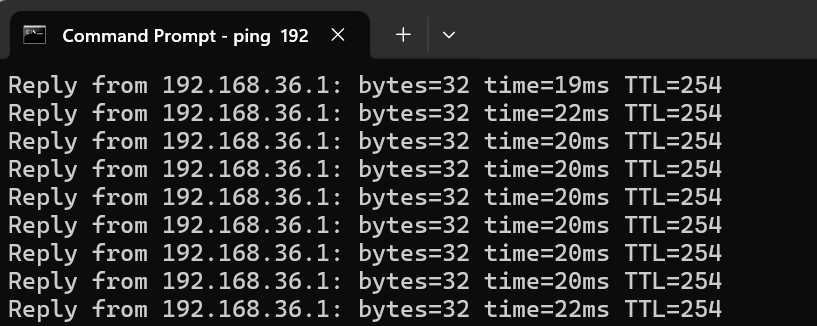
When pinging the remote router’s LAN IP to check the connectivity, please enable the Ping for LAN Access option via System Maintenance / Management. Then, the remote router can reply to Ping over the VPN connection.

